Product updates
What’s new in Circuit for Teams

Optional proof of delivery
POD requirements can now be turned on or off for specific stops. Drivers can skip POD collection when it is not needed, which helps them to save valuable time across the duration of their route.
How to specify proof of delivery requirements
- Go to Settings > Proof of delivery
- Set account level defaults for POD collection
- When uploading route data, set POD as required or not required
- On a route, change the POD settings for a stop in Stop Setup
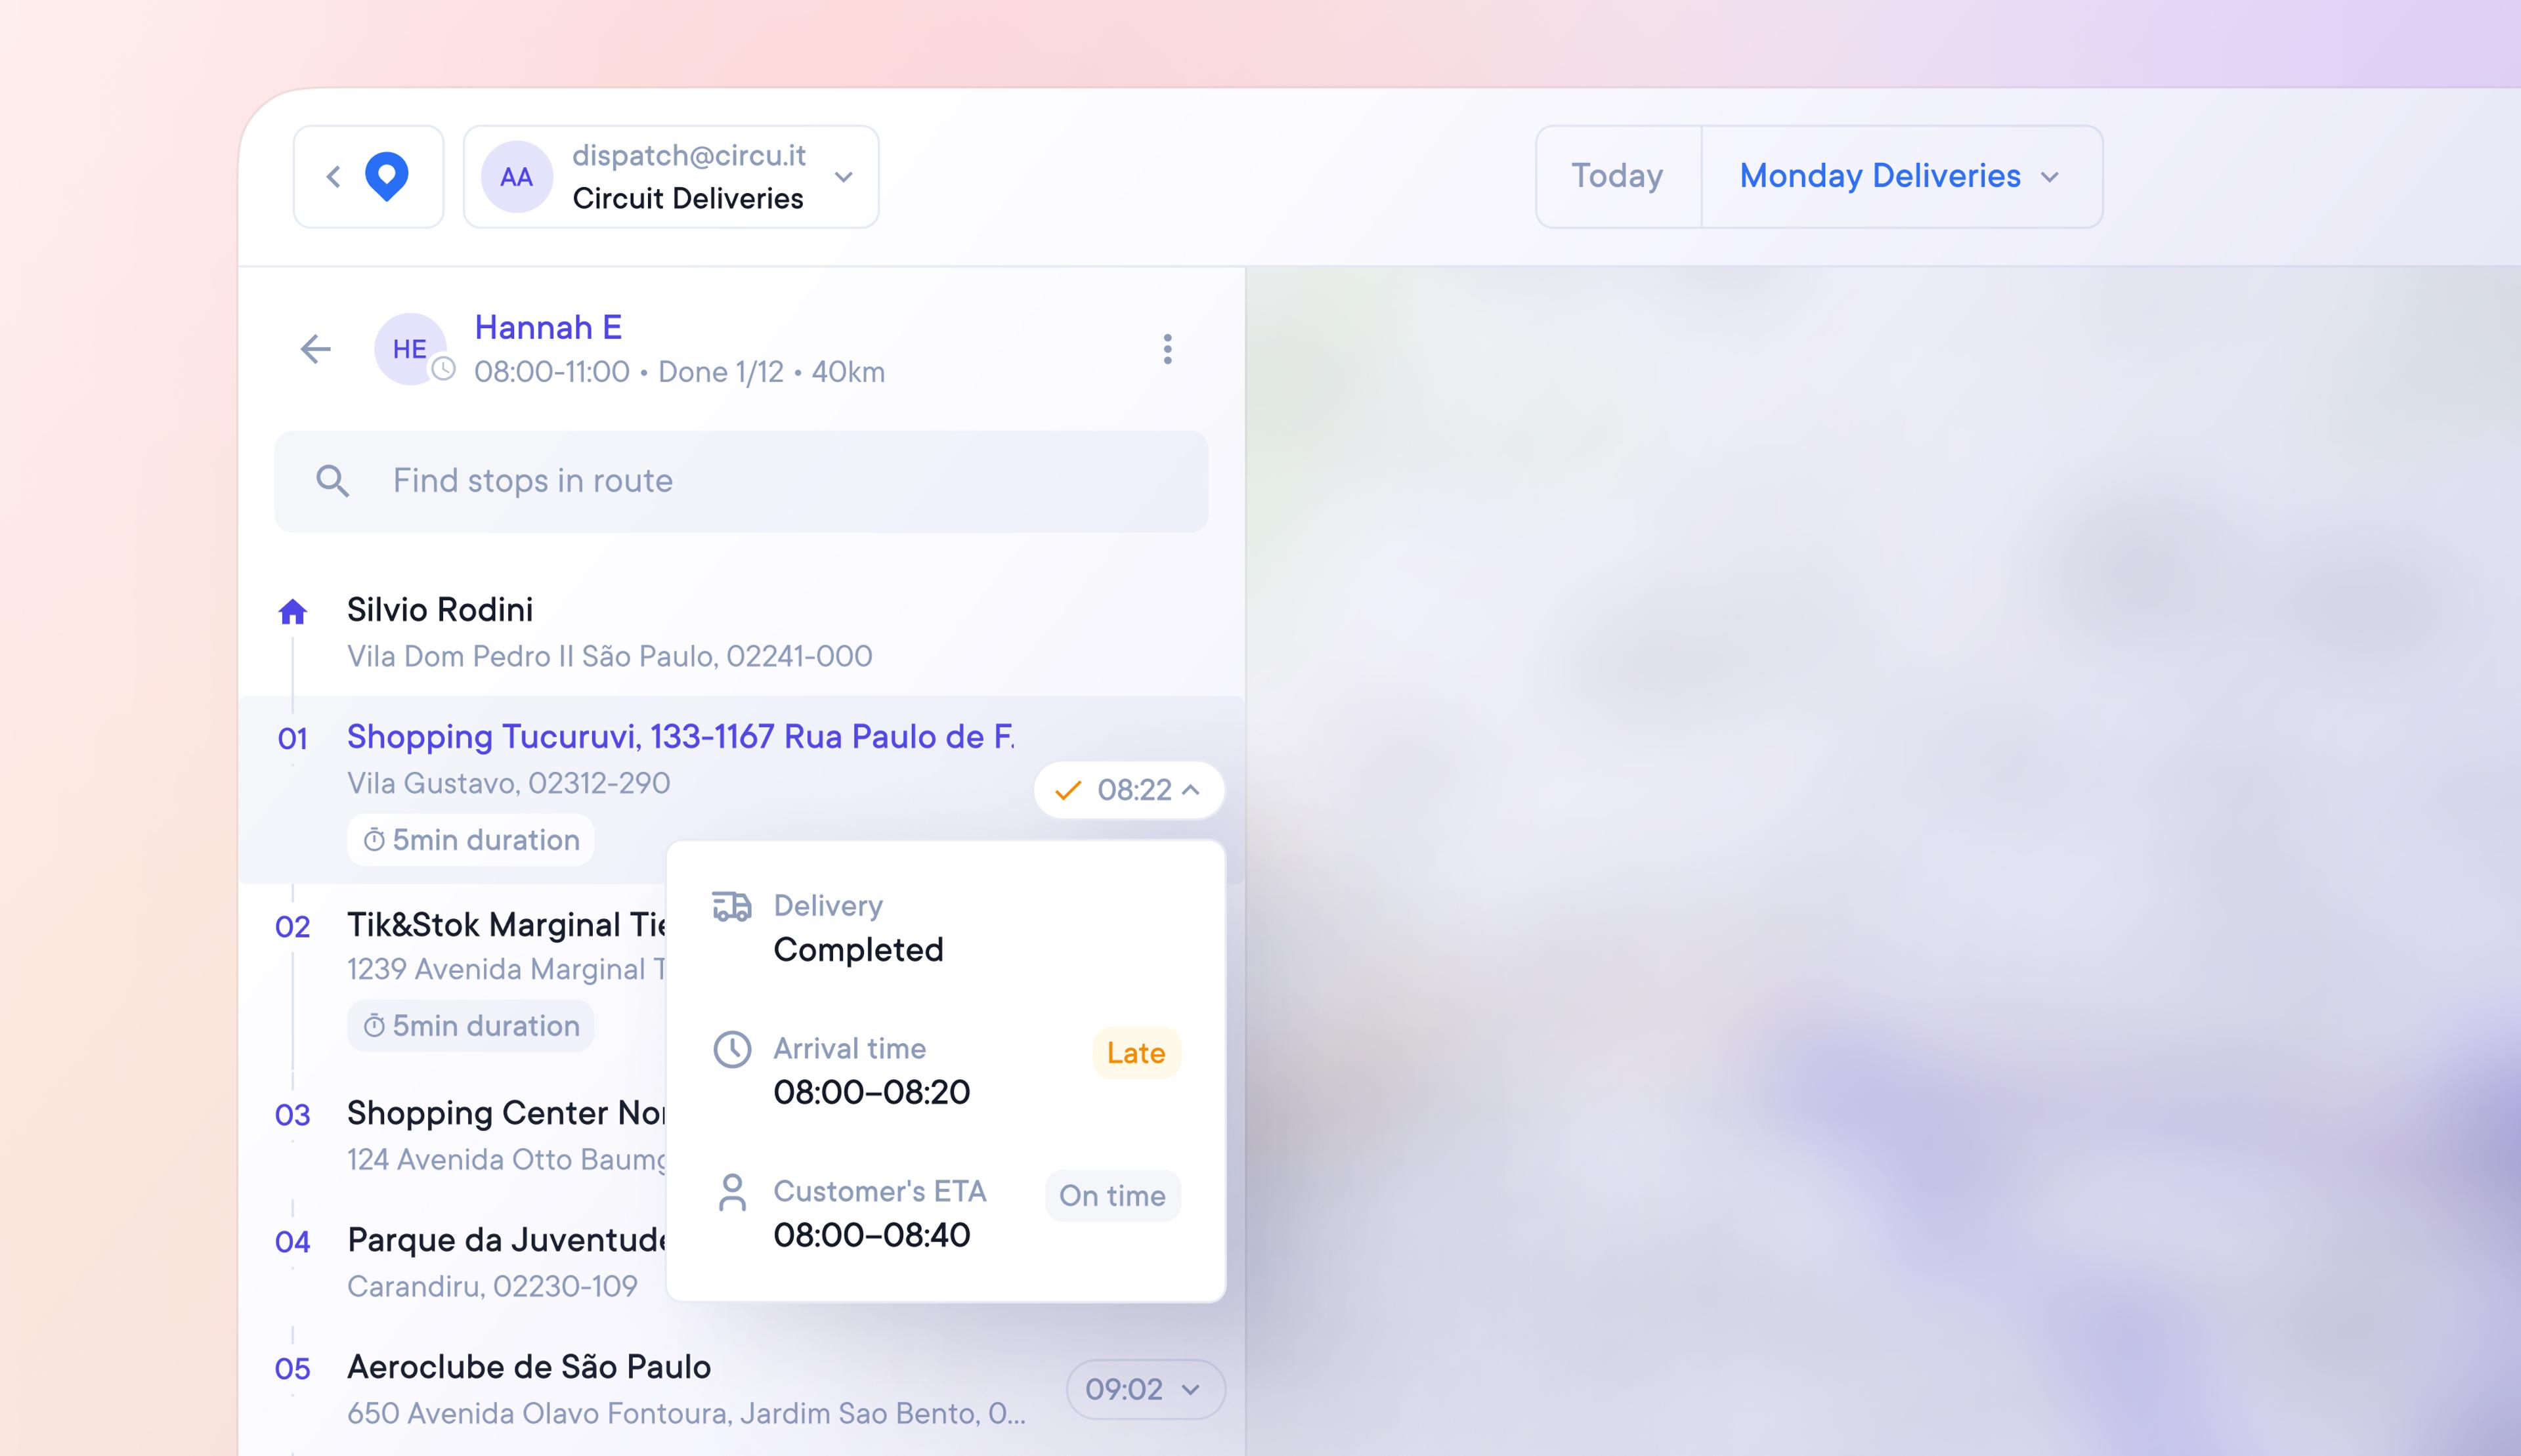
Dynamic stop status icons
Dispatchers can now see the real-time status of stops on an active route and make live changes to increase the chances of successful delivery.
How dynamic stop status icons work
Dynamic stop status icons are live indicators of a stop’s delivery progress:
- Orange dot = The stop is at risk of being early or late
- Green tick = The stop was completed on time
- Orange tick = The stop was completed early or late
- Red cross = The stop was not completed
Hover over each icon for additional detail about:
- Delivery status
- Arrival time
- Customer's ETA
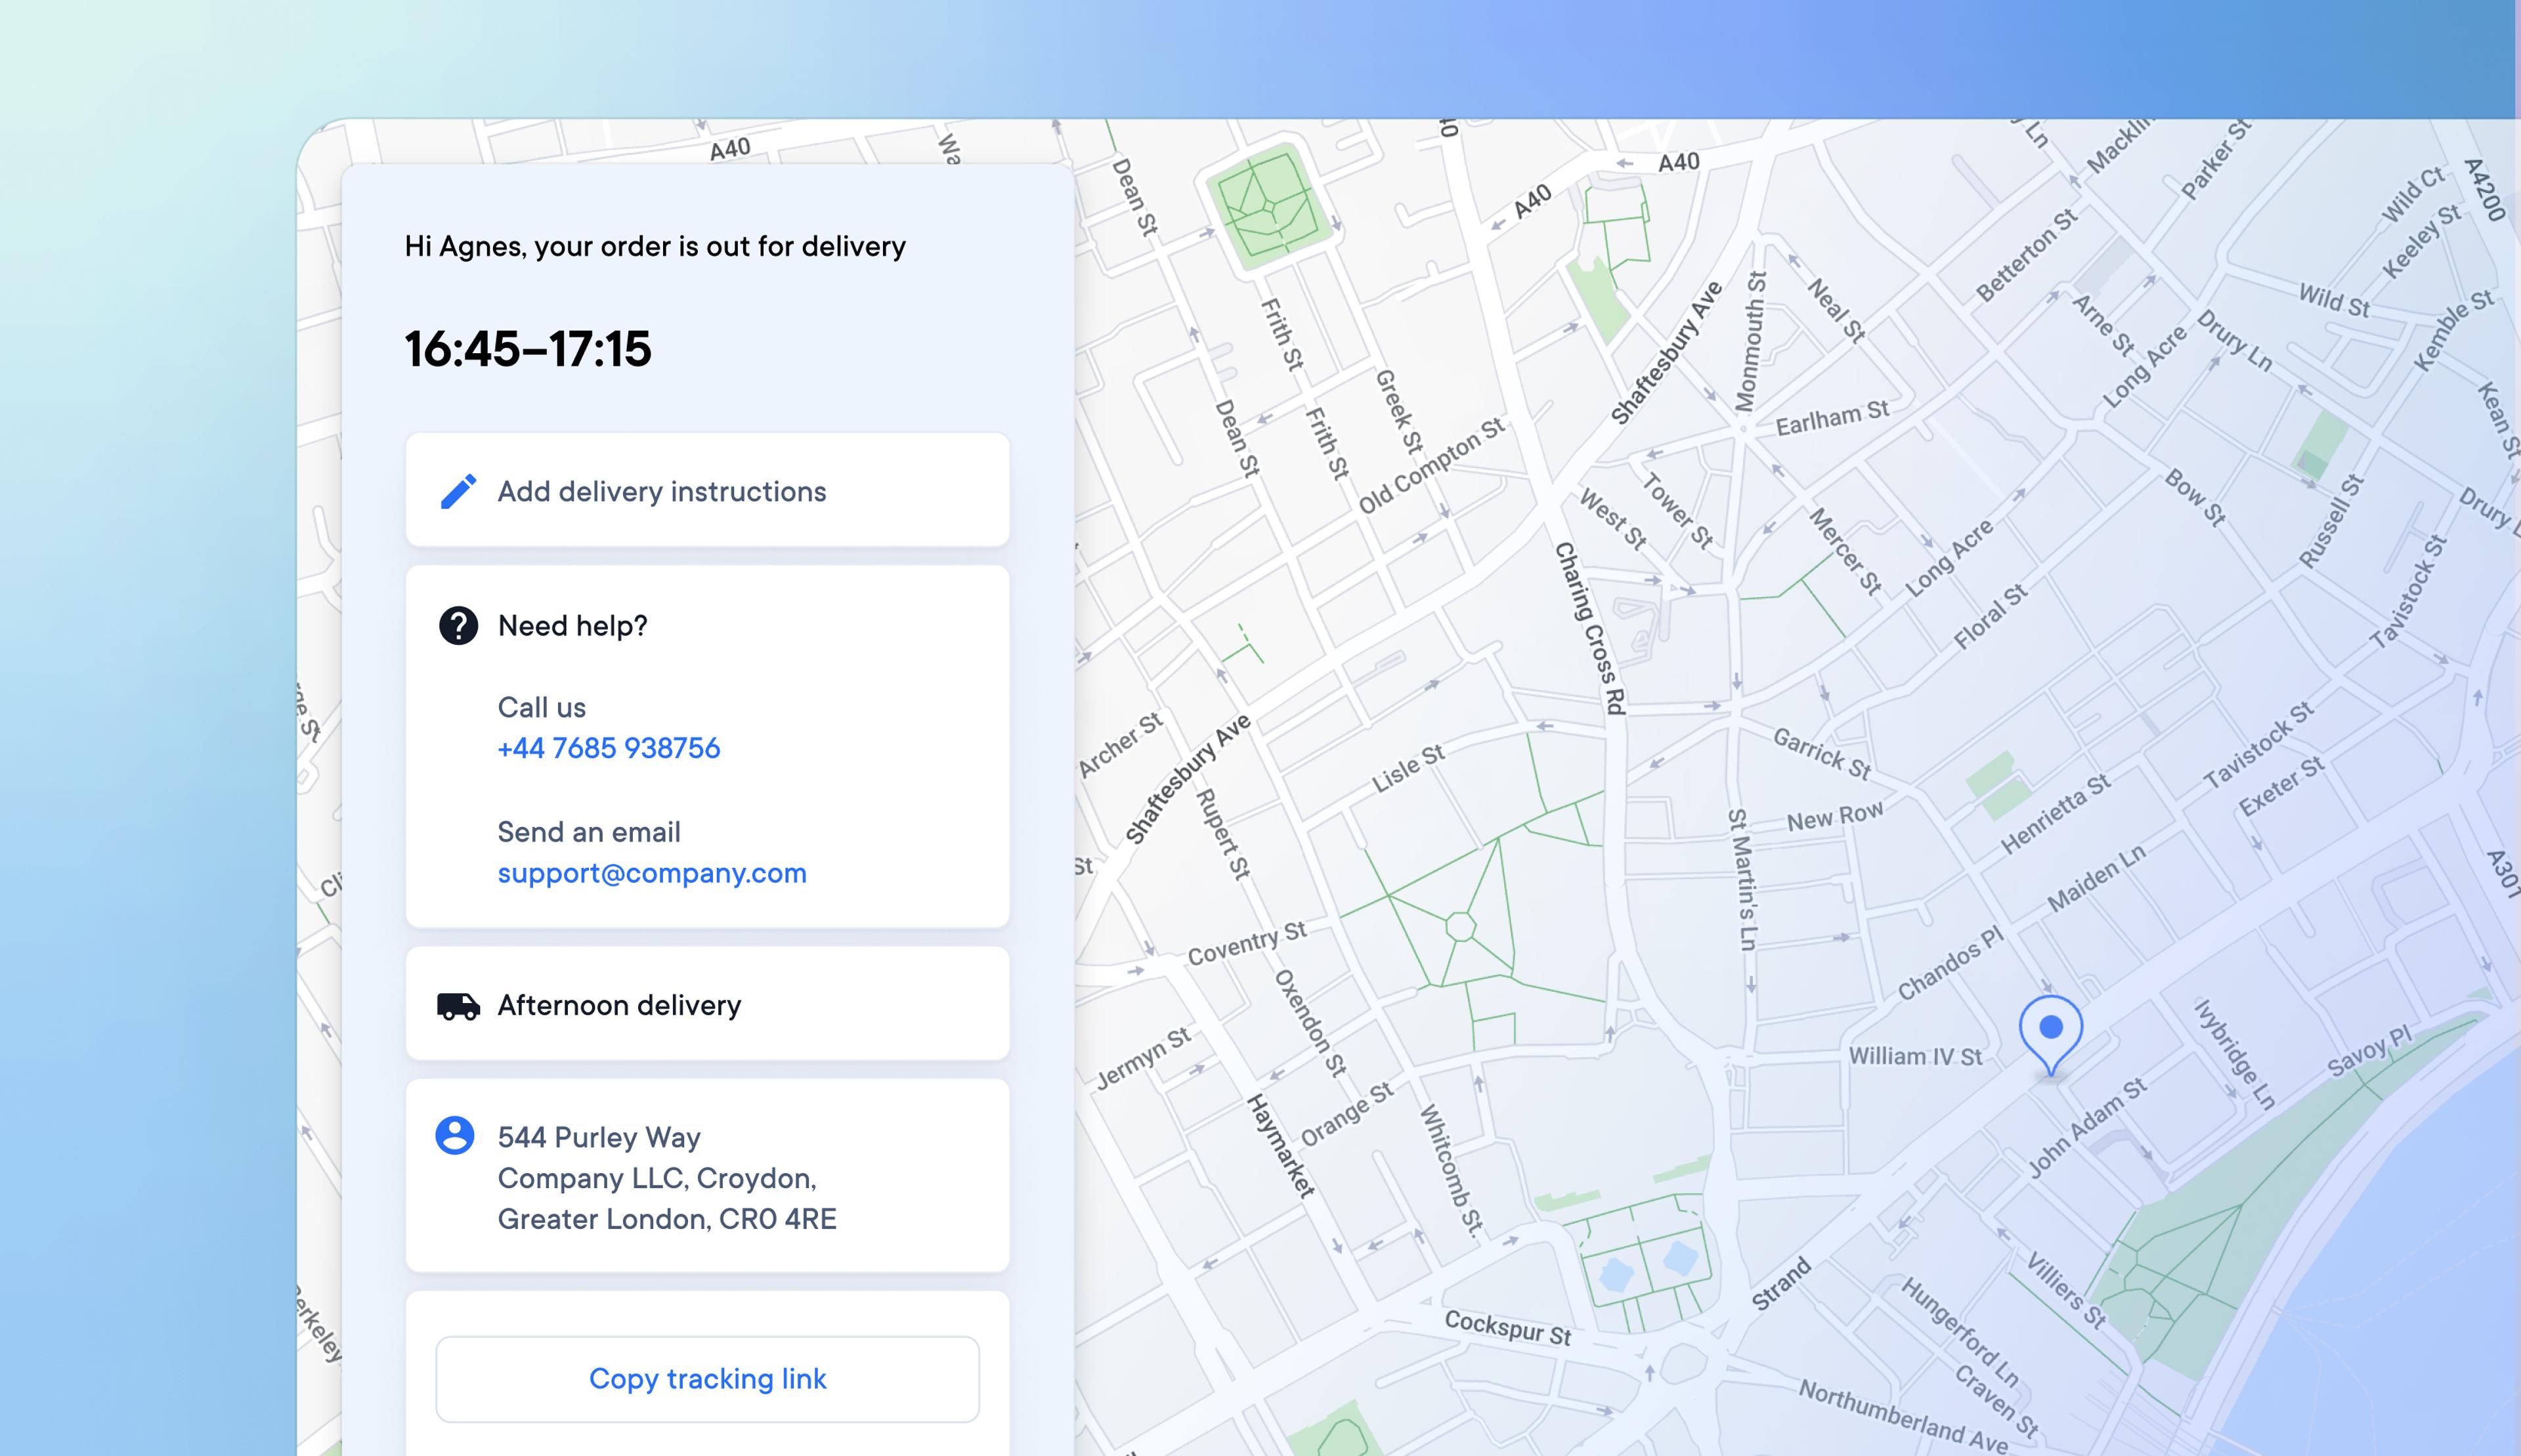
Improved delivery experience for customers
Dispatchers can now choose to add customer service contact details to the delivery information available to customers, providing a better delivery experience to customers who need help.
Delivery tracking information provided to customers now includes:
- Dynamic estimated time of delivery
- Delivery status
- Proof of delivery information
- The ability for the customer to add delivery instructions
- Customer service contact email and/or telephone number
- Sender name and address
- Shareable tracking link
Make changes to live routes and notify drivers
Dispatchers who need to modify routes that are already in progress can do so whilst automatically notifying drivers about the changes that have been made.
A dispatcher or admin can now:
- Add or make changes to existing stops on a live route
- Preview changes
- Reoptimize a live route to include the latest changes
- Save or discard changes
- Notify the driver of the changes automatically
Same-day updates to routes are now easily carried out by Dispatchers and communicated instantly to drivers.
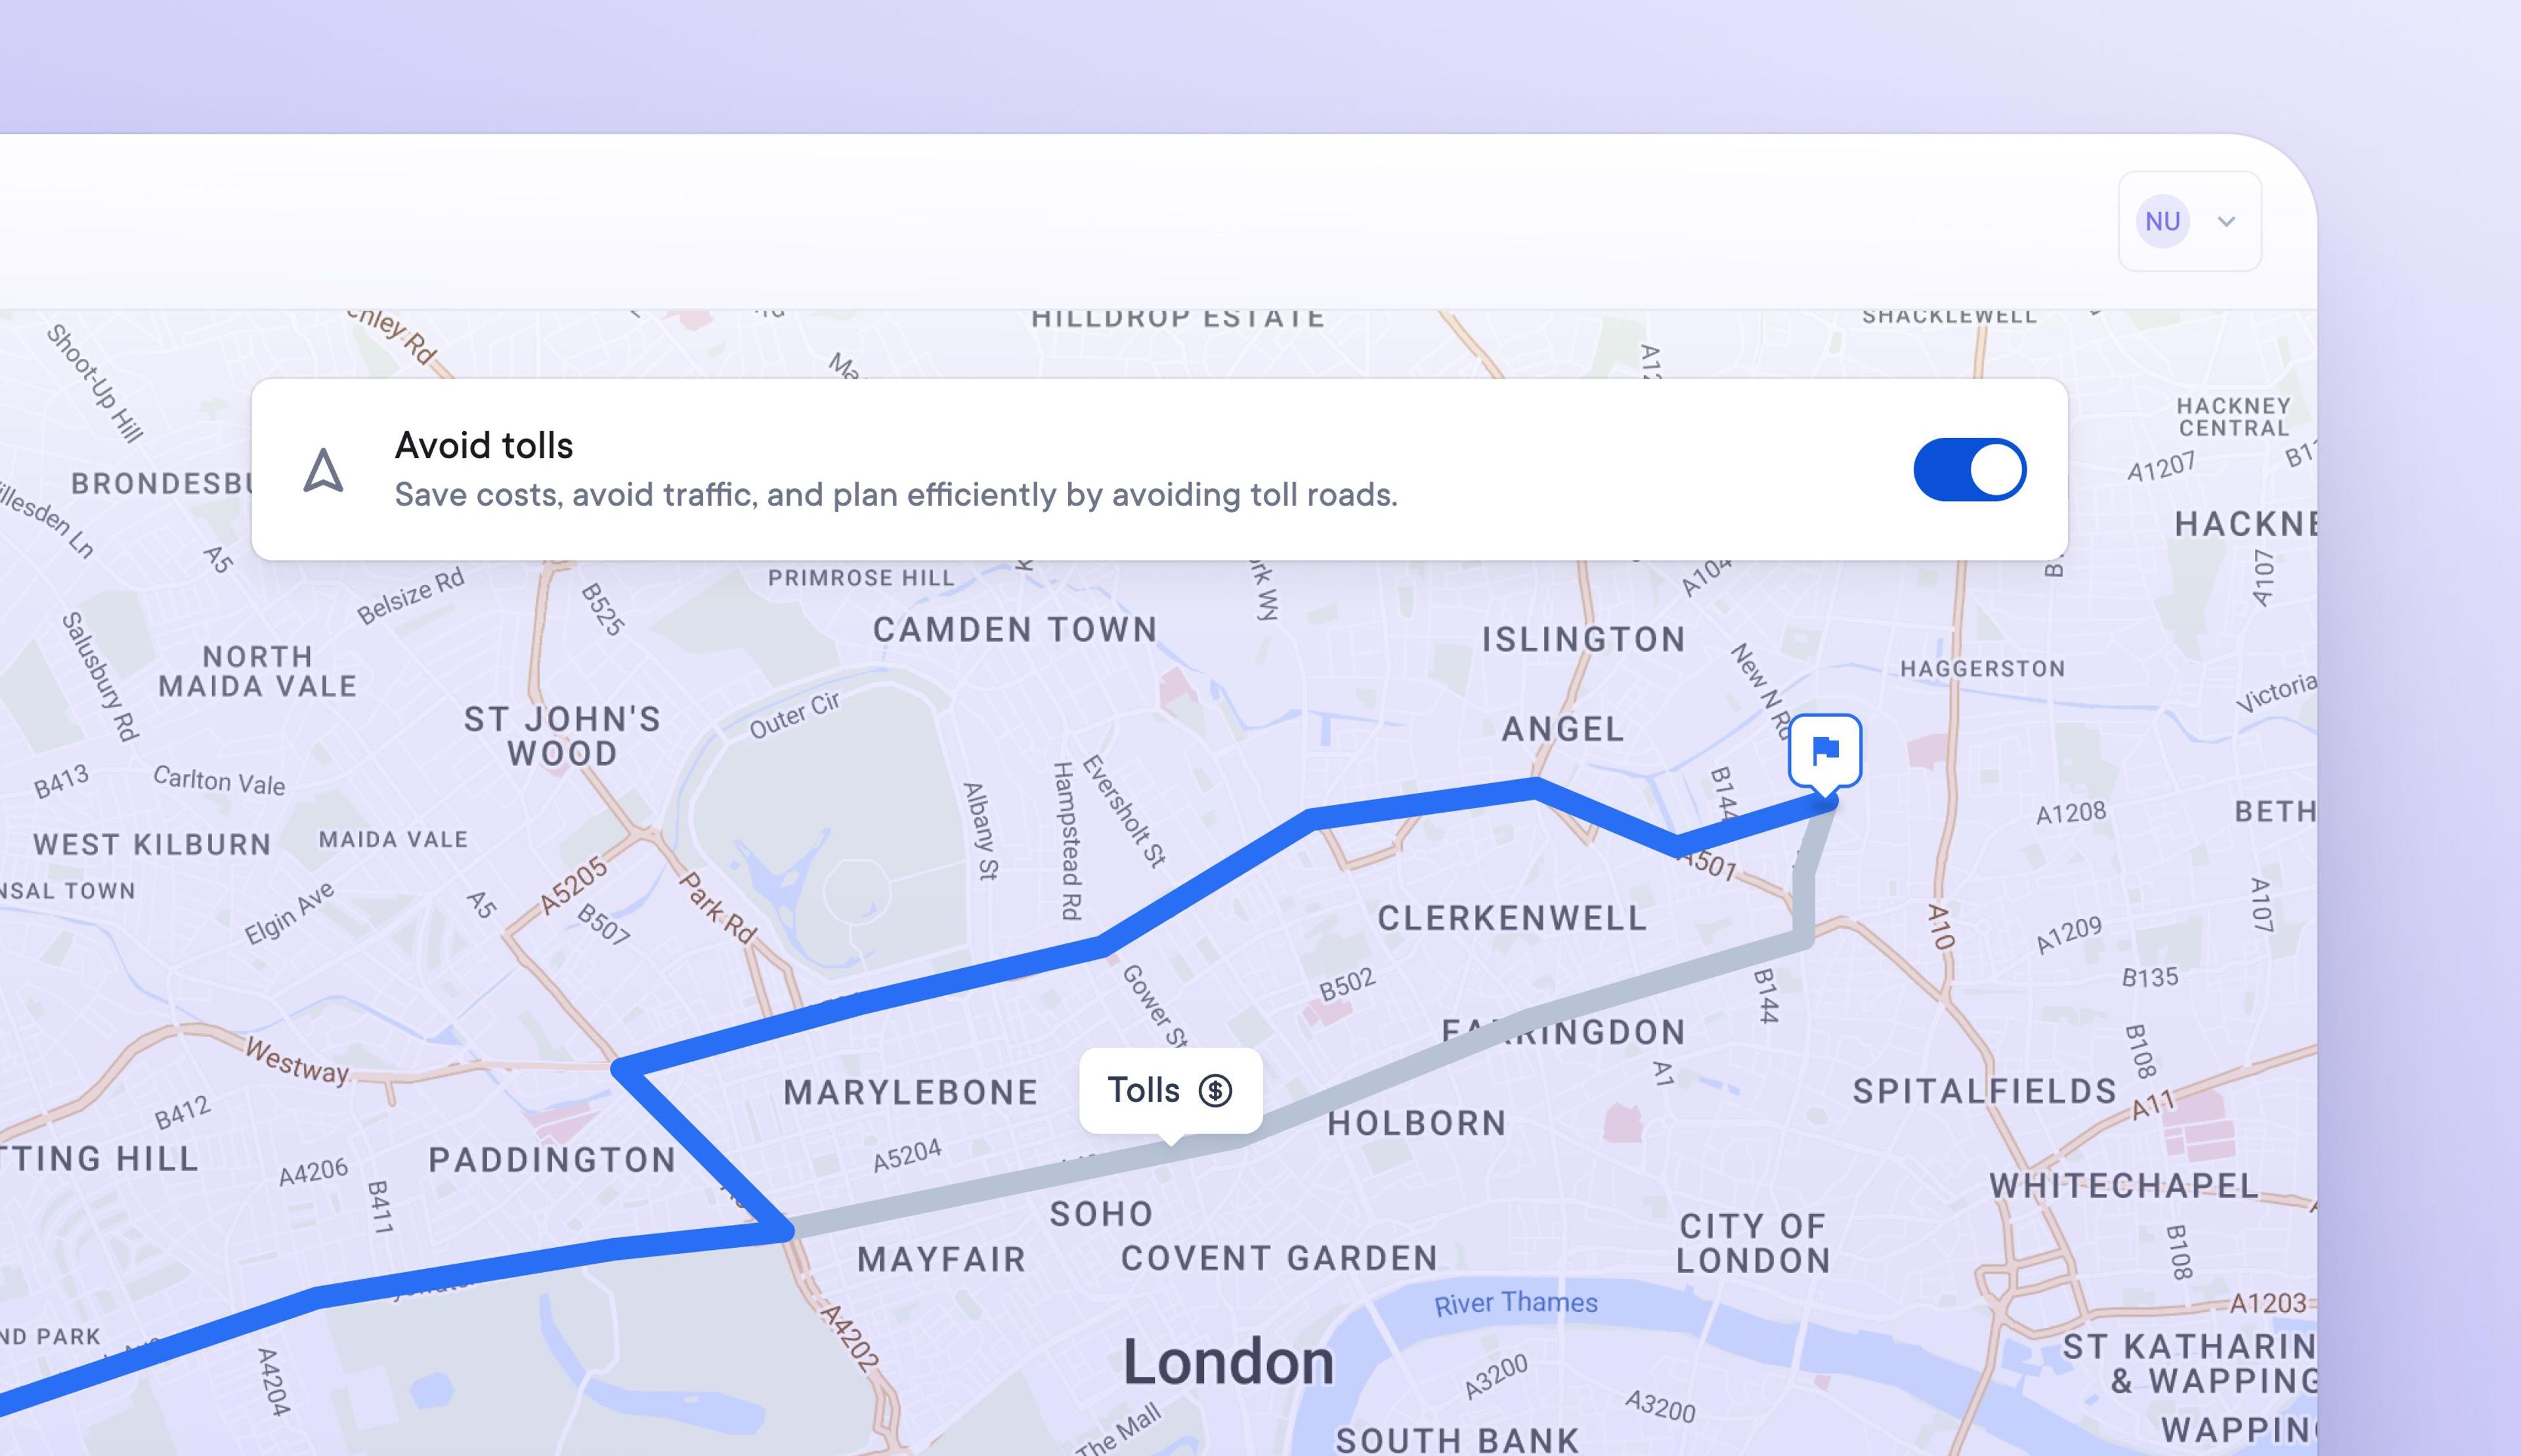
Create routes that avoid expensive toll roads
Toll roads can contribute to increased delivery costs, affecting profitability.
New account-wide settings now allow dispatchers and drivers to create delivery routes that automatically avoid toll roads.
How to set avoid toll preferences:
- Go to Settings > Route optimization
- Set ‘Avoid tolls’ to on
- Make sure drivers have their vehicle type set to ‘Car’
- Make sure drivers also have their navigation app set to ‘avoid tolls’
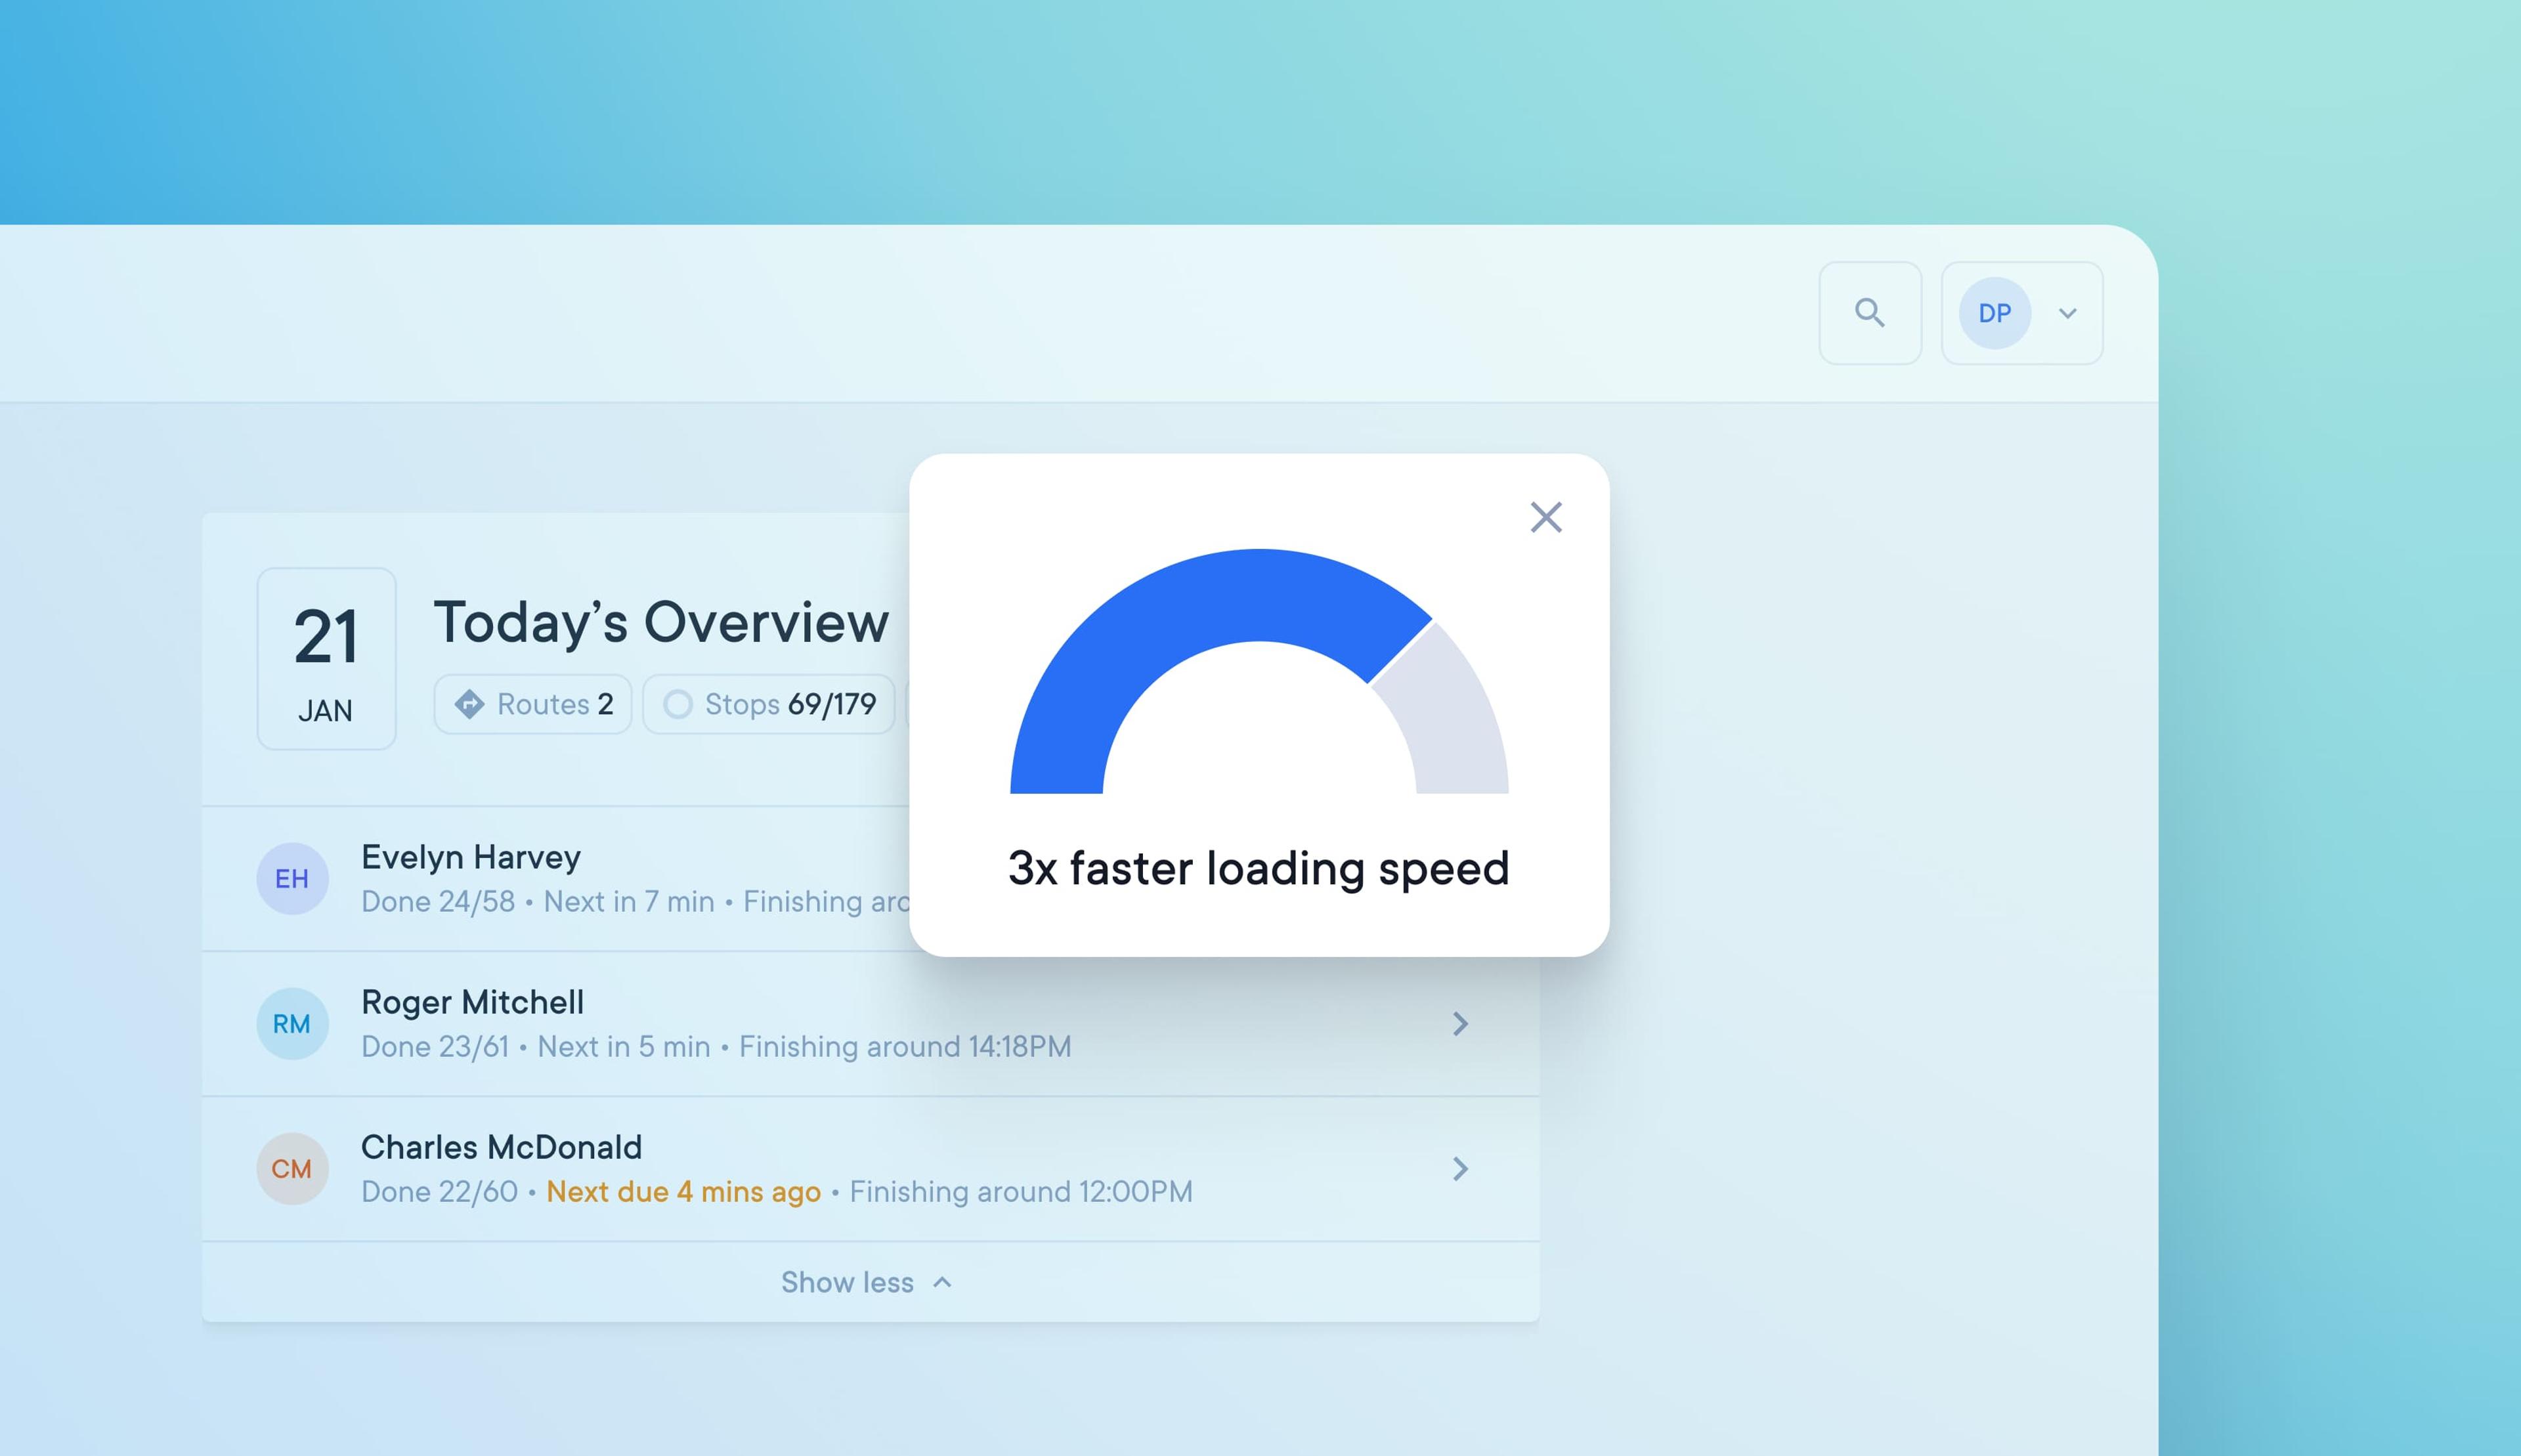
Faster access to the delivery dashboard and data
Previously, large teams with multiple drivers and routes may have experienced a slight lag as the Overview Dashboard page loaded.
Page loading performance has been improved so that large amounts of data can be quickly retrieved, processed, and displayed.
The Overview Dashboard page loads 50% faster for small teams and 3x faster for large ones, giving almost instant access to a view of daily delivery activity.
Select Map or Satellite view
In addition to the default map view, dispatchers and admins can now select satellite view for a photographic bird's eye view of routes.
This provides detailed satellite imagery of the landscape, which can help when trying to pinpoint hard-to-find or incorrectly mapped stops.
How to select satellite view
- Select a route
- In the top, right-hand corner of the map view are the options Map/Satellite
- Click on Satellite
- Click Map to swap back to the default map view
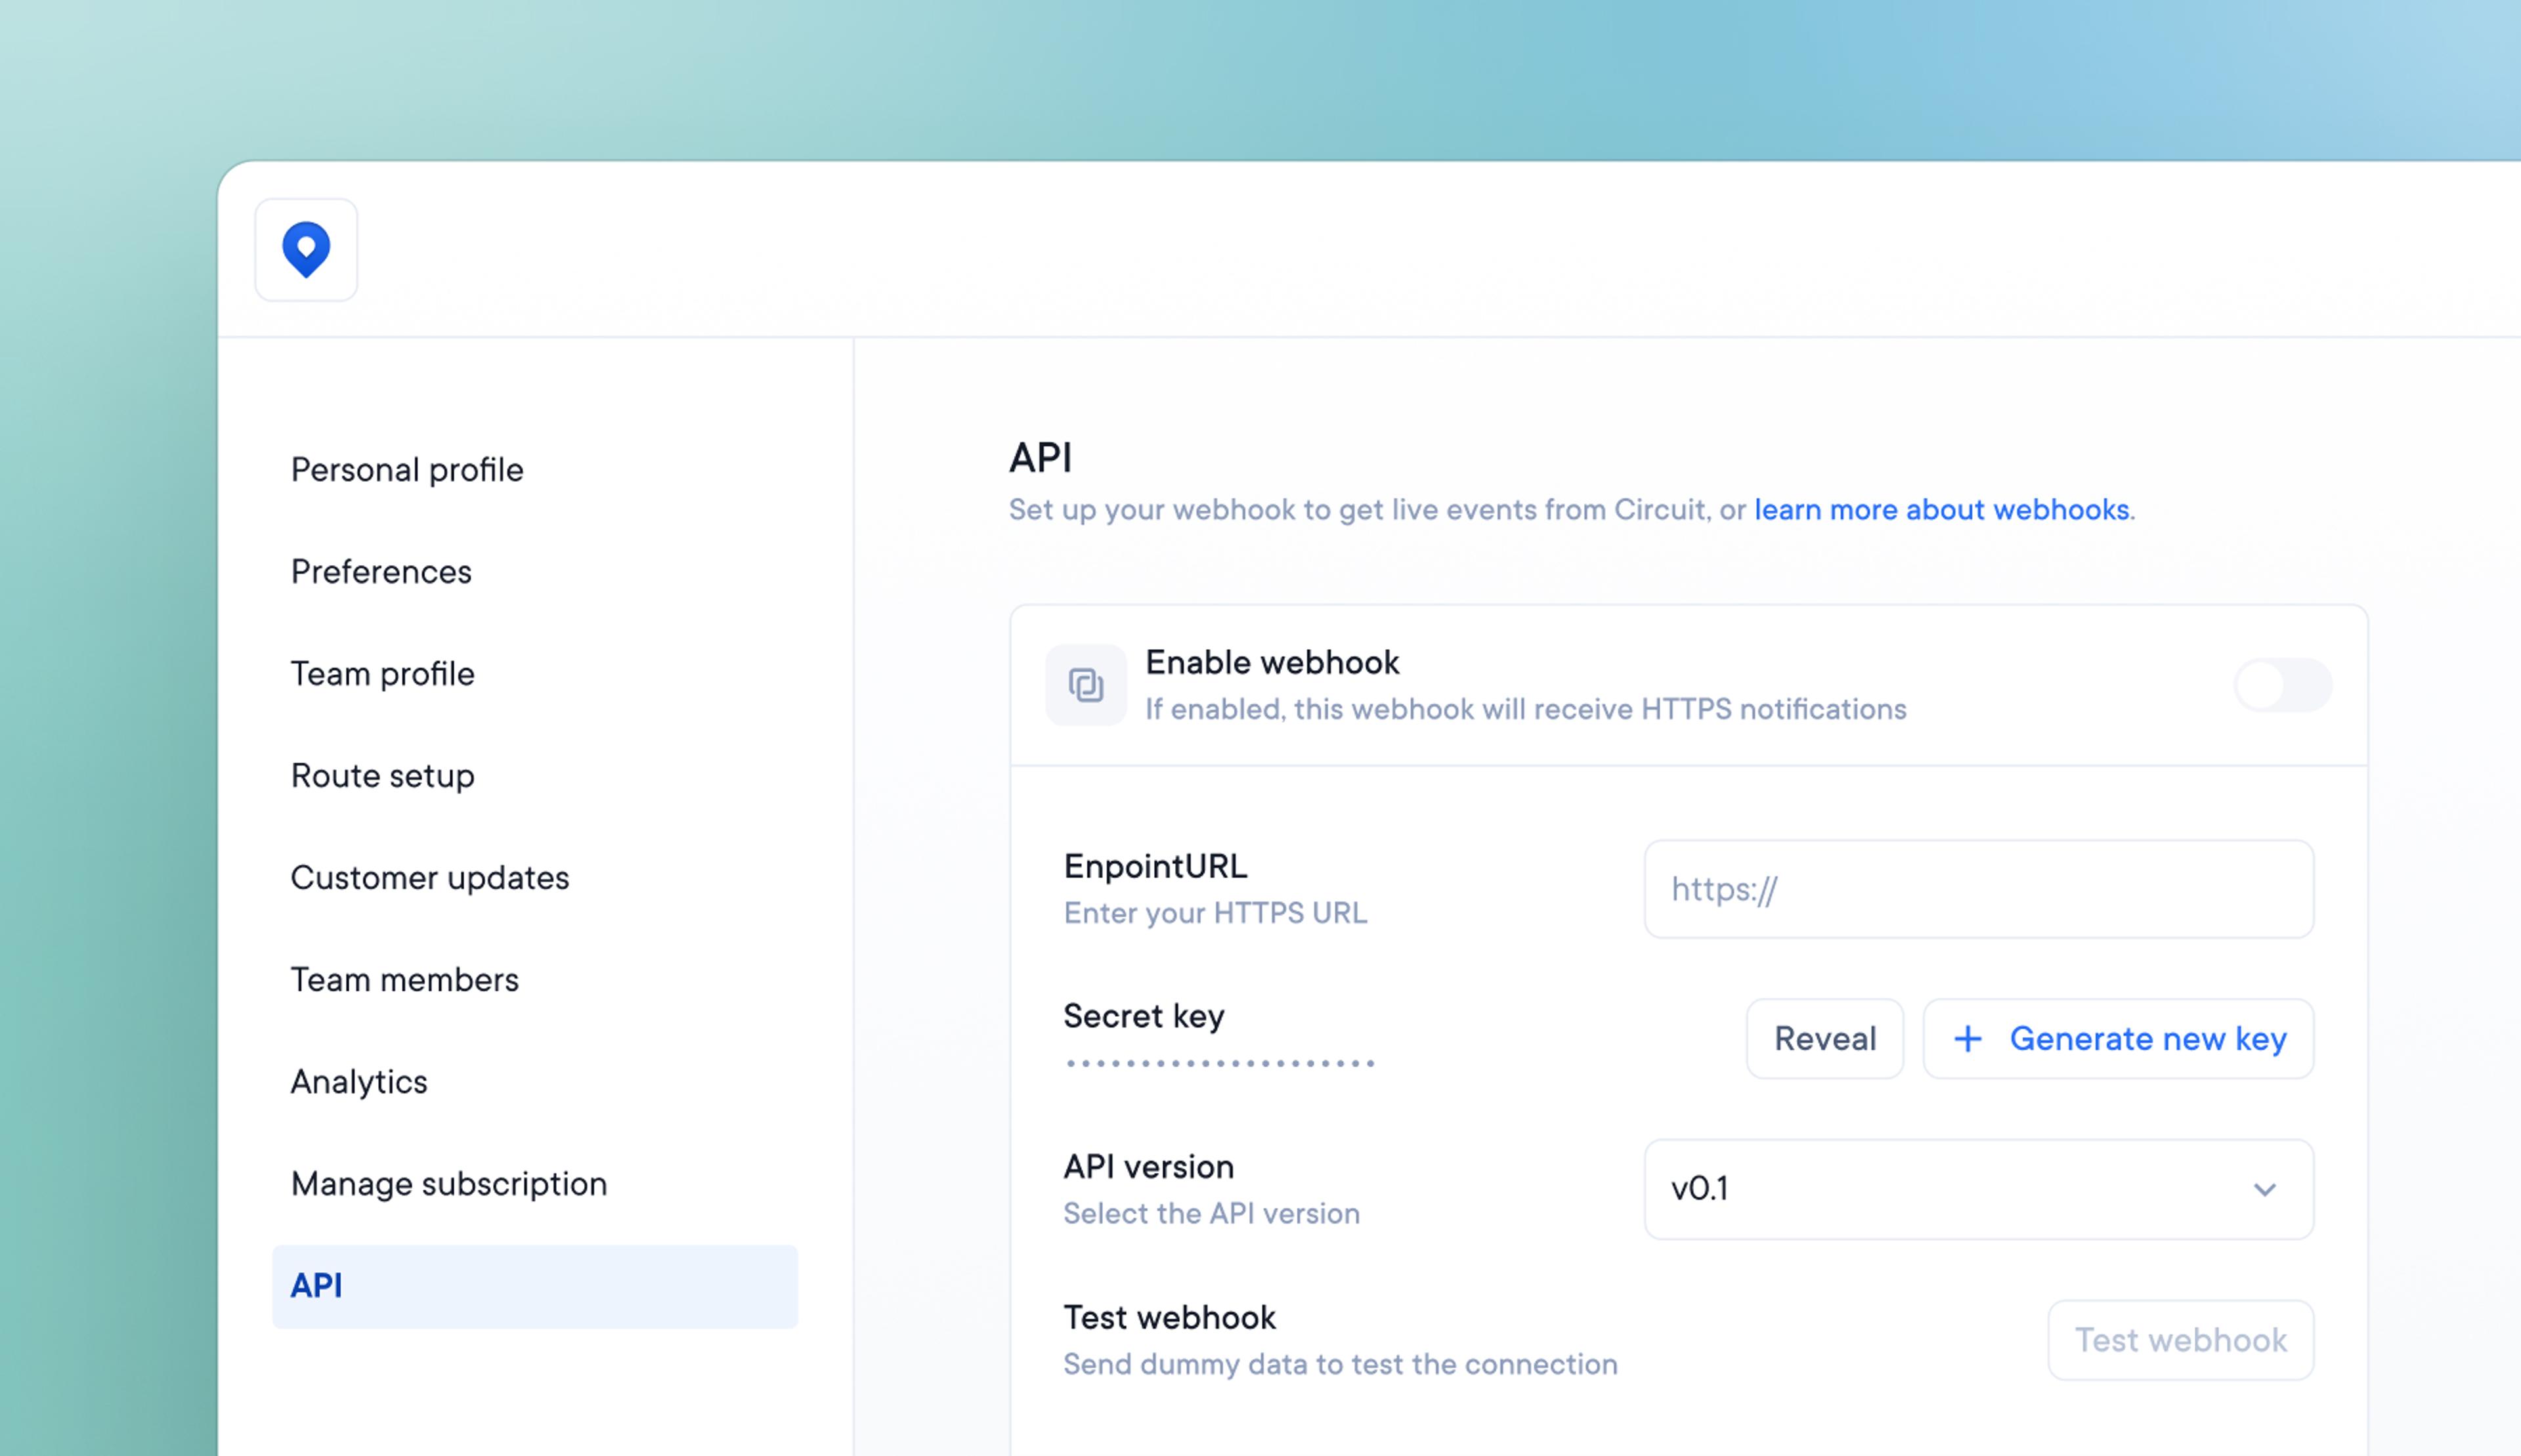
Integrate with Circuit’s Webhook API for live event data
Circuit for Teams users can now access and benefit from Circuit’s Webhook API V0.1b
The API enables two different software programs to communicate and provides access to useful event-based data.
API Data
The API publishes data relating to three key events:
- When a route is sent to a driver
- When a route is started
- When a stop is attempted
How to integrate with Circuit’s API
Go to Settings > API to read the complete technical documentation and best practices.
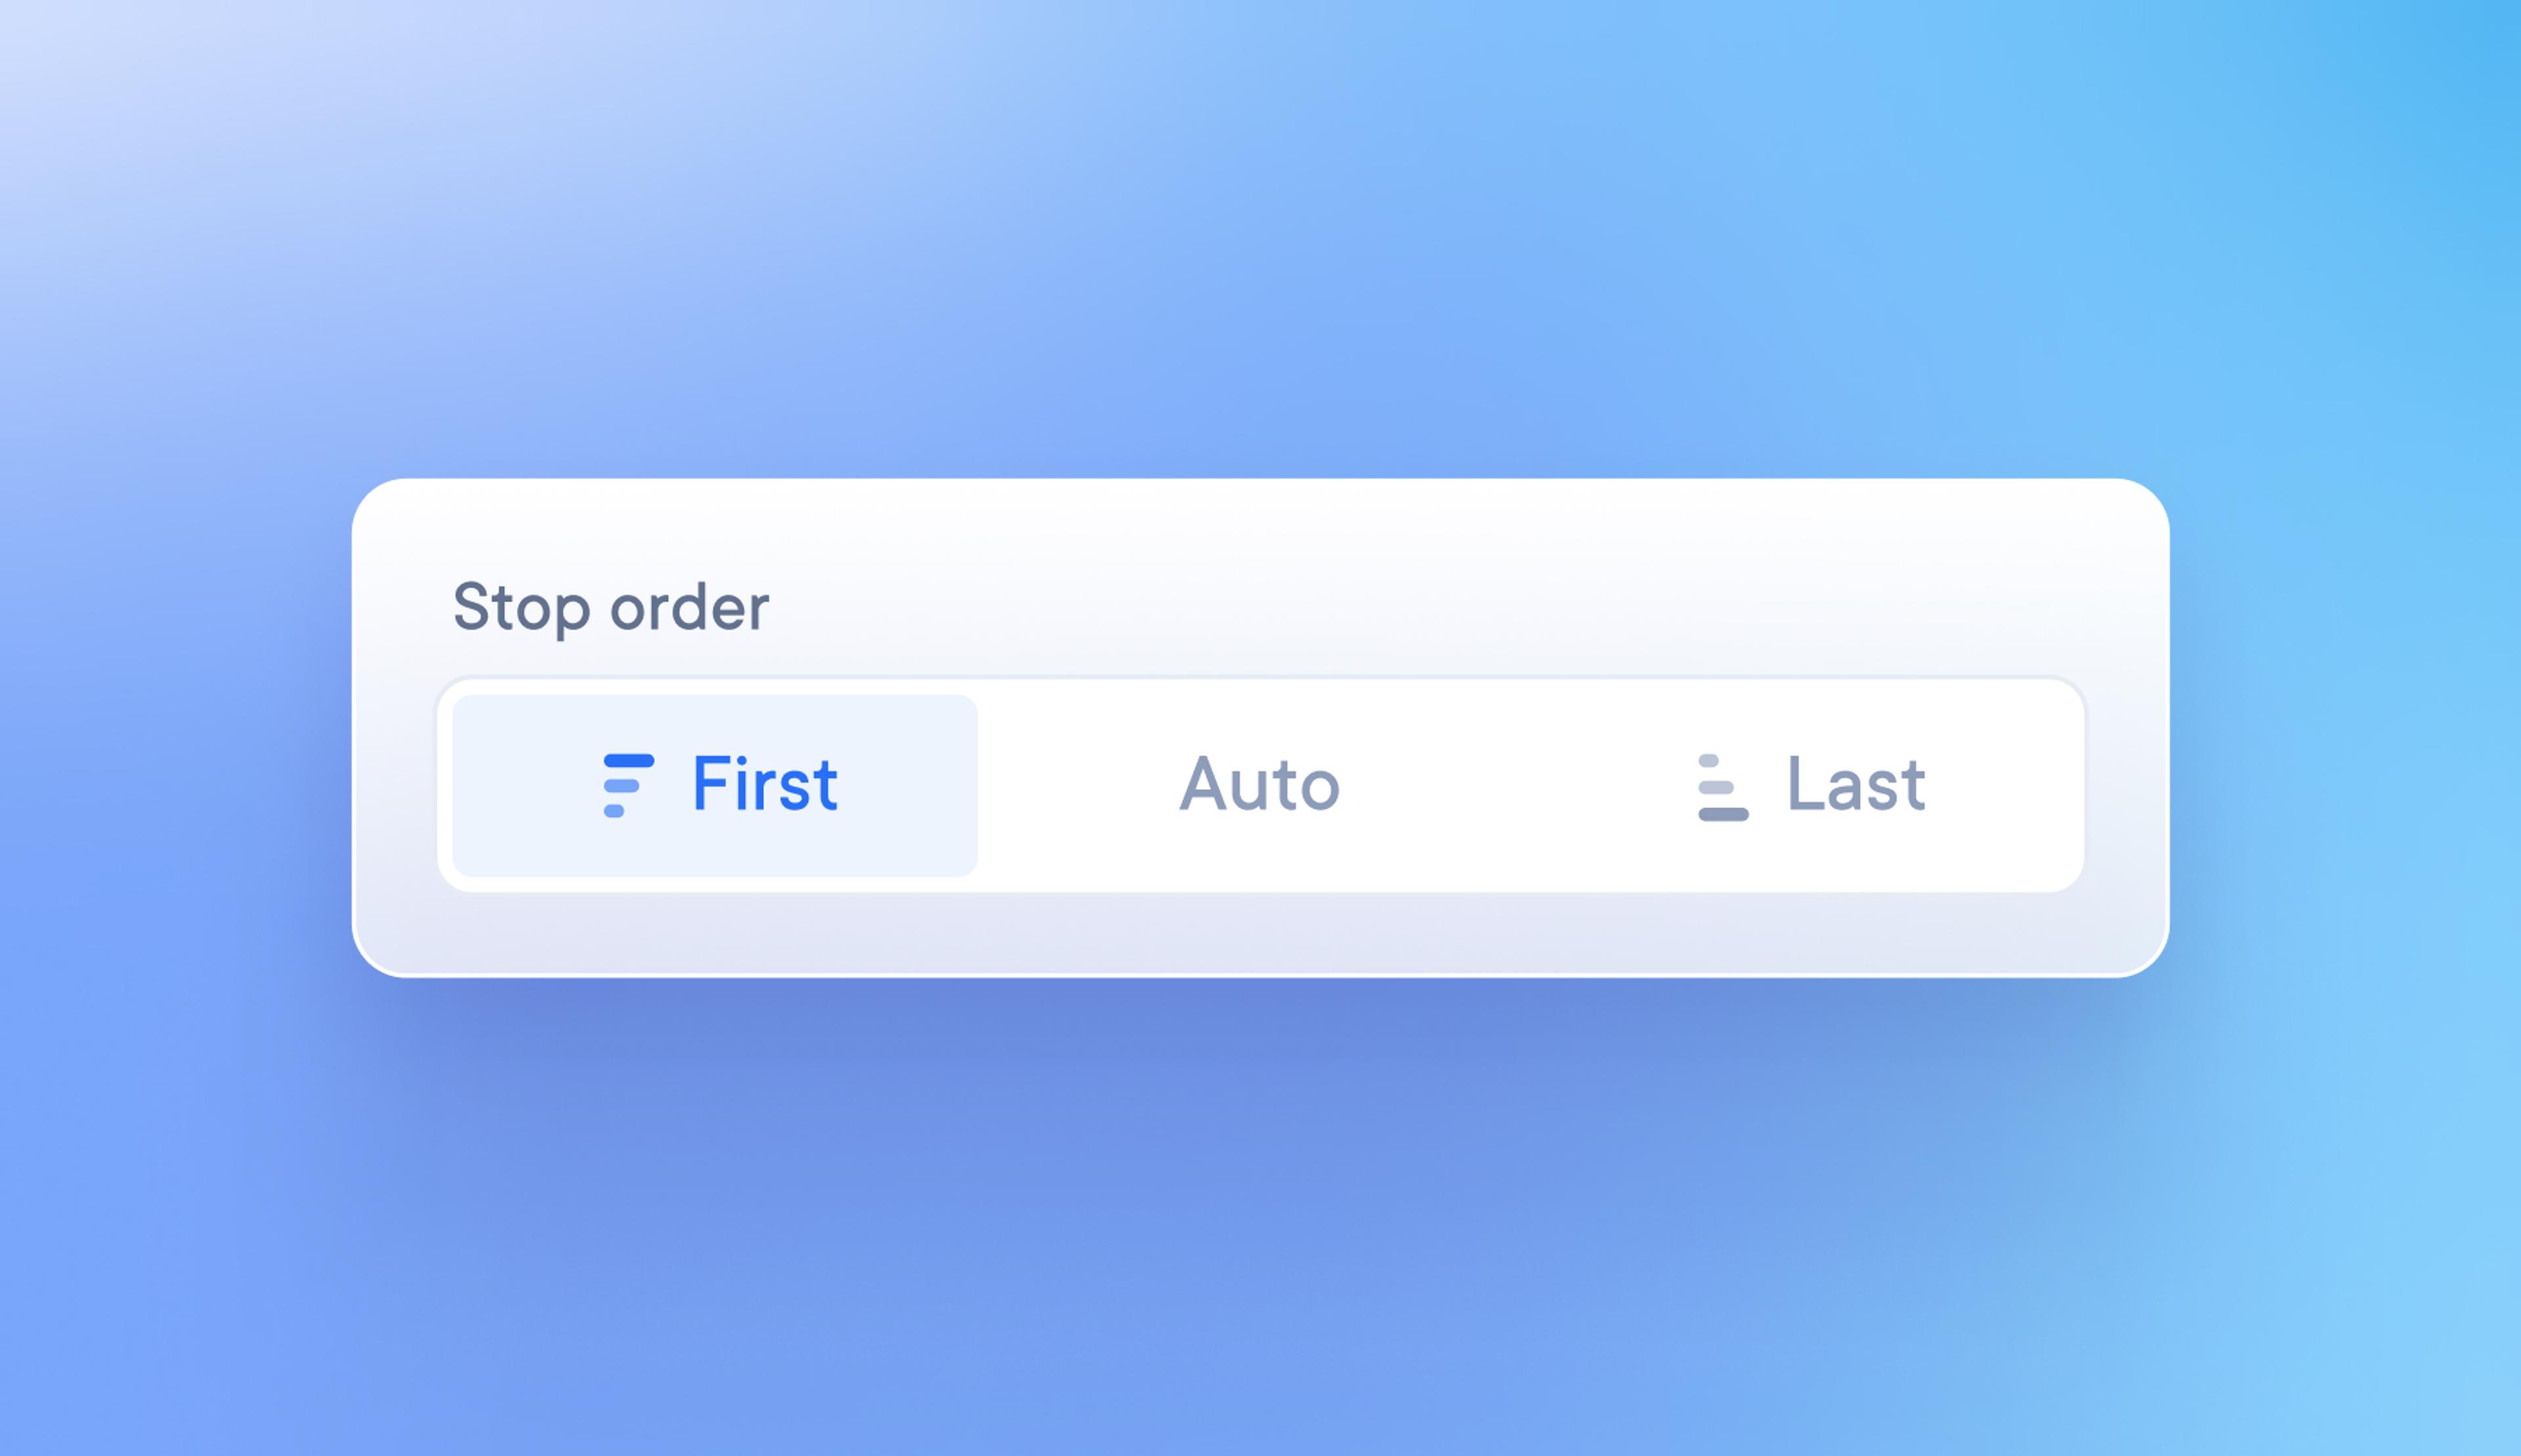
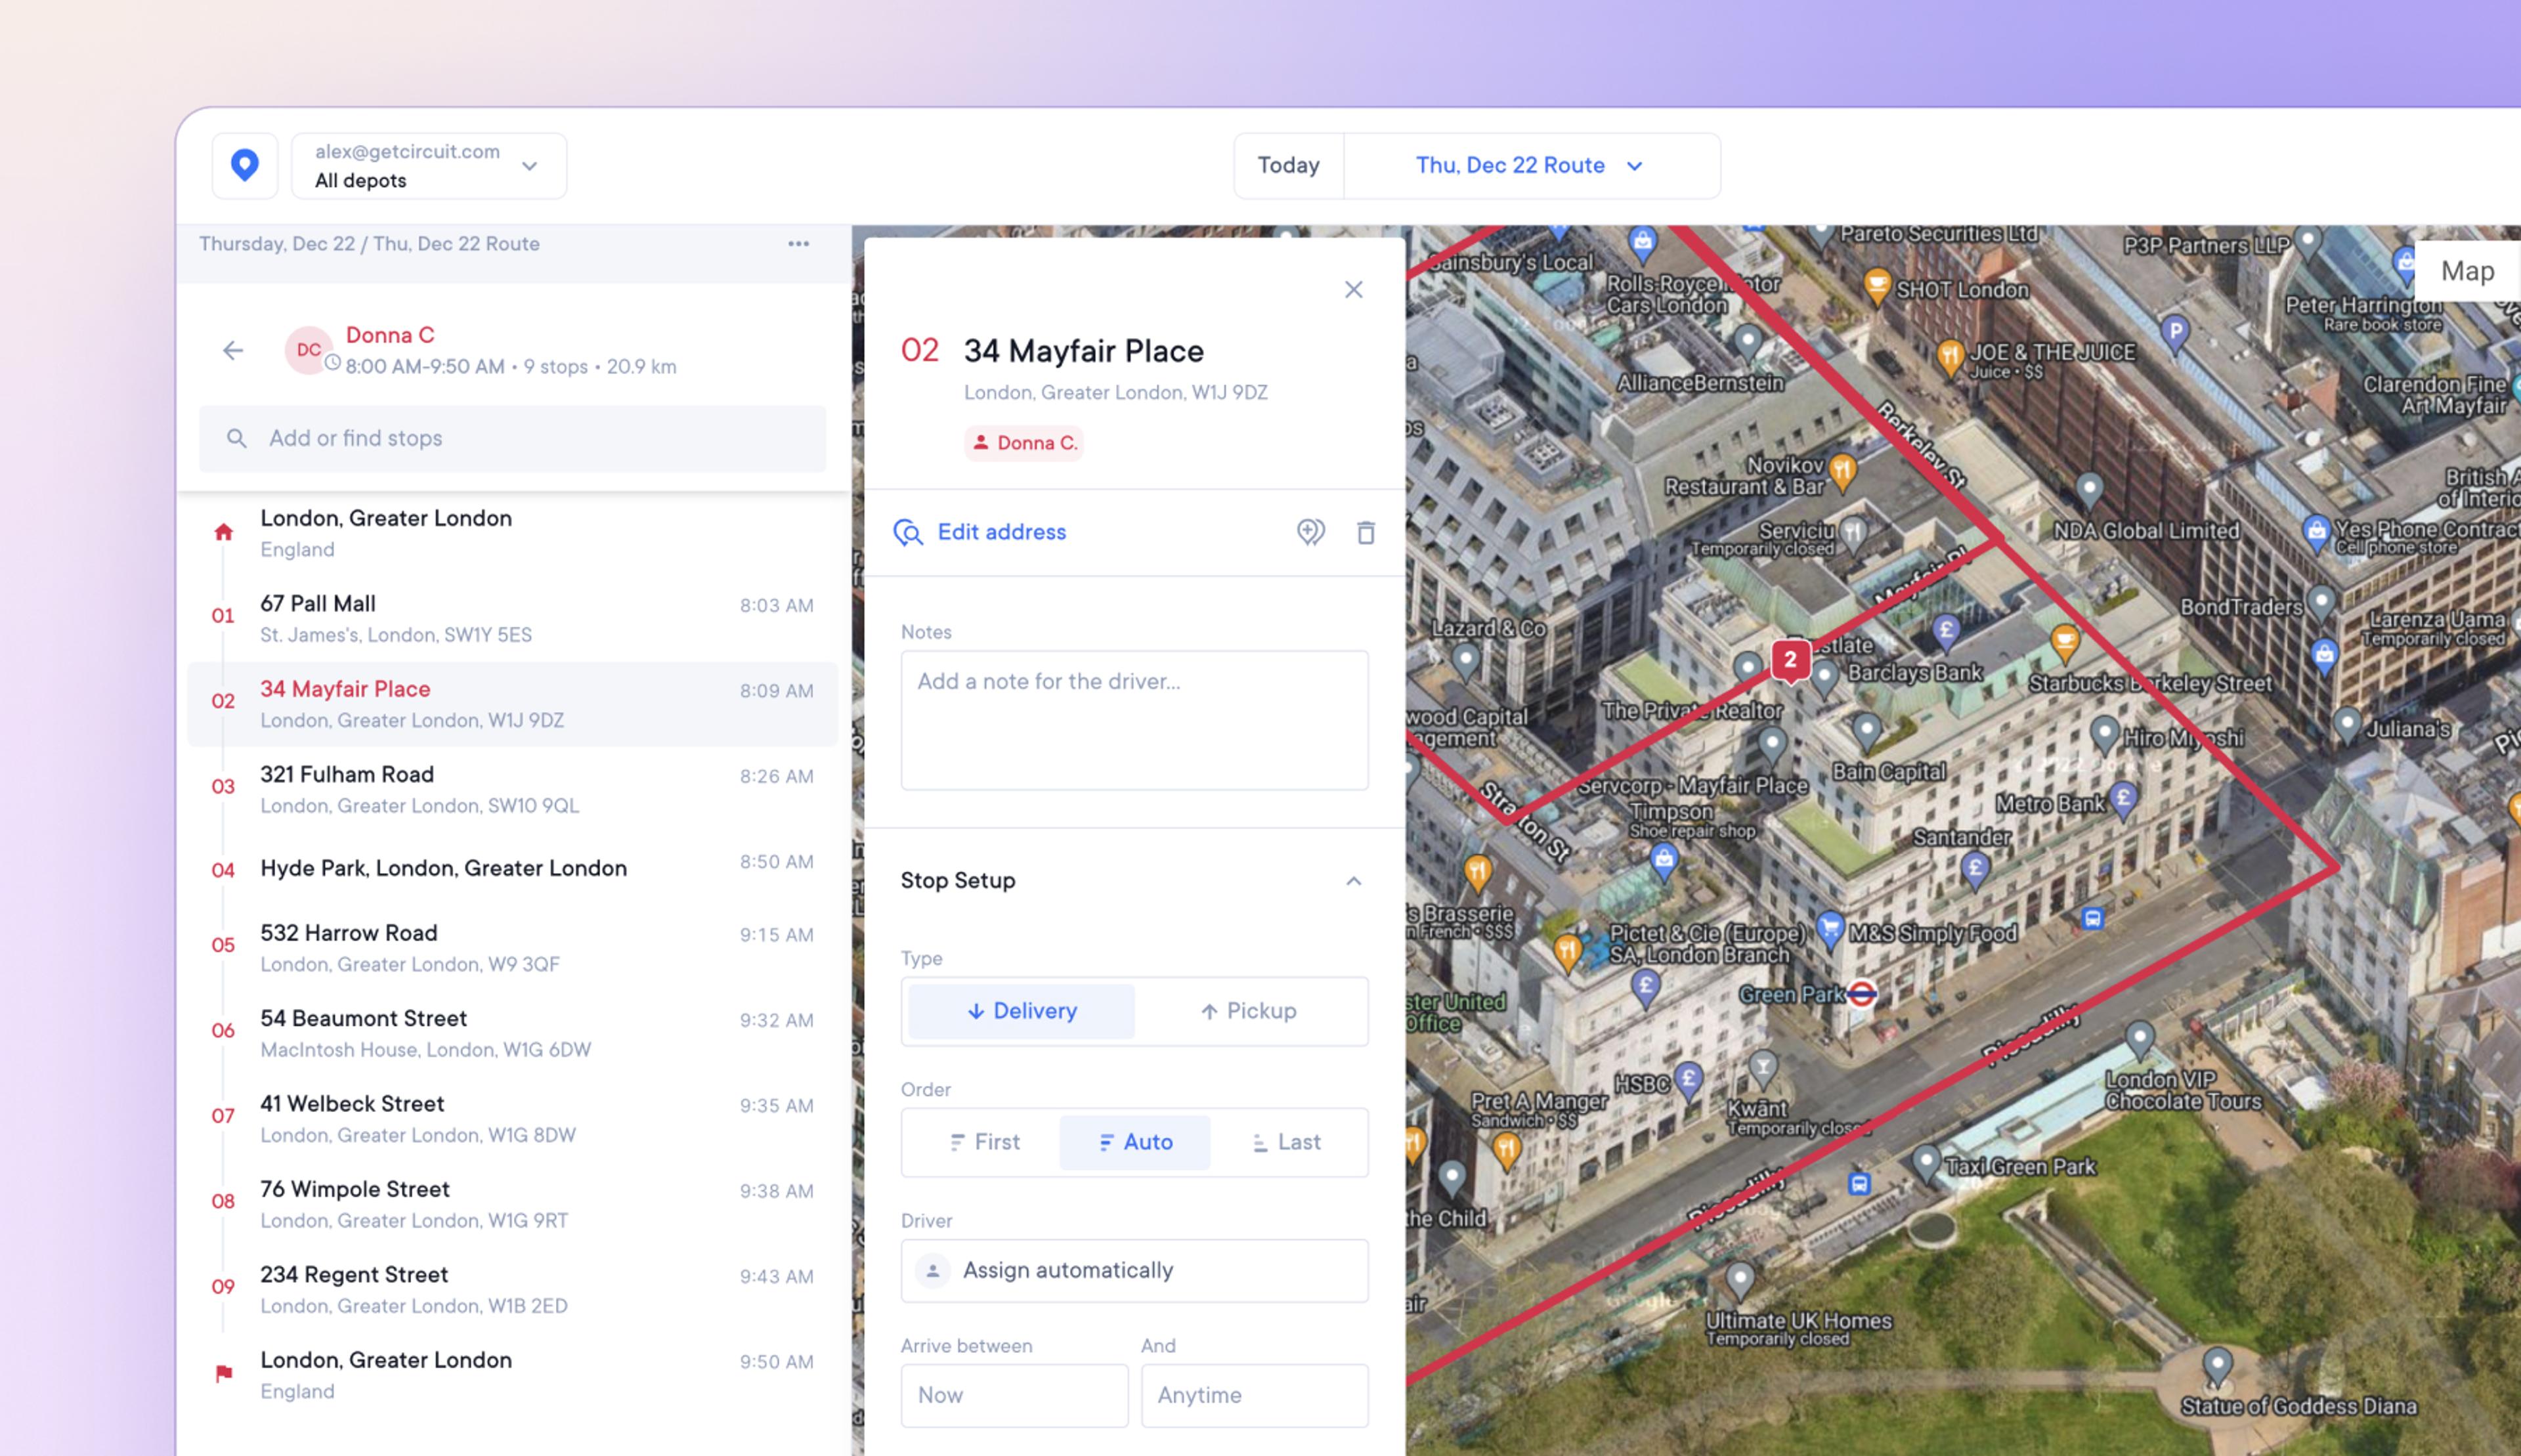
Select single/multiple stops to be attempted first or last
On a route, dispatchers can select:
- a single/multiple stops to be attempted first
- a single/multiple stops to be attempted last
This allows drivers to complete priority deliveries at the beginning of their route and leave less urgent deliveries until the end.
How to select single/multiple stops to be attempted first or last
- Click on a stop
- Under Stop Setup, select First or Last
- Stops marked as First will be attempted at the start of the route
- Stops marked as Last will be attempted at the end of the route
- There is no min/max limit on the number of stops you can mark as First/Last
- The default for any stop not marked as First/Last is Auto
- Stops marked as Auto will be added to the route order when it is optimized
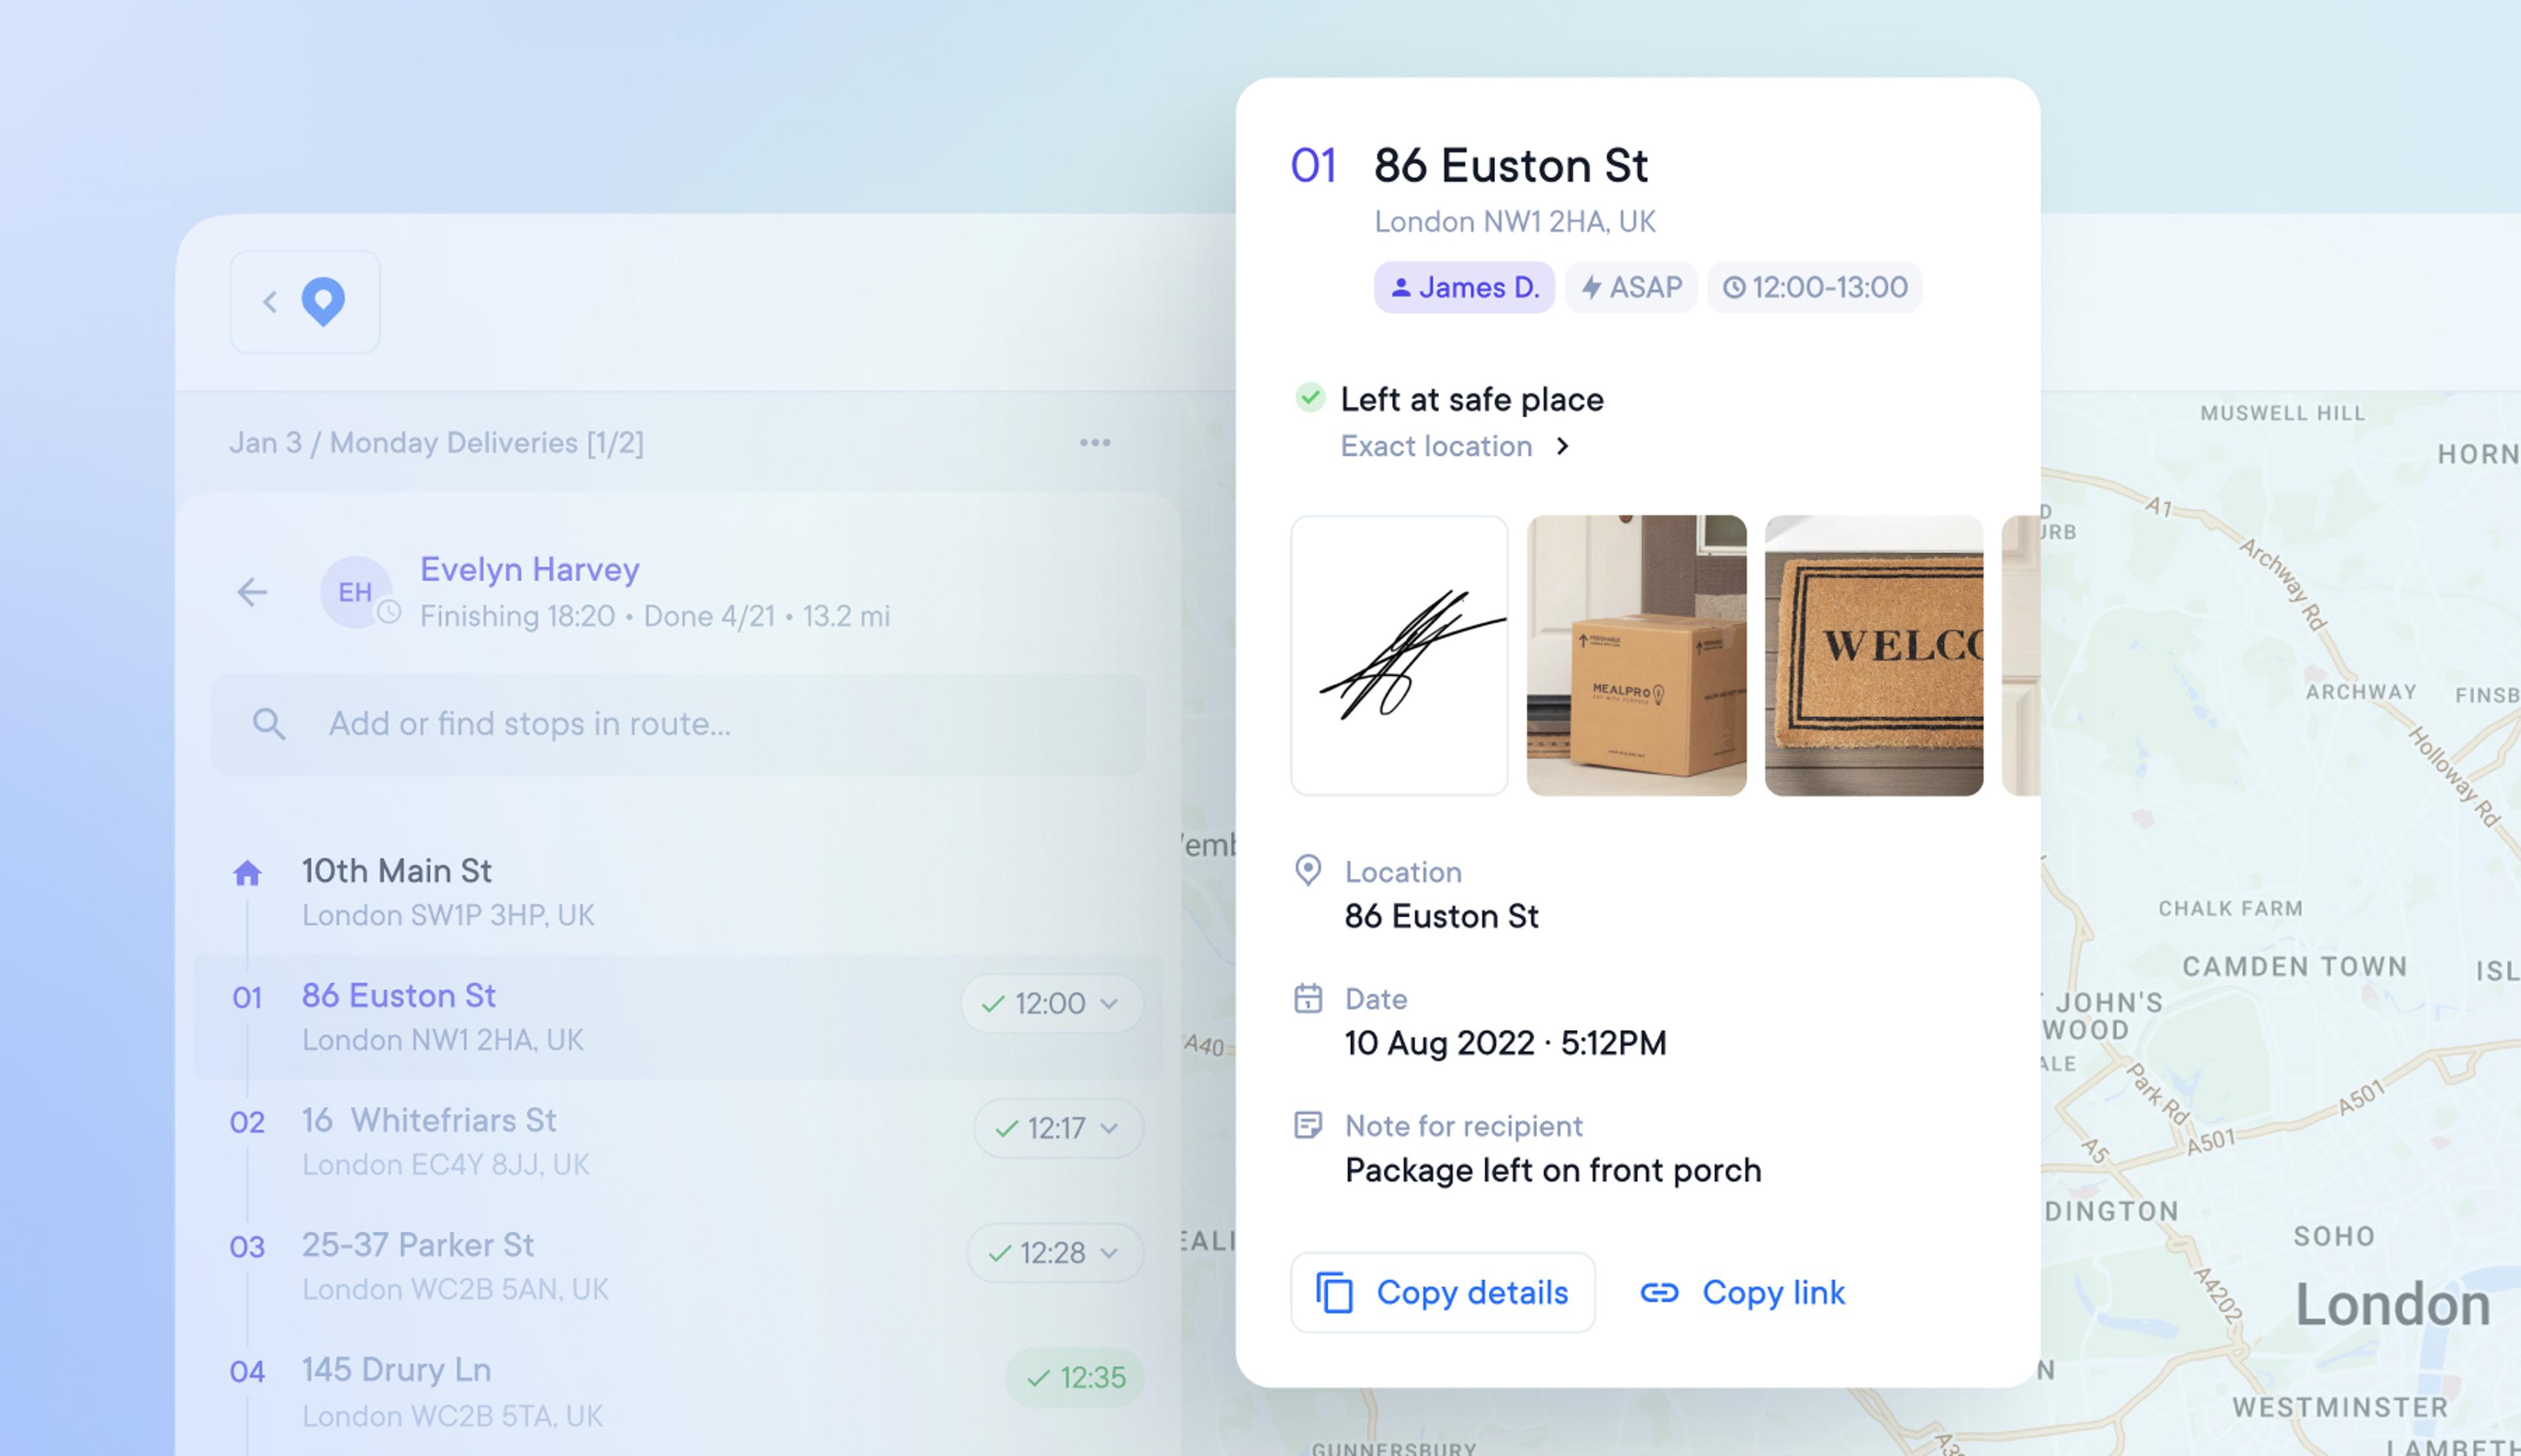
Copy, view, and share proof of delivery information
When there is a problem with a delivery, dispatchers and admins often have to find proof of delivery and forward that to the concerned client or customer.
You can now easily find and copy all the POD information from a specific stop in one click.
How to copy and share POD info
- Click on the stop
- Below the POD info click the Copy details button
- This will copy all the POD info for that stop to your clipboard
- Paste this info wherever you need to transfer it
View the POD info your recipient sees
- Click on the stop
- Below the POD info click the Copy link button
- This will copy a link to your clipboard
- Open this link in your browser
- This link will display the same information the recipient sees when they click their tracking link