Product updates
What’s new in Circuit Route Planner
Attach useful information to stops by adding access instructions
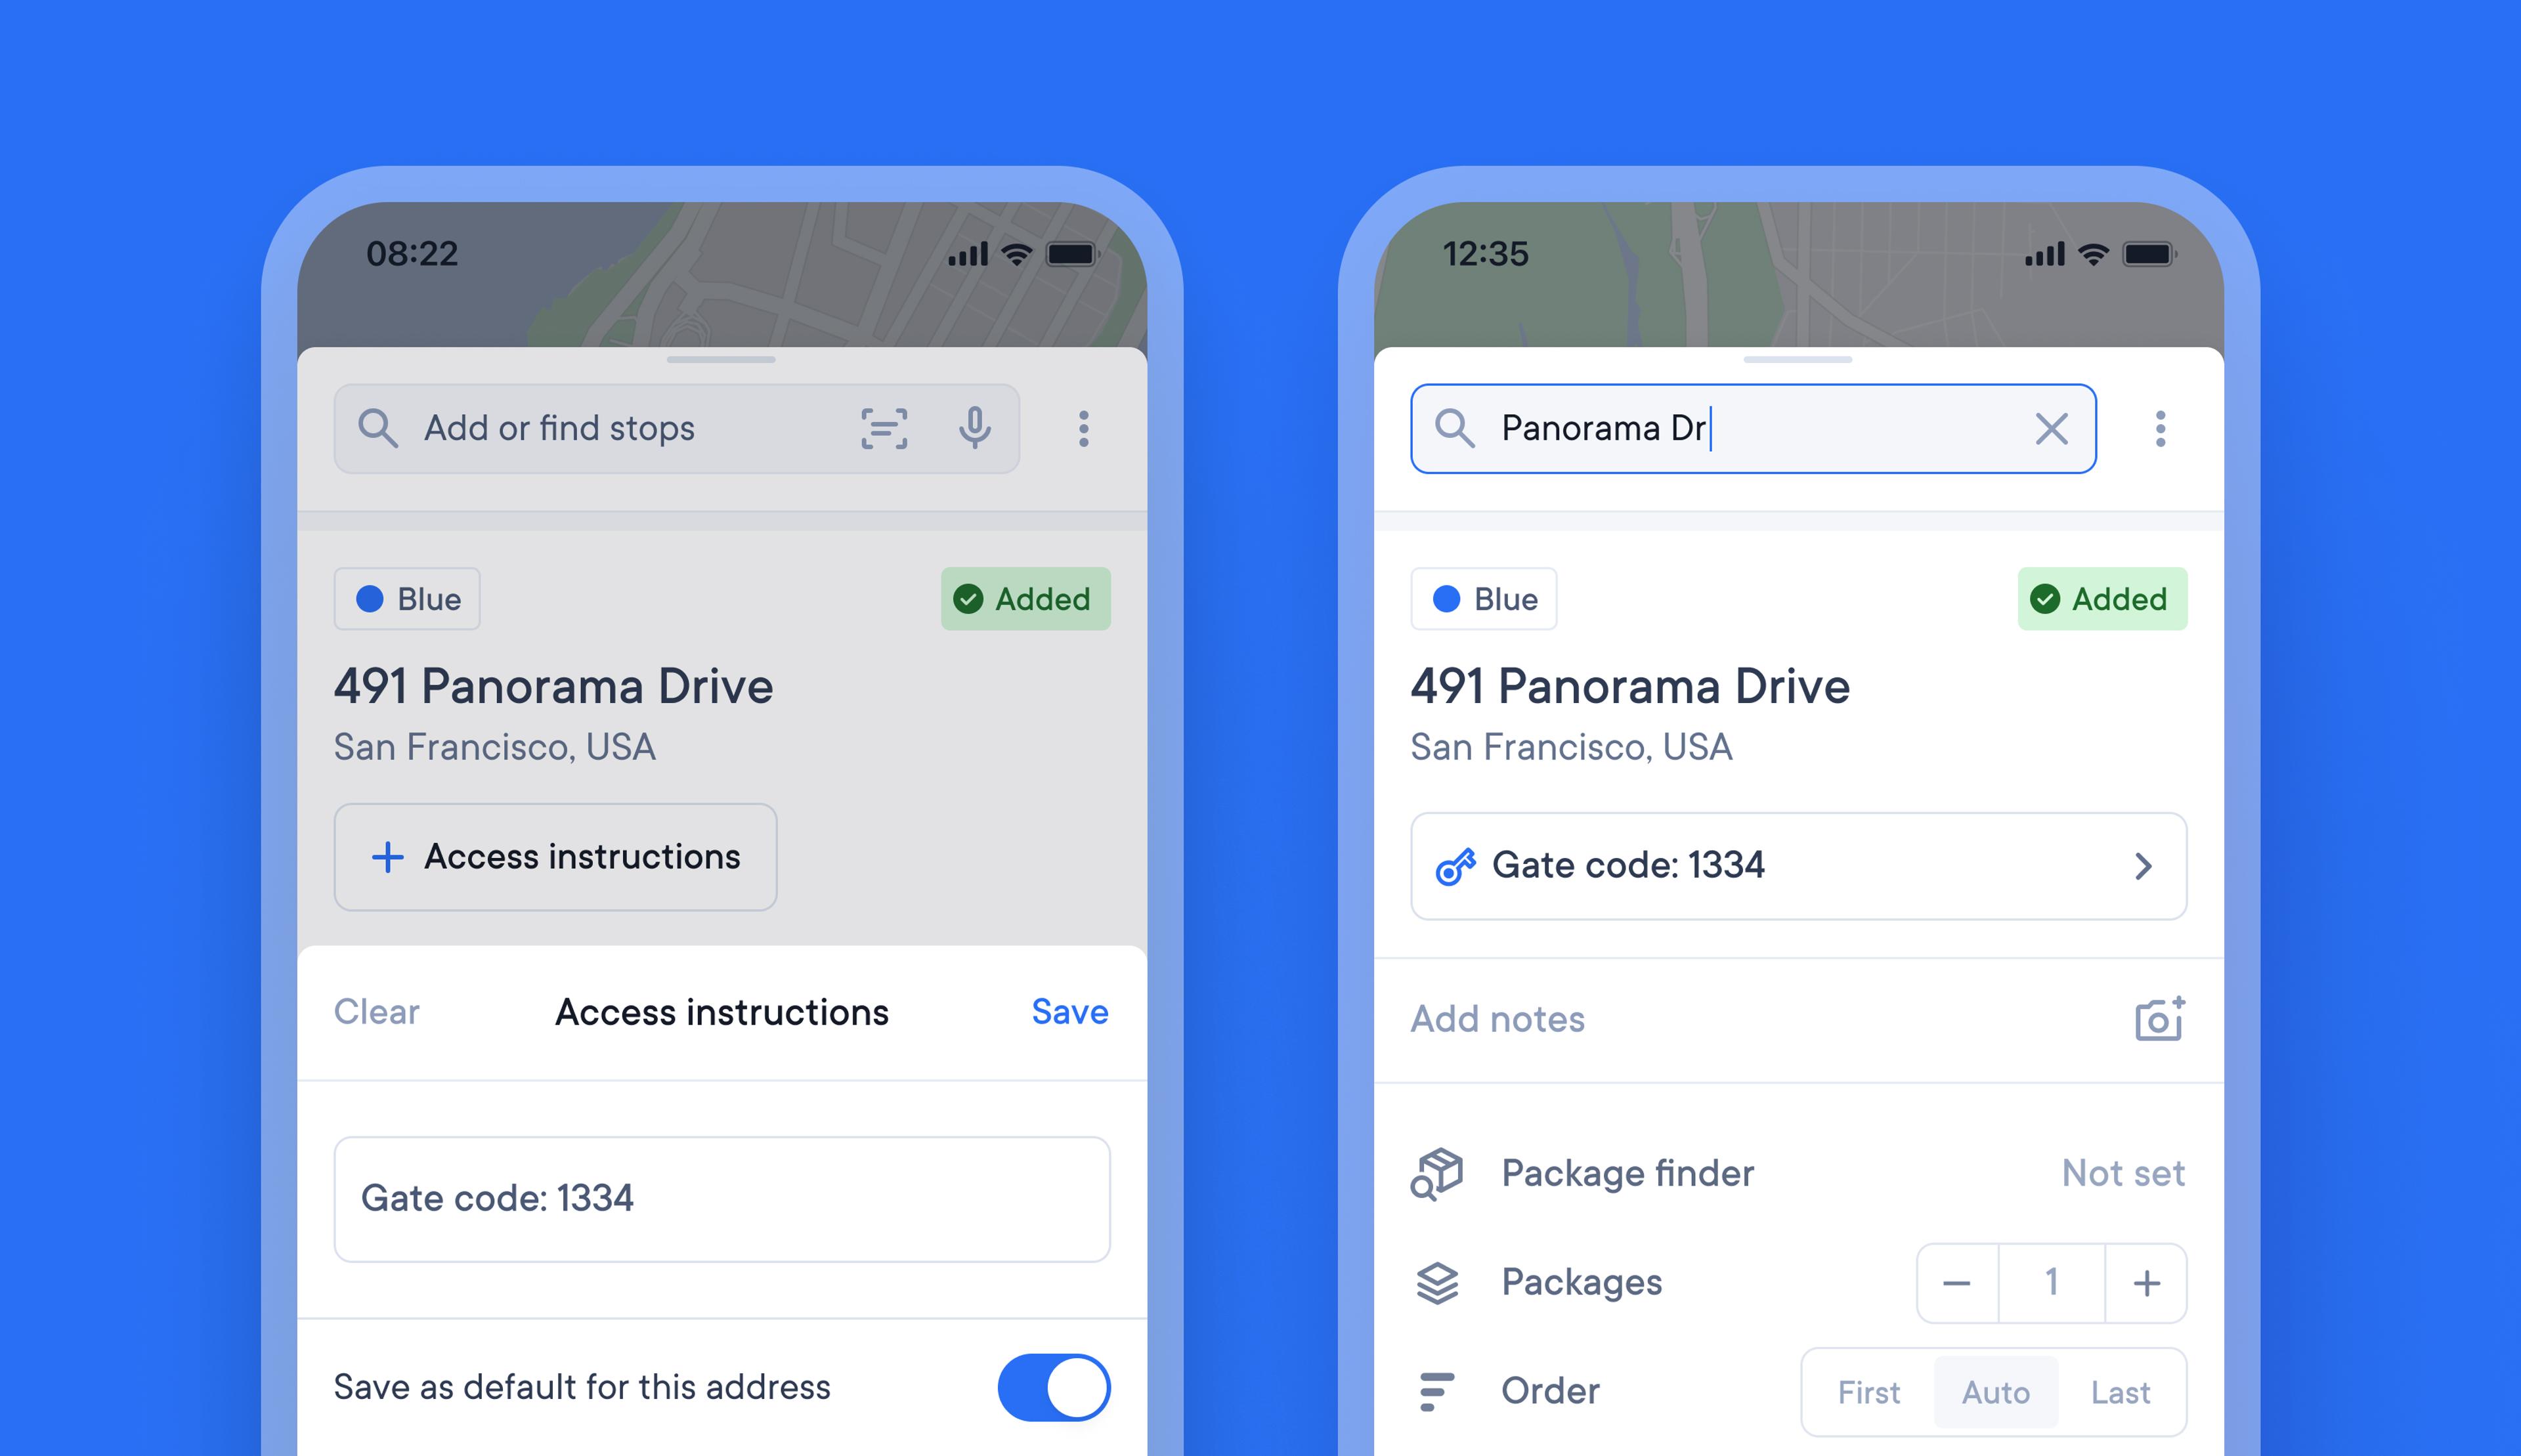
Drivers often need to remember specific access instructions for certain stops on their route. Keeping all this additional knowledge on paper, in their memory, or on their phone can be messy and time-consuming.
It’s now possible to attach access instructions to a stop, and once added they will be visible every time that stop is included in a route. Simply edit or clear access instructions whenever you need to update or delete them.
How to add access instructions to a stop:
- On a stop tap > Access instructions
- Add access instructions in the text box
- Select 'save as default for this address' for this info to be included every time that stop is added to a route
- Edit or delete access instructions at any time
Choose between high-detail and simplified map views to improve navigation
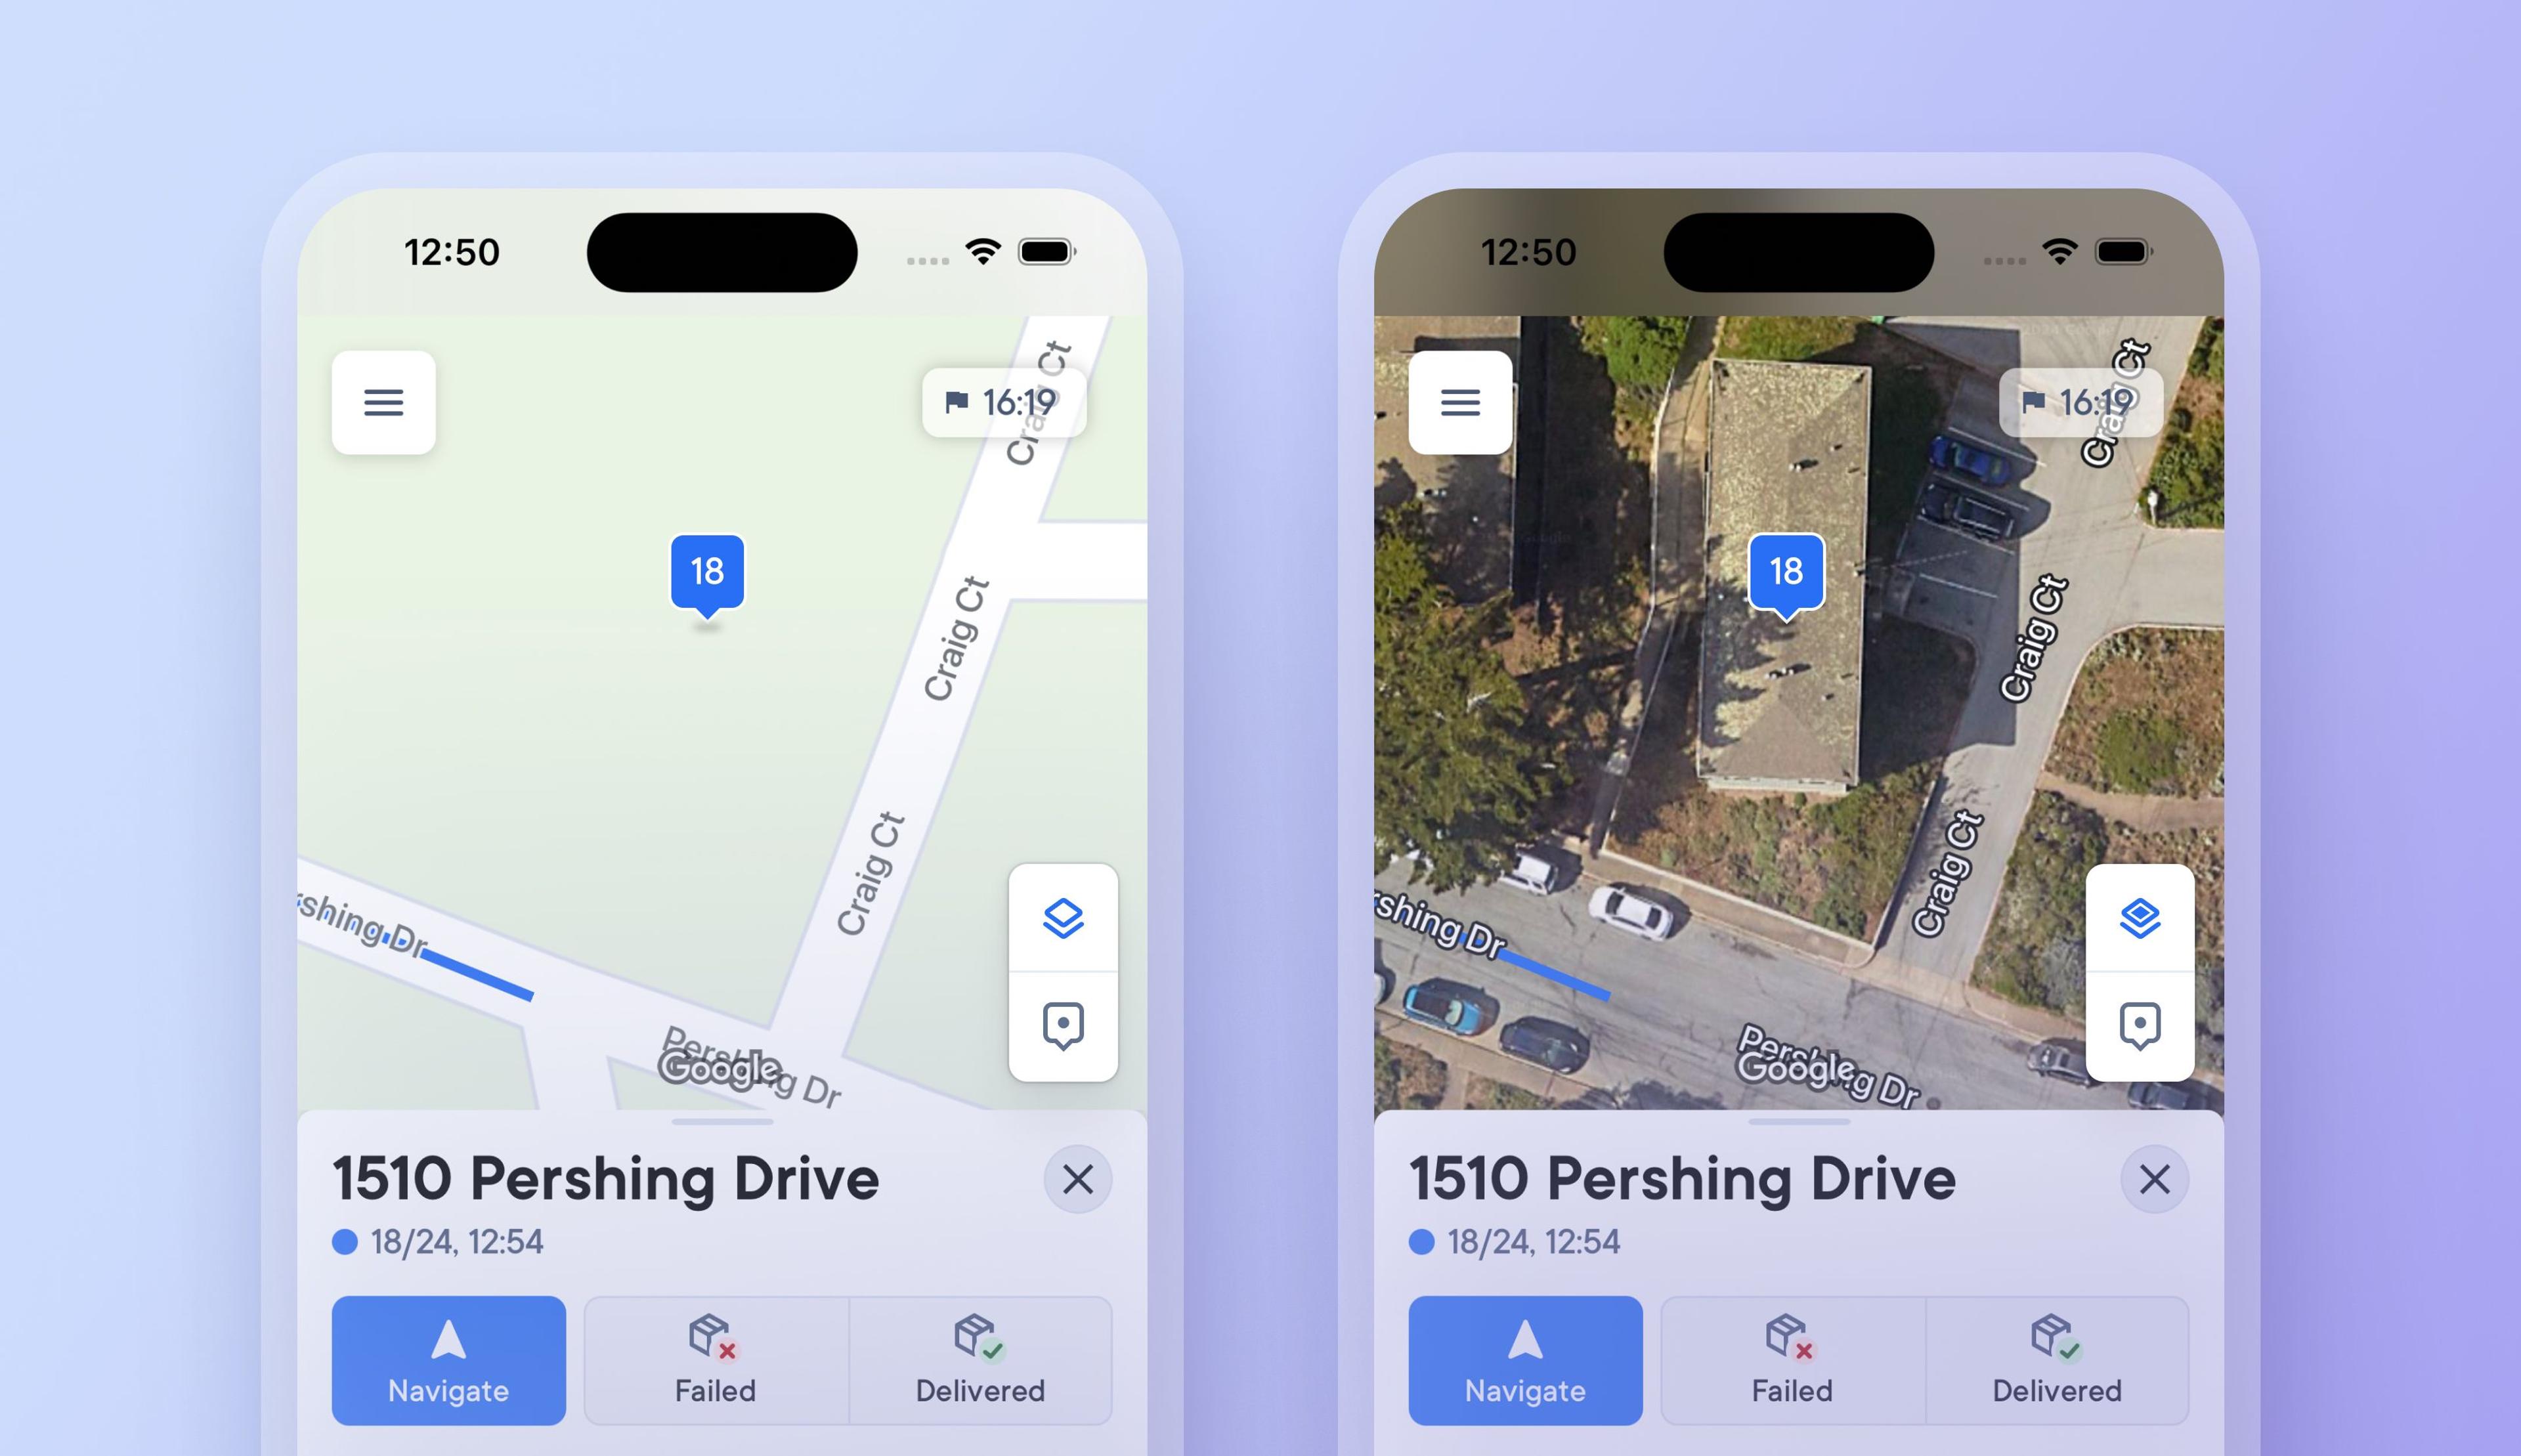
Previously, drivers had to select and set a map view type, which could only be changed in app settings.
Now, you can tap a button on the map to switch between a detailed satellite map view and a simplified route view, making it easier to see more or less detail when needed.
Changing to a satellite map view when approaching a stop provides additional visual context, and you can instantly switch back to a simplified view when navigating longer distances between stops where photographic imagery is not required.
Color code stops to make them more visible
On busy routes with many similar deliveries, it can be tricky for drivers to remember when certain stops have special conditions attached to them.
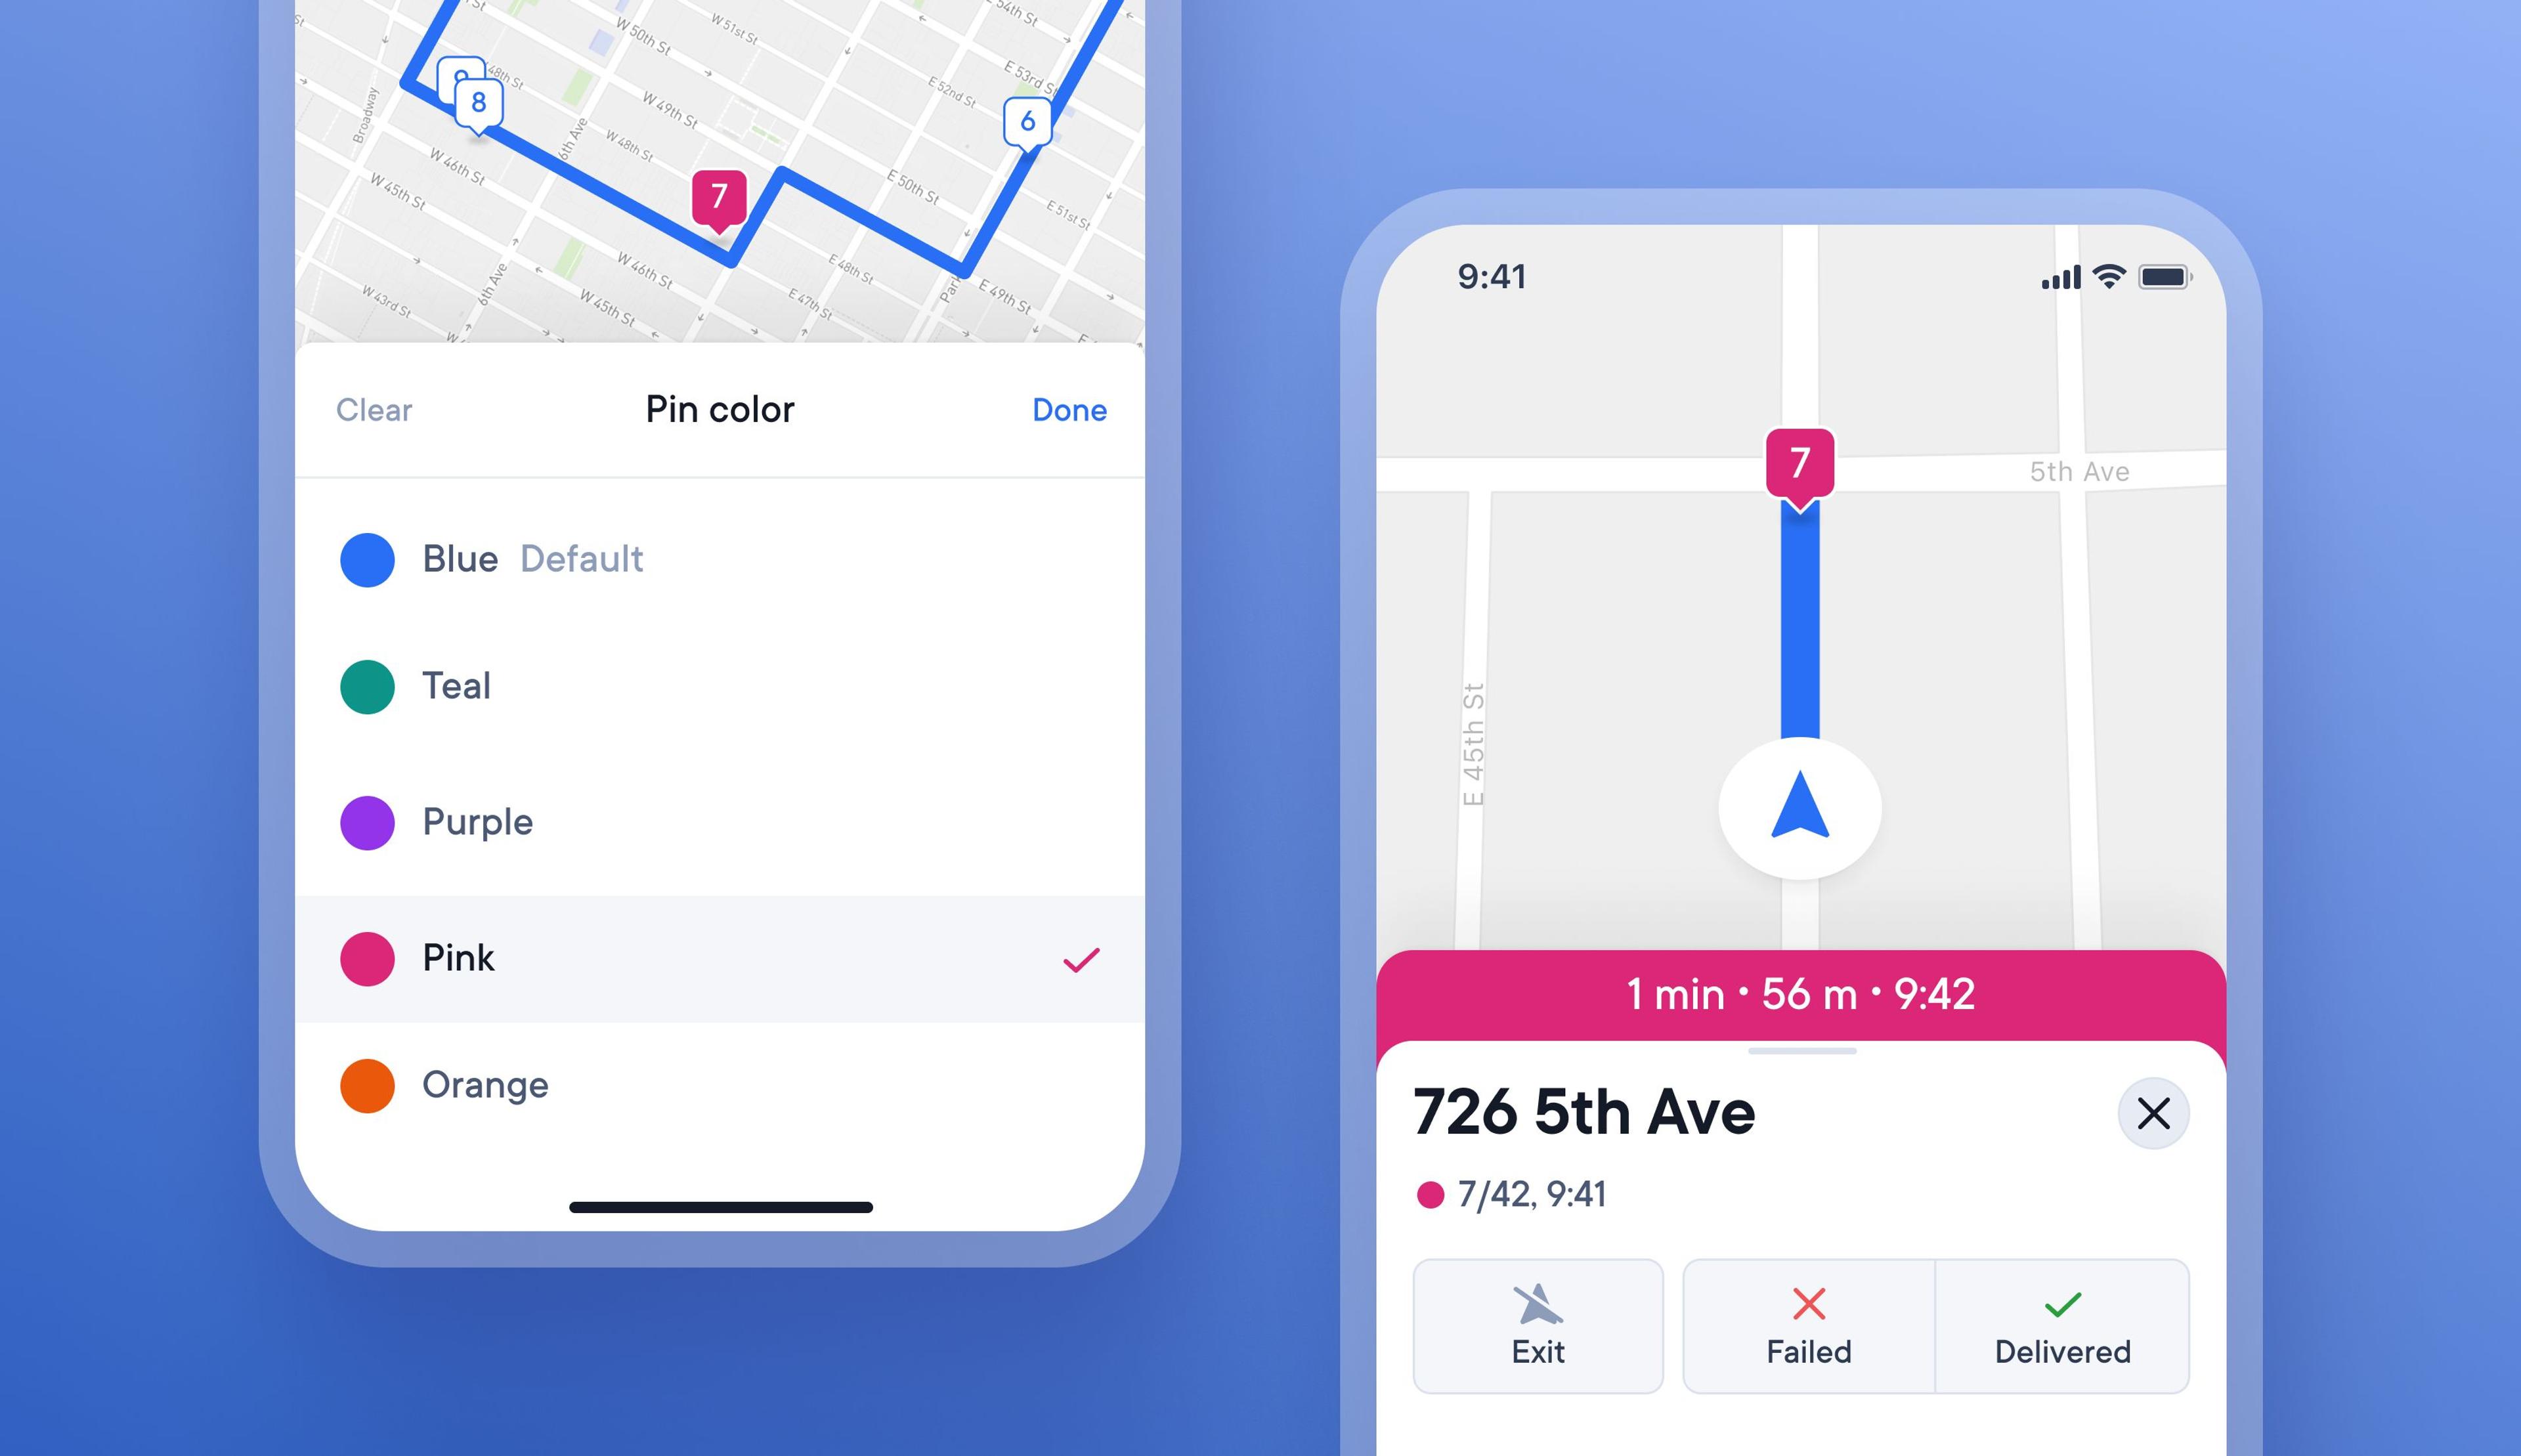
Now, drivers can color-code stops with specific requirements to highlight them better on a route.
There are four different colors to choose from, and when a stop is color coded, the pin on the map and progress bar change color.
How to color code a stop
- Tap on a stop to edit it
- Tap the default blue color icon in the top left
- Select a different color from the list for that stop
The color coded stop will now show as the chosen color on the map, and the progress bar will update to this color when approaching the stop
Manually select the order of stops
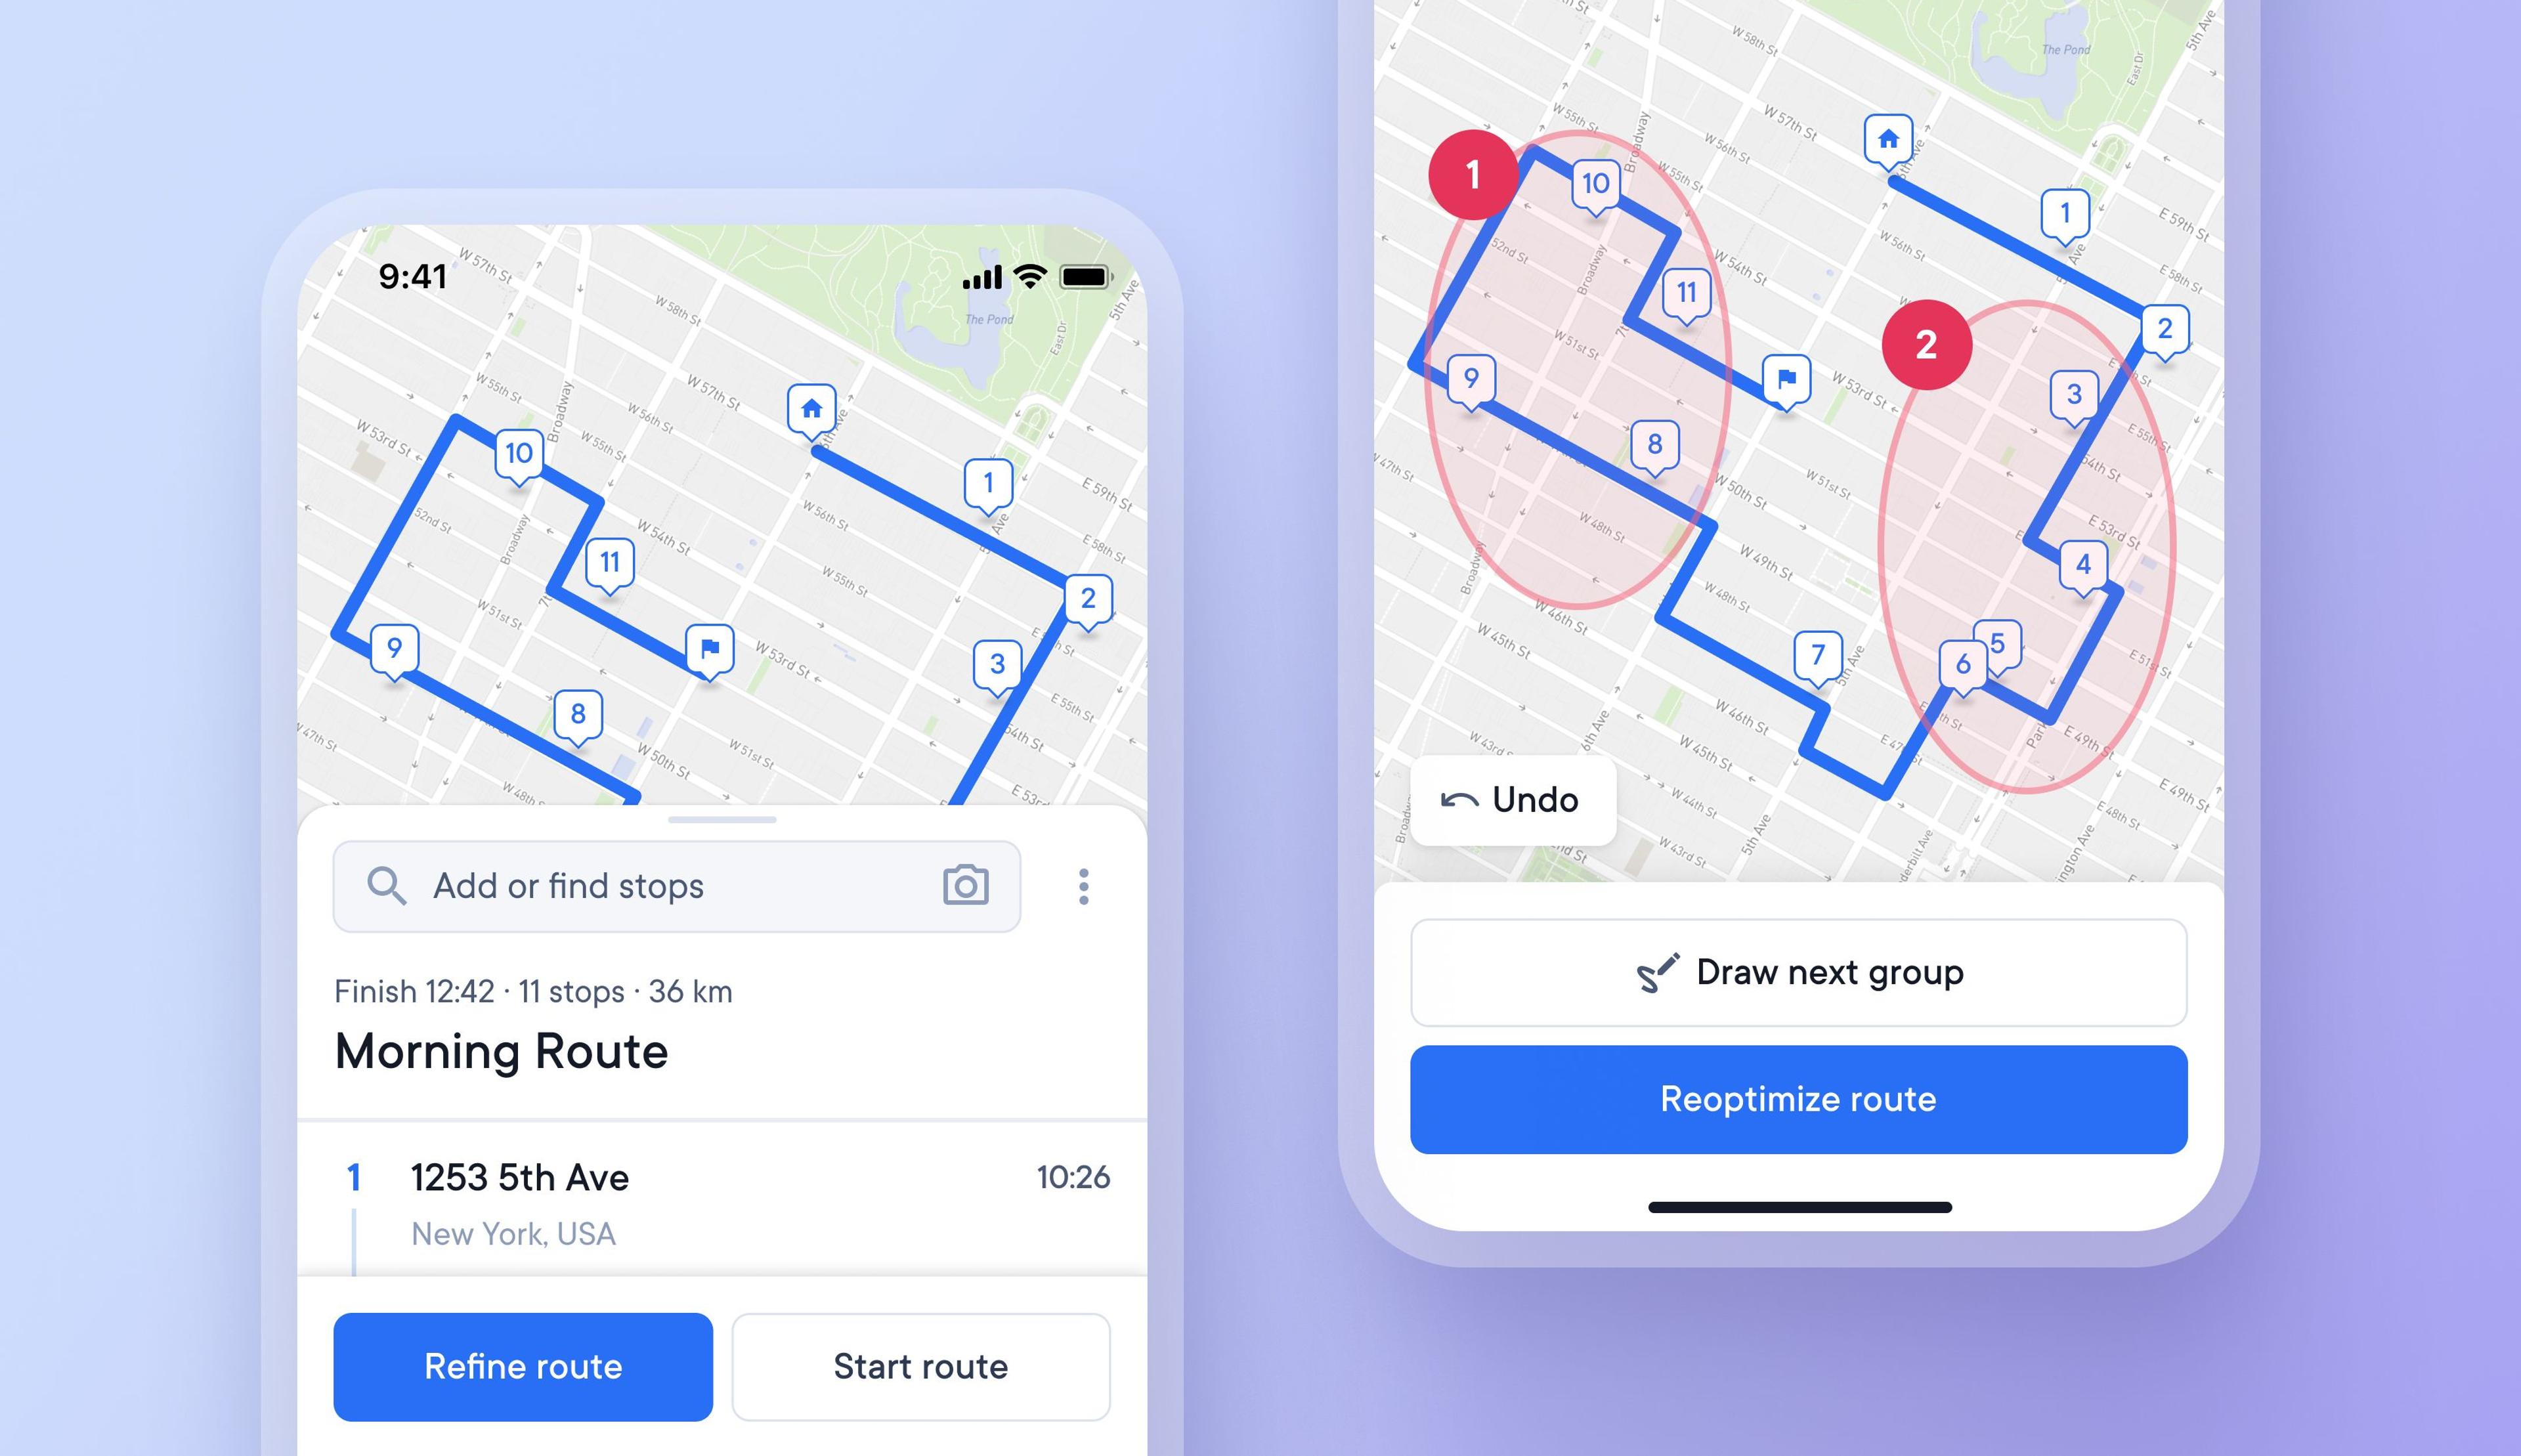
Drivers can now customize their route based on individual needs, and local knowledge by manually selecting the order in which stops are attempted.
This helps drivers create more finely tuned routes, and quickly and easily make changes to stops as and when needed.
How to create manually ordered routes
- Add stops and tap > Optimize route
- Tap Refine > Manually order route
- Draw a circle around the group of stops you wish to attempt at first
- Draw as many groups of stops as you like, in the order you want to attempt them
- When finished manually ordering tap > Reoptimize route
- Tap > Confirm route to start your route
Add a photo of packages for faster identification
Finding one particular item in a delivery vehicle full of similar looking brown packages can be confusing at times.
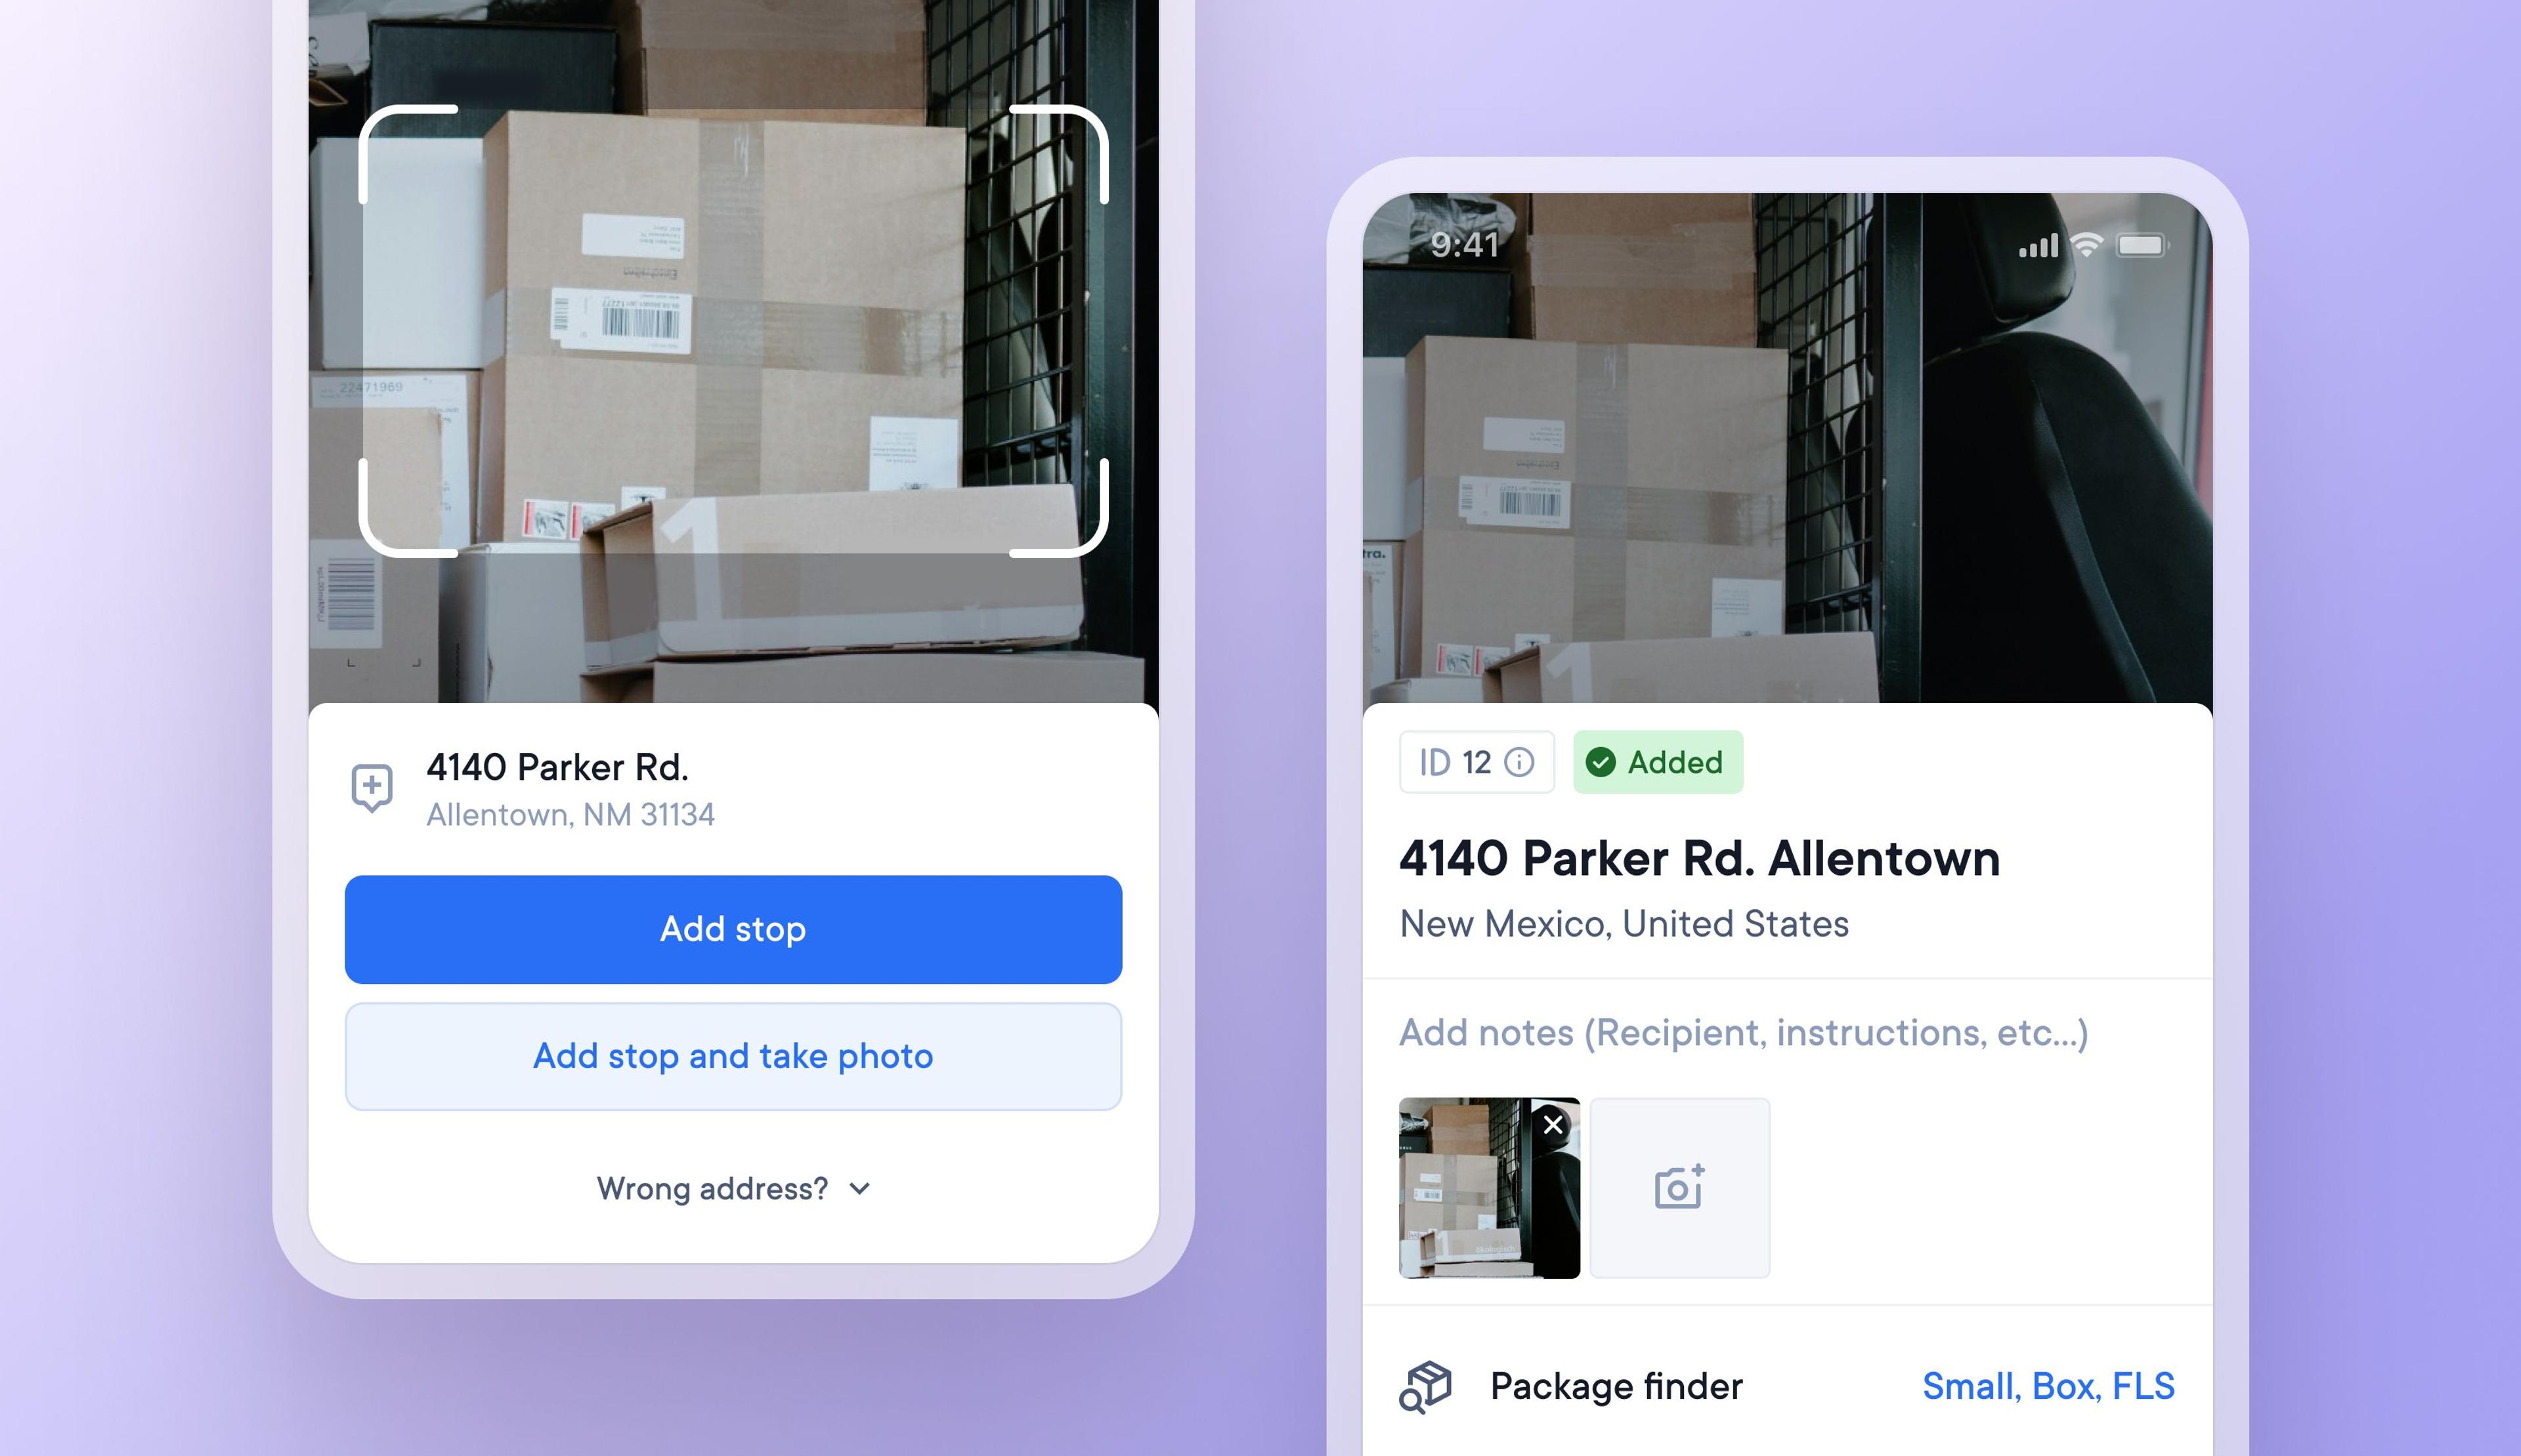
Now drivers can choose to take a photo of a package as they add that delivery address to their route. Upon arrival at the stop, the driver can view the package photo again to remind themselves what the package looks like.
How to add a stop and take a photo of a package
- Go to add a stop > Select 'add stop and take photo'
- After the stop is added, the camera will automatically go to photo mode
- Take a photo of the package
- This photo is added to the stop details
- Tap the camera icon on the stop details to view the photo
Maximize phone screen space with Live Activities and the iOS Dynamic Island
Often, delivery drivers need to repeatedly switch between their delivery app and other functions on their phones. Switching between multiple apps and tabs on a small phone screen whilst navigating a delivery route can be challenging.
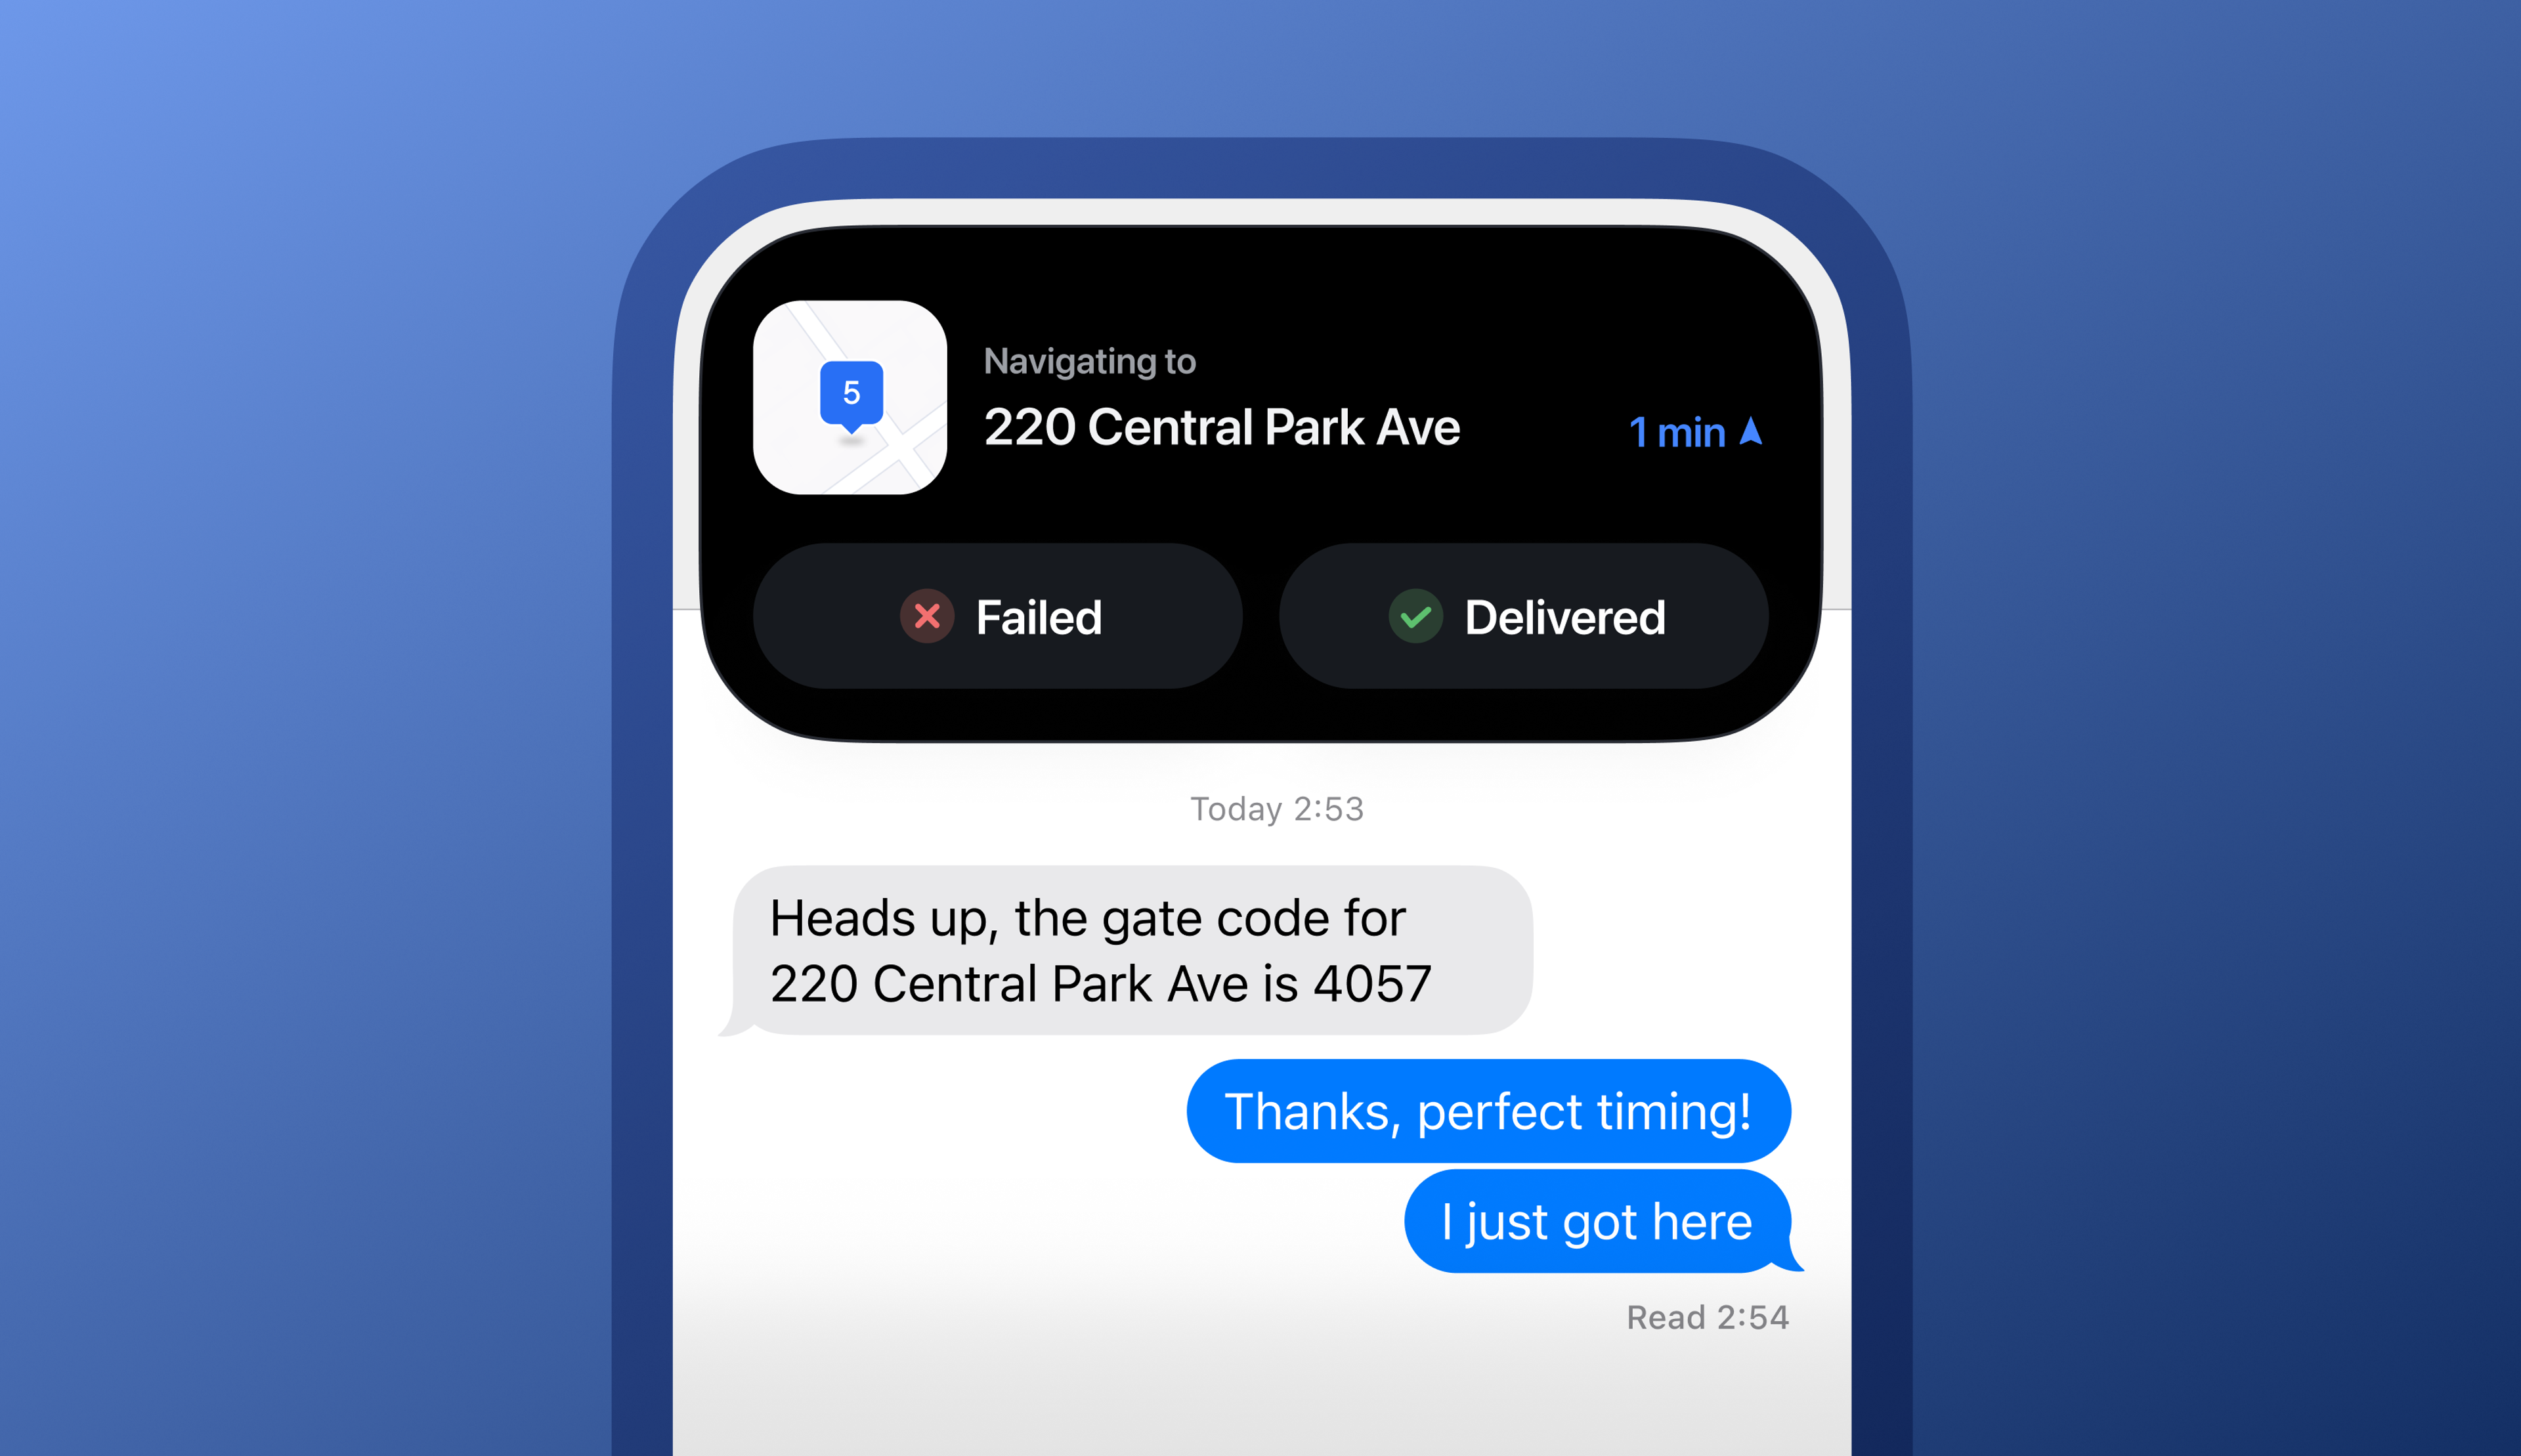
iOS users can now use Circuit Route Planner in a condensed view as a Live Activity on the iOS Dynamic Island to help maximize the use of limited phone screen space.
How to use Circuit Route Planner on the Dynamic Island:
- Open your iOS device settings to enable Live Activities
- Go to Settings > Face ID & Passcode and enter your passcode
- Set Live Activities to > On
- Open Circuit Route Planner > start a route
- Minimize the app to go to Dynamic Island view
- Long press the Dynamic Island to expand it
- Route progress is displayed as it happens
- Complete actions eg update a stop status, take a break etc
- Tap anywhere on the Dynamic Island to return to the full-screen app view
Scan and add addresses on Android devices
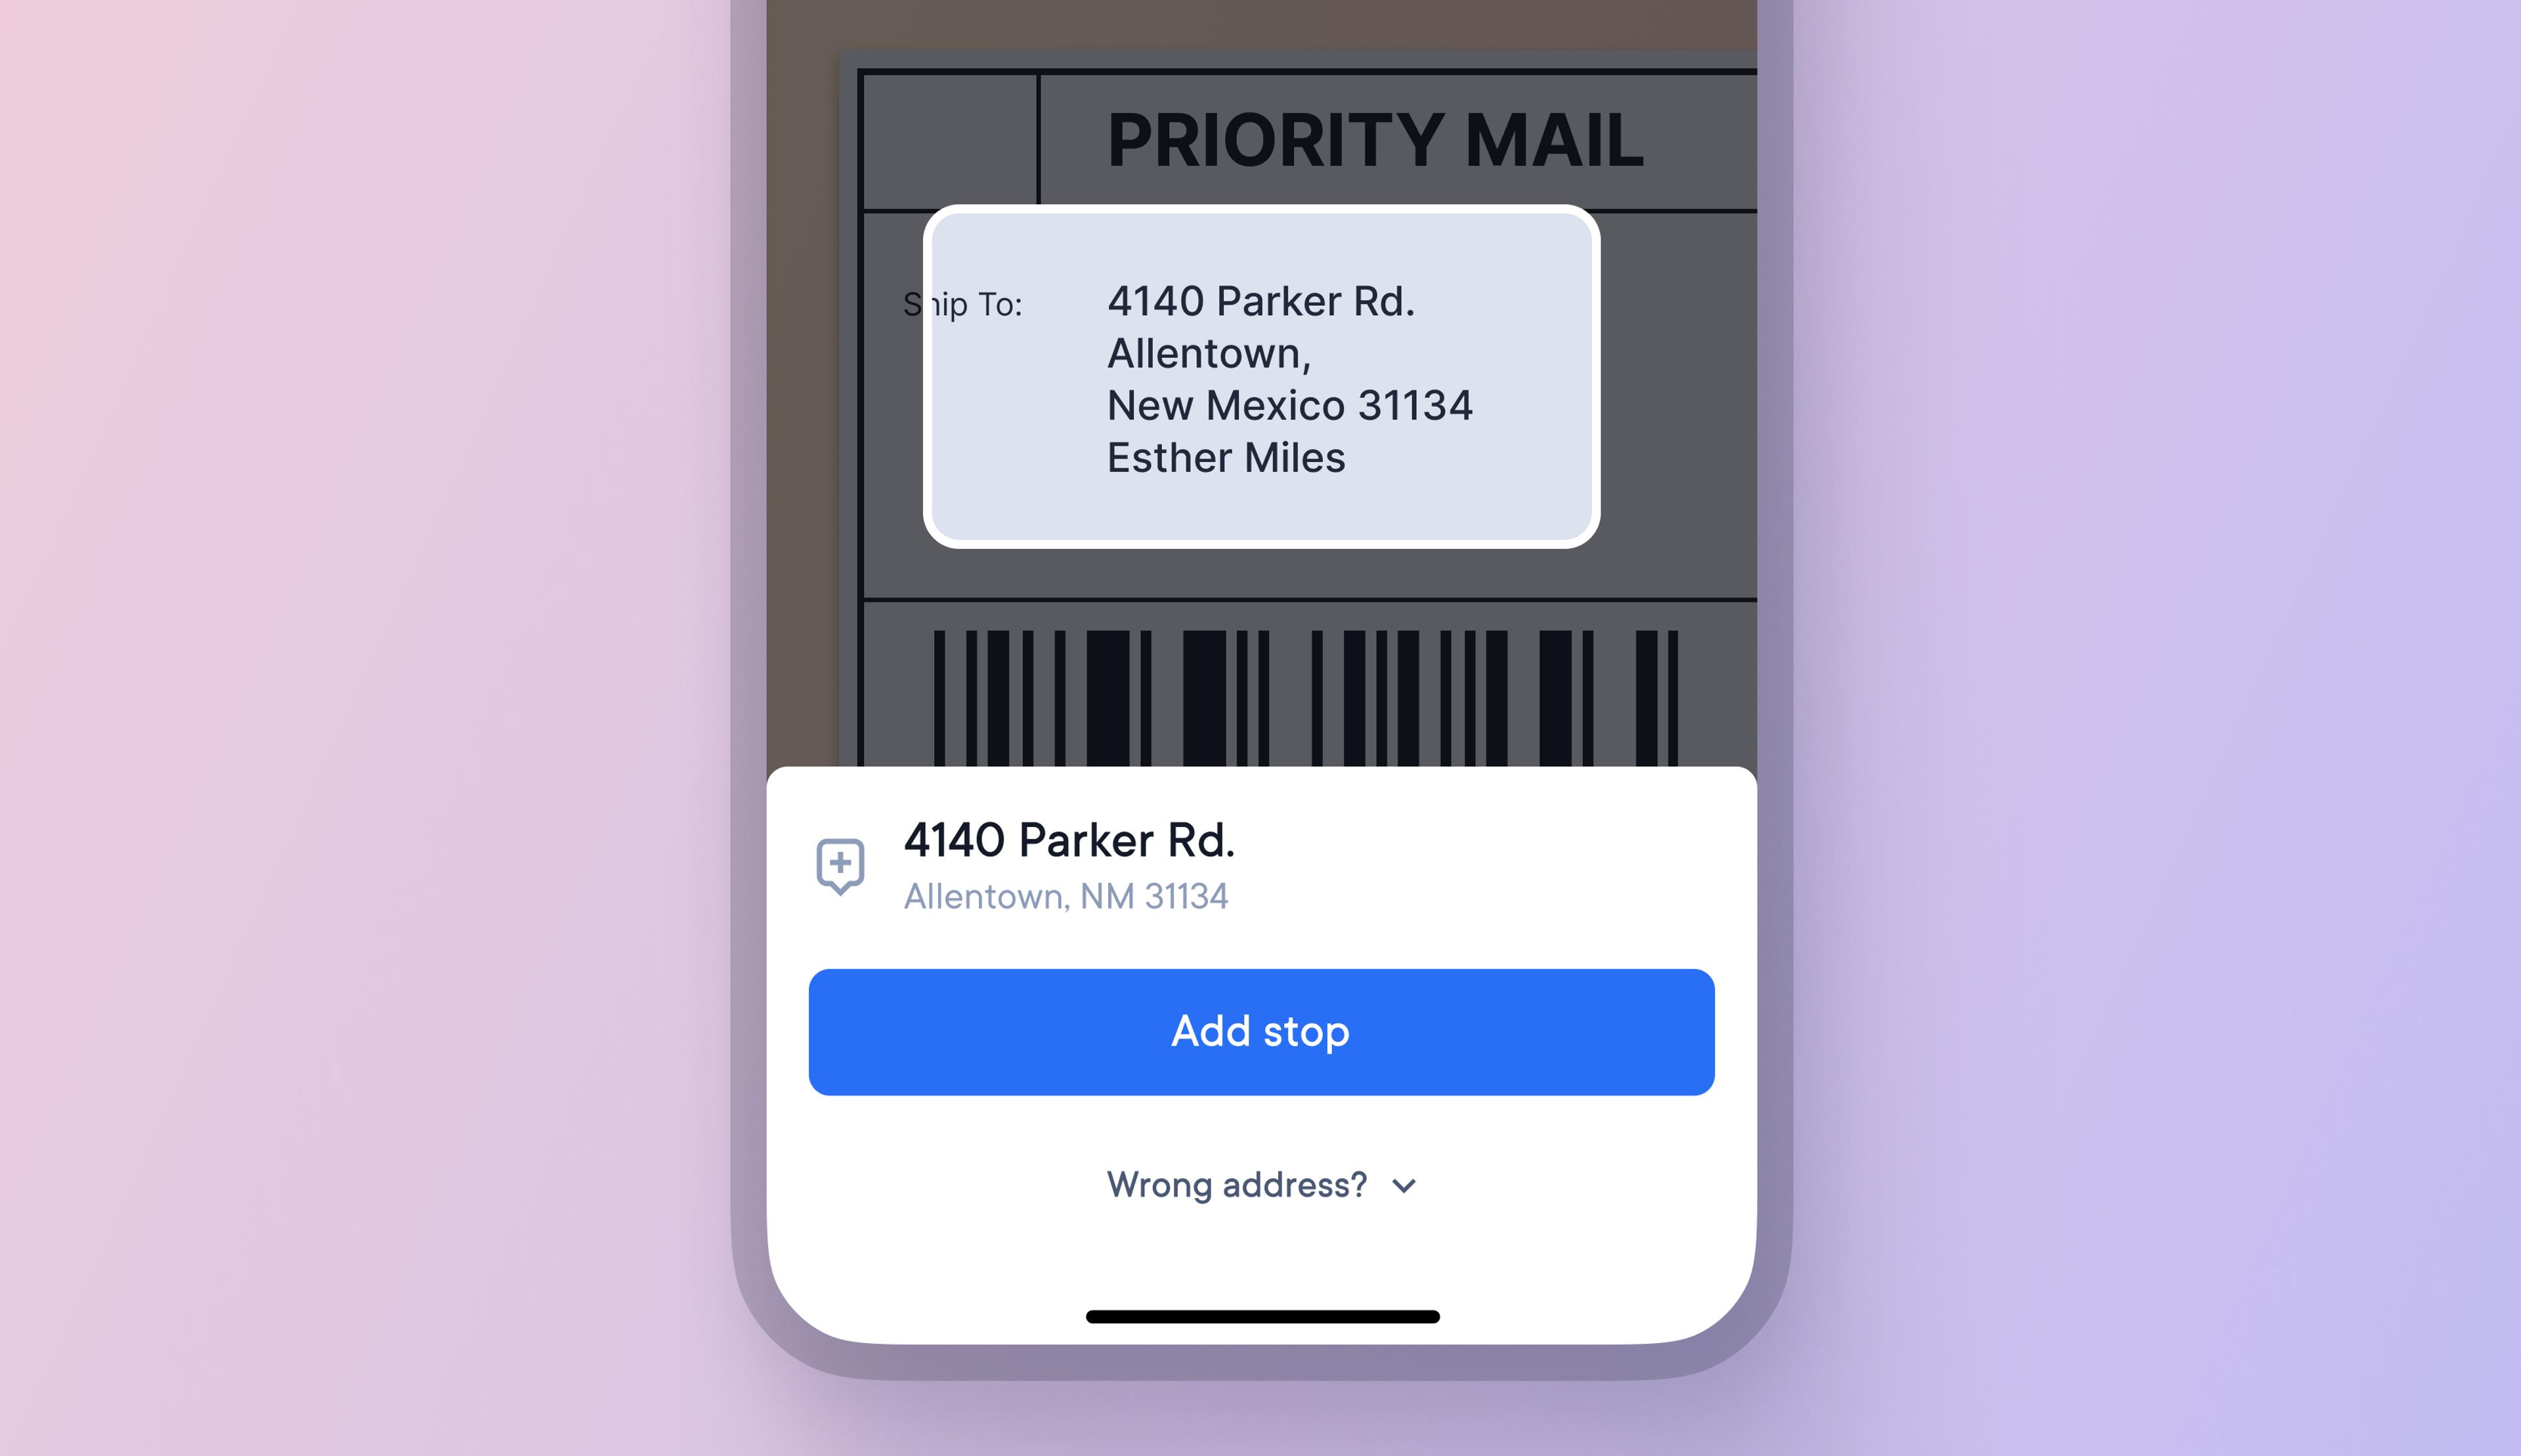
Android users can now scan address labels with their smartphone's camera and add those addresses as stops to their routes.
Camera scanning helps to accelerate route creation and vehicle loading, helping drivers save time.
How to scan and add addresses:
- Add stops
- Tap the square viewfinder icon
- Select the correct language from the drop-down menu
- Line the address label up inside the viewfinder box
- An address result will appear
- Tap > add stop to add that stop to your route
- Tap > scan next to scan your next address label
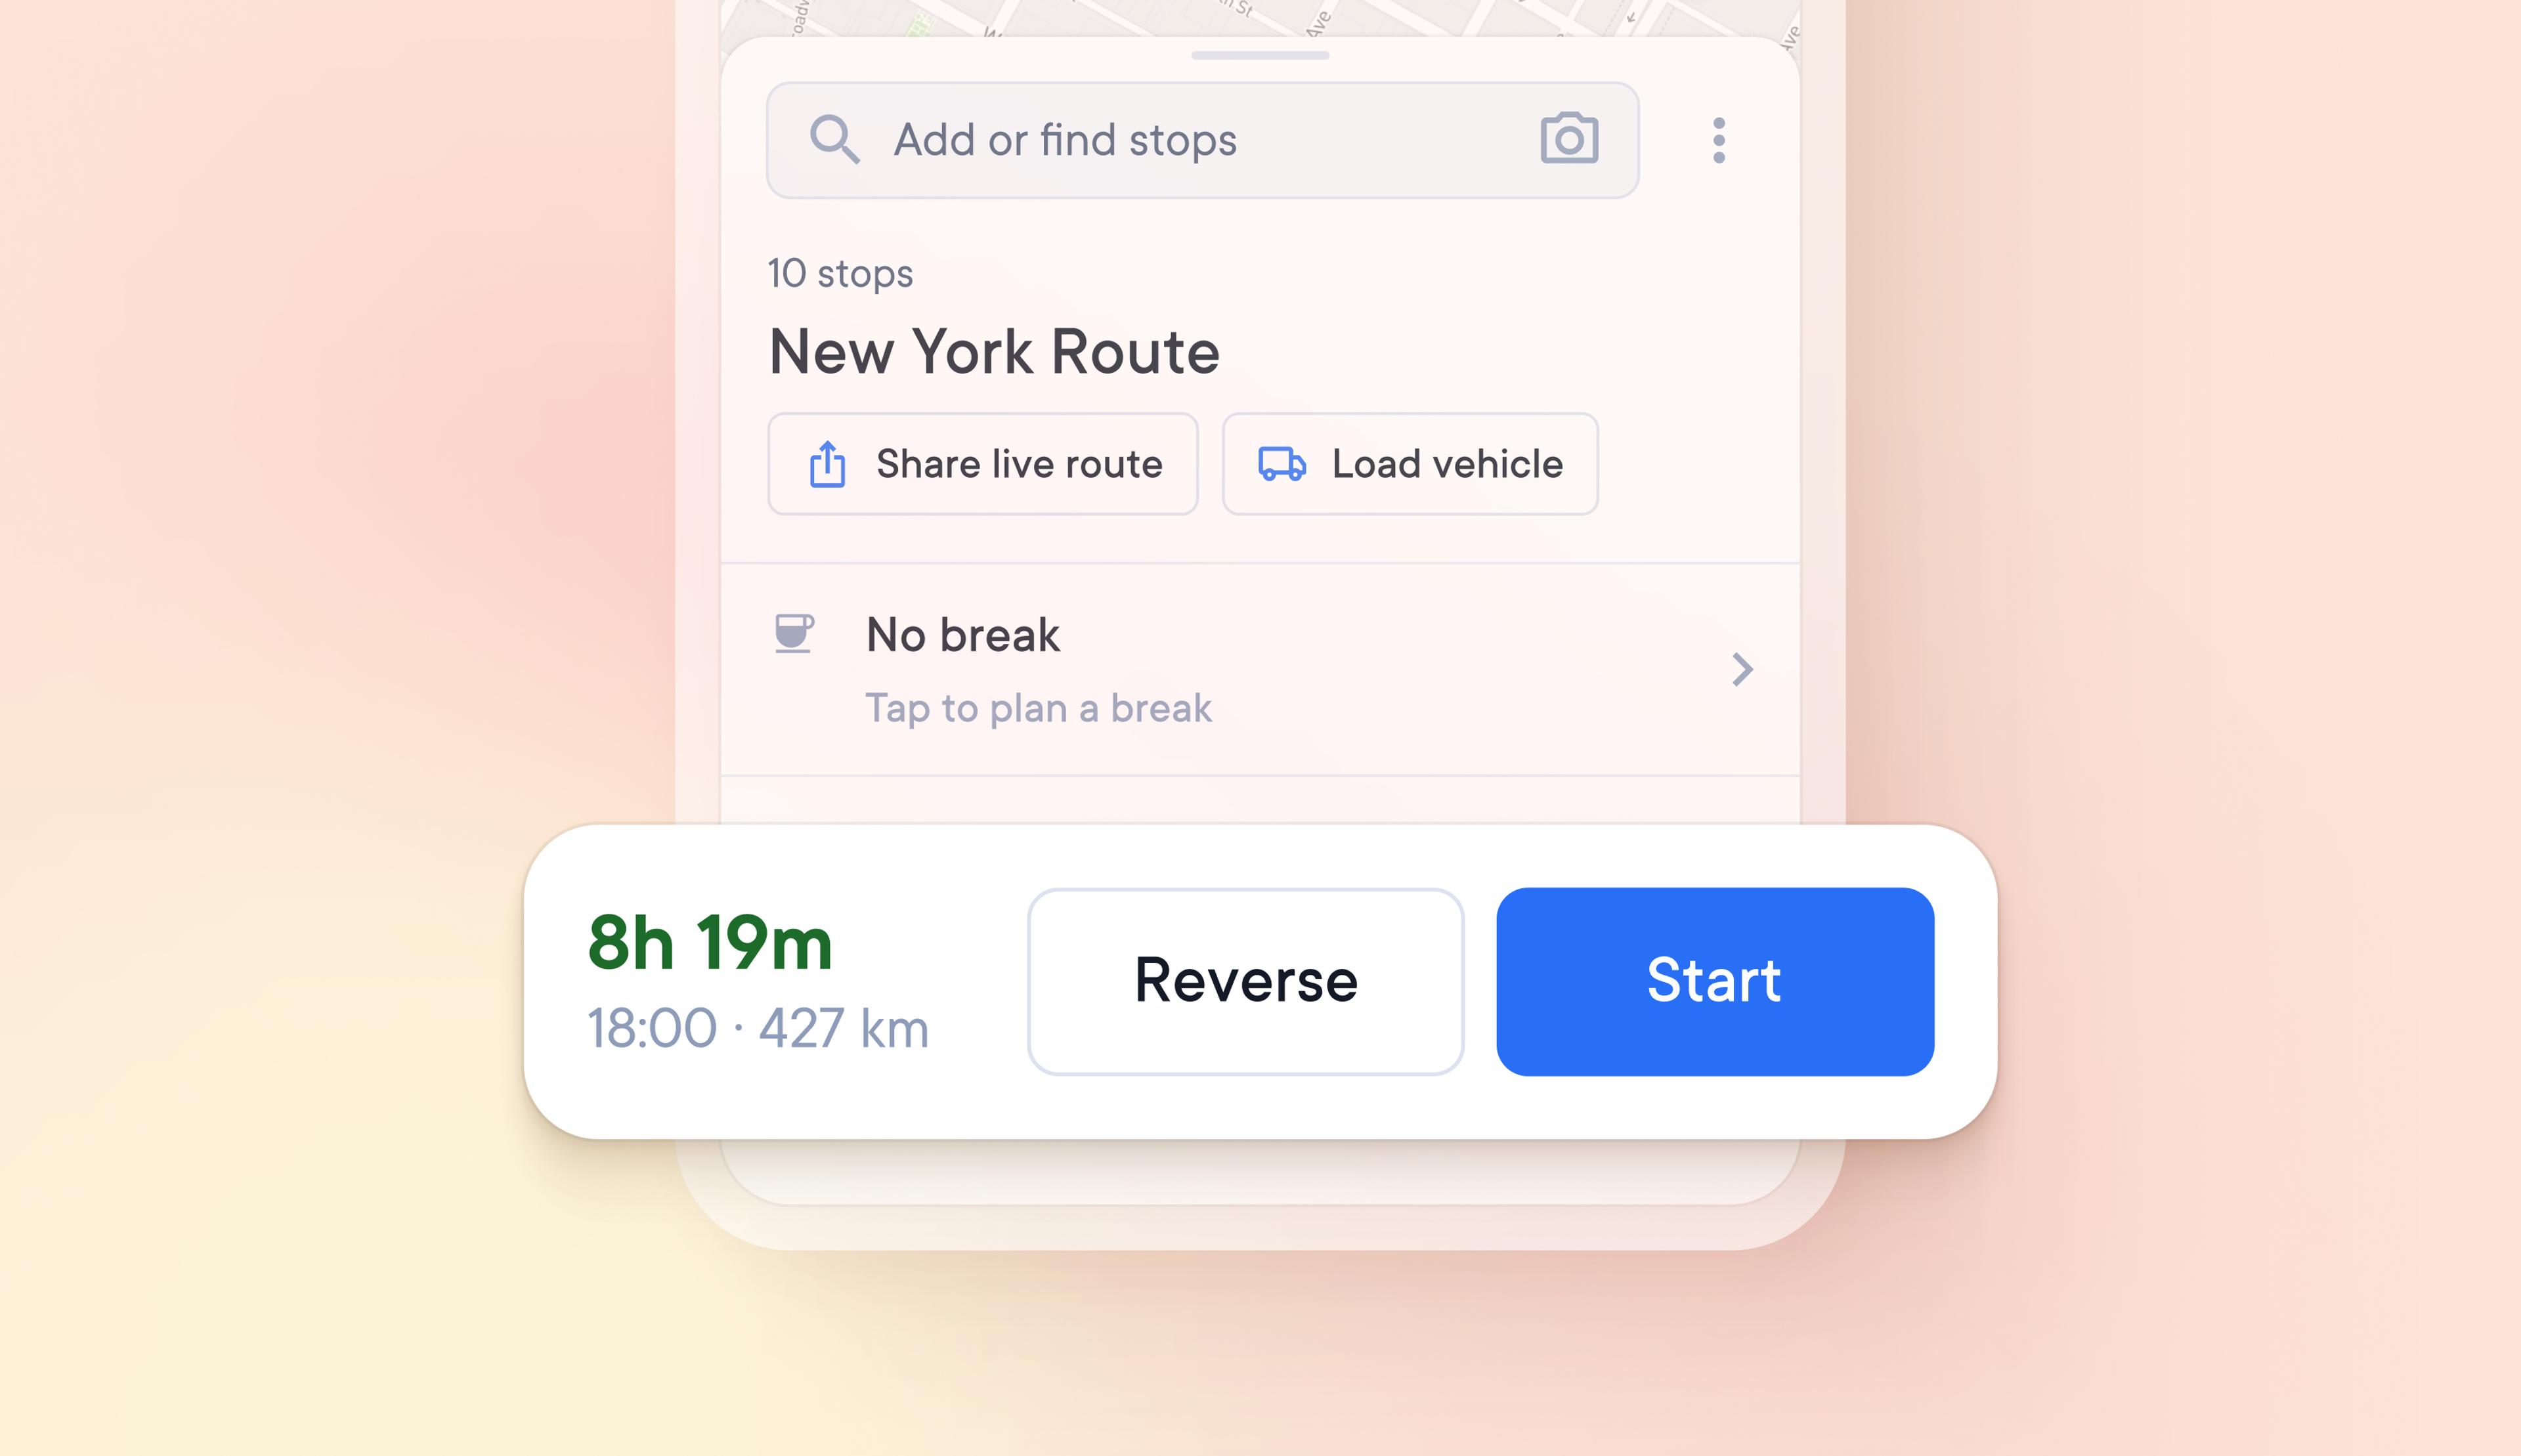
Reverse the order of stops on a route
Rather than having to select individual stops to be placed first or last, drivers can now reverse the order of all stops on their route in one click.
This is the first in a series of features that will offer more route customization options.
How to reverse the order of a route:
- Create and optimize a route
- The option to Reverse or Start your route will appear
- Tap Reverse, and the order of all stops will be reversed
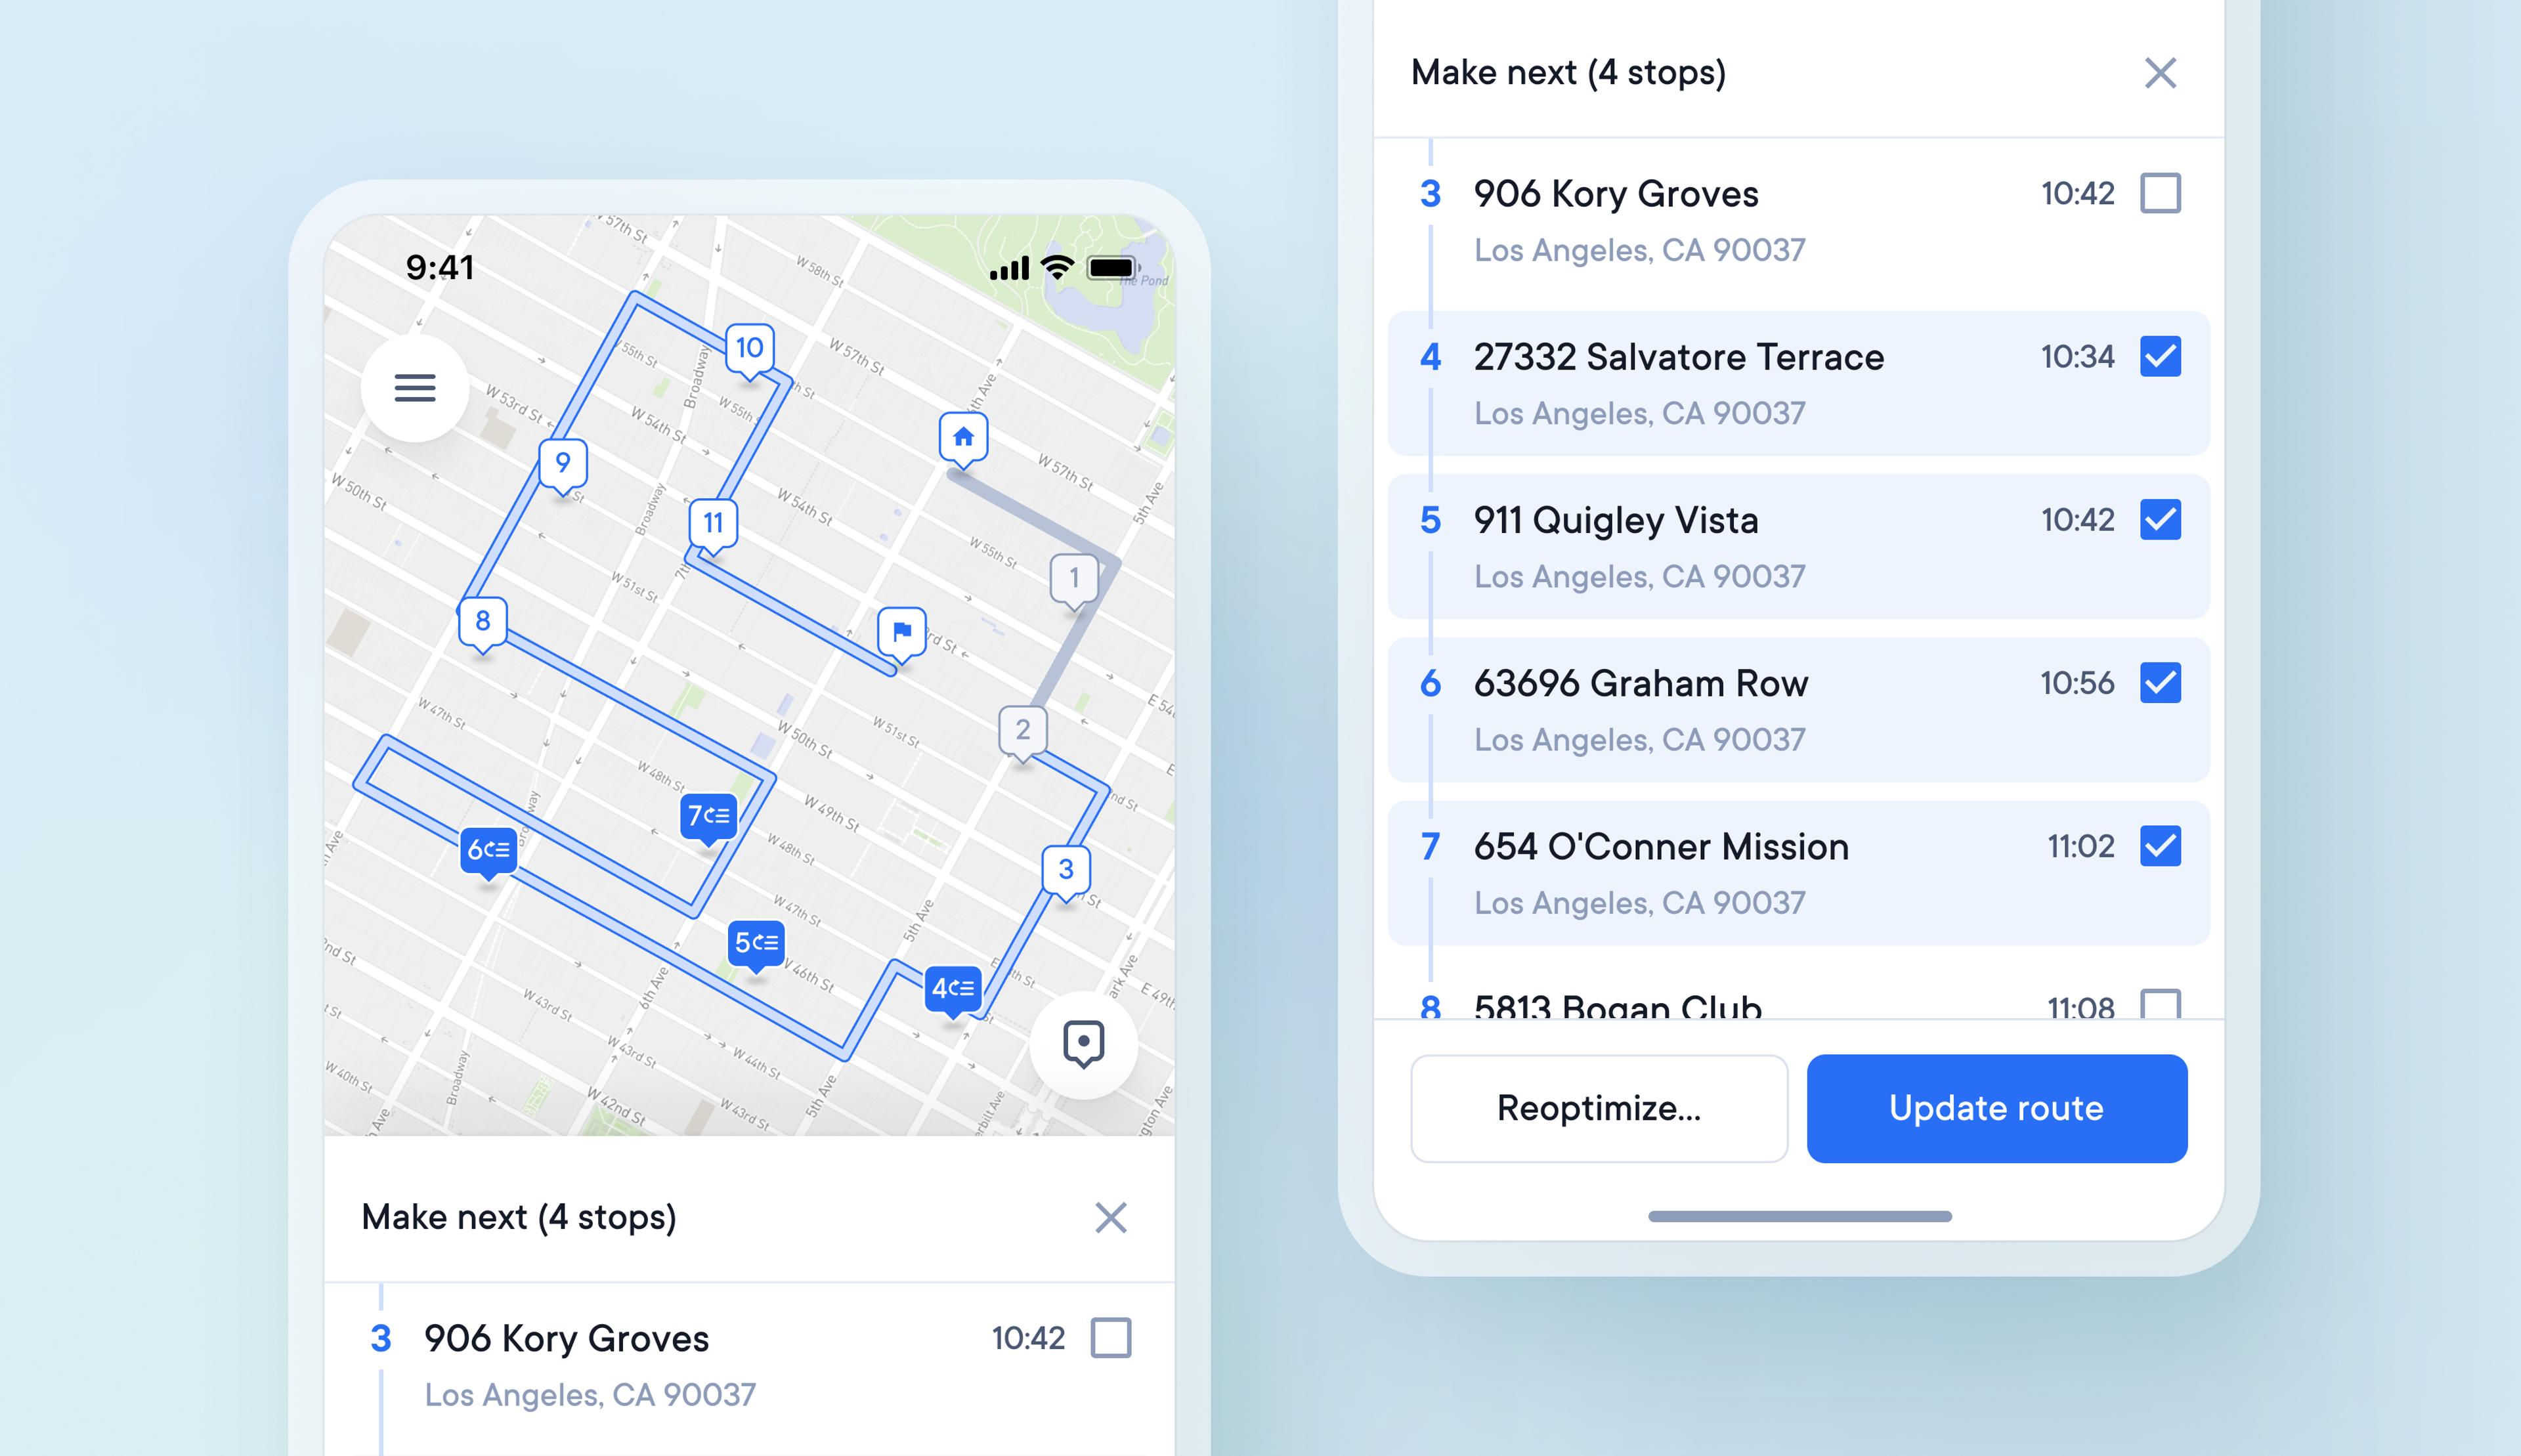
Change the order of a live route by making selected deliveries the next stop
Before, drivers had to use time windows or first and last stop settings to place selected stops at chosen points along a route. Now, drivers can also select multiple stops on their route to make next and choose to slot these changes into their existing route or completely reoptimize it.
How to make selected stops next on a live route:
- Select a stop
- Tap the option to ‘make next’
- You can mark multiple stops as 'make next'
- Stops marked as 'make next' will have a blue tick next to them in the stops list
- After selecting the stops to ‘make next’ you can reoptimize or update your route
- Reoptimizing calculates a route using every stop which can create a totally new route
- Updating a route simply slots any minor changes into your existing route
- Multiple stops marked as 'make next' are automatically put in the most efficient order
- Stops marked as ‘make next’ will take priority over stops marked as ‘first’
Improved description and location settings make it easier to find packages
Locating specific items in a packed vehicle can be difficult and waste valuable time.
A driver can now give specific packages a detailed description and assign a specific location in their vehicle to that package, making it easier to find.
How to add package details:
- Add a stop
- Tap on the Package finder section of the stop details
- Select small, medium, or large and box, bag, or letter
- Tap on the Place in vehicle section of the stops details
- Select front, middle, back, left, right, floor or shelf
Update your existing route when making minor changes
Previously making any change to an existing route required full re-optimization, which could completely change the order of all stops and the direction of the route.
It's now possible to make minor changes and slot them into an existing route.
How to make minor changes to an existing route:
- Make a change to an existing route
- Choose to reoptimize or update your route
- Reoptimizing may alter the order of all your stops
- Updating will slot the changes you have made into your existing route
Edit routes and skip re-optimization when offline
Previously, changing a route then required re-optimizing it, which is not possible without an internet connection.
Now whenever drivers are in an area without internet coverage, they can make changes to a route, skip the re-optimization stage and return to complete that stage once they are online again.
How to make changes to a route when offline
- Make a change to your route like adding a stop
- If you are offline you will be prompted to check your internet connection or skip re-optimization for now and try to complete that again later
- Skipping re-optimization will add the new stop to the end of the route
- The fact that your route has been edited and not reoptimized will be highlighted
- When your internet coverage is restored click the ‘optimization pending’ message to reoptimize your route
Add break time to a route
Not being able to consider break periods during a route can lead to inaccurate ETAs and missed time windows because break time is not accounted for.
Drivers can now add breaks to a route, giving them the chance to plan rest periods and keep expected delivery times accurate.
How to add a break to a route
- Create a route
- Tap the option to add a break
- Set a time window during which to take a break eg 12-2pm
- Set how long a break period should be eg 30 mins
- Optimize the route, and the break will be added
- The break is visible on the map as a coffee cup icon and in the stops list
- Choose to take or skip a break when arriving at that point in a route
Preview changes to an existing route
Previously when making changes to an optimized route, as soon as a change is made, all visible route information is removed. This made it hard to see your potential changes next to the most recently mapped route.
Now when changes are made to an optimized route, all the route information remains visible, and the potential changes are clearly marked on the map and in the stops list.
How to preview changes to an existing route:
- If you add a stop to an optimized route, this will be visible on the map as a stop marker with a plus sign, and visible in the stops list in a section called added stops.
- If you edit a stop on an optimized route, this will be visible on the map as a stop marker with a pencil icon, and visible in the stops list in a section called edited stops.
- If you remove a stop from an optimized route, this will be visible on the map as a stop marker with a trash can icon, and visible in the stops list in a section called removed stops.
Once you are happy with your changes, you can then apply them to your route.
Time-saving stop details sheet design
Having to swipe multiple times within an app to find and edit the details of a stop adds unnecessary time and friction for drivers.
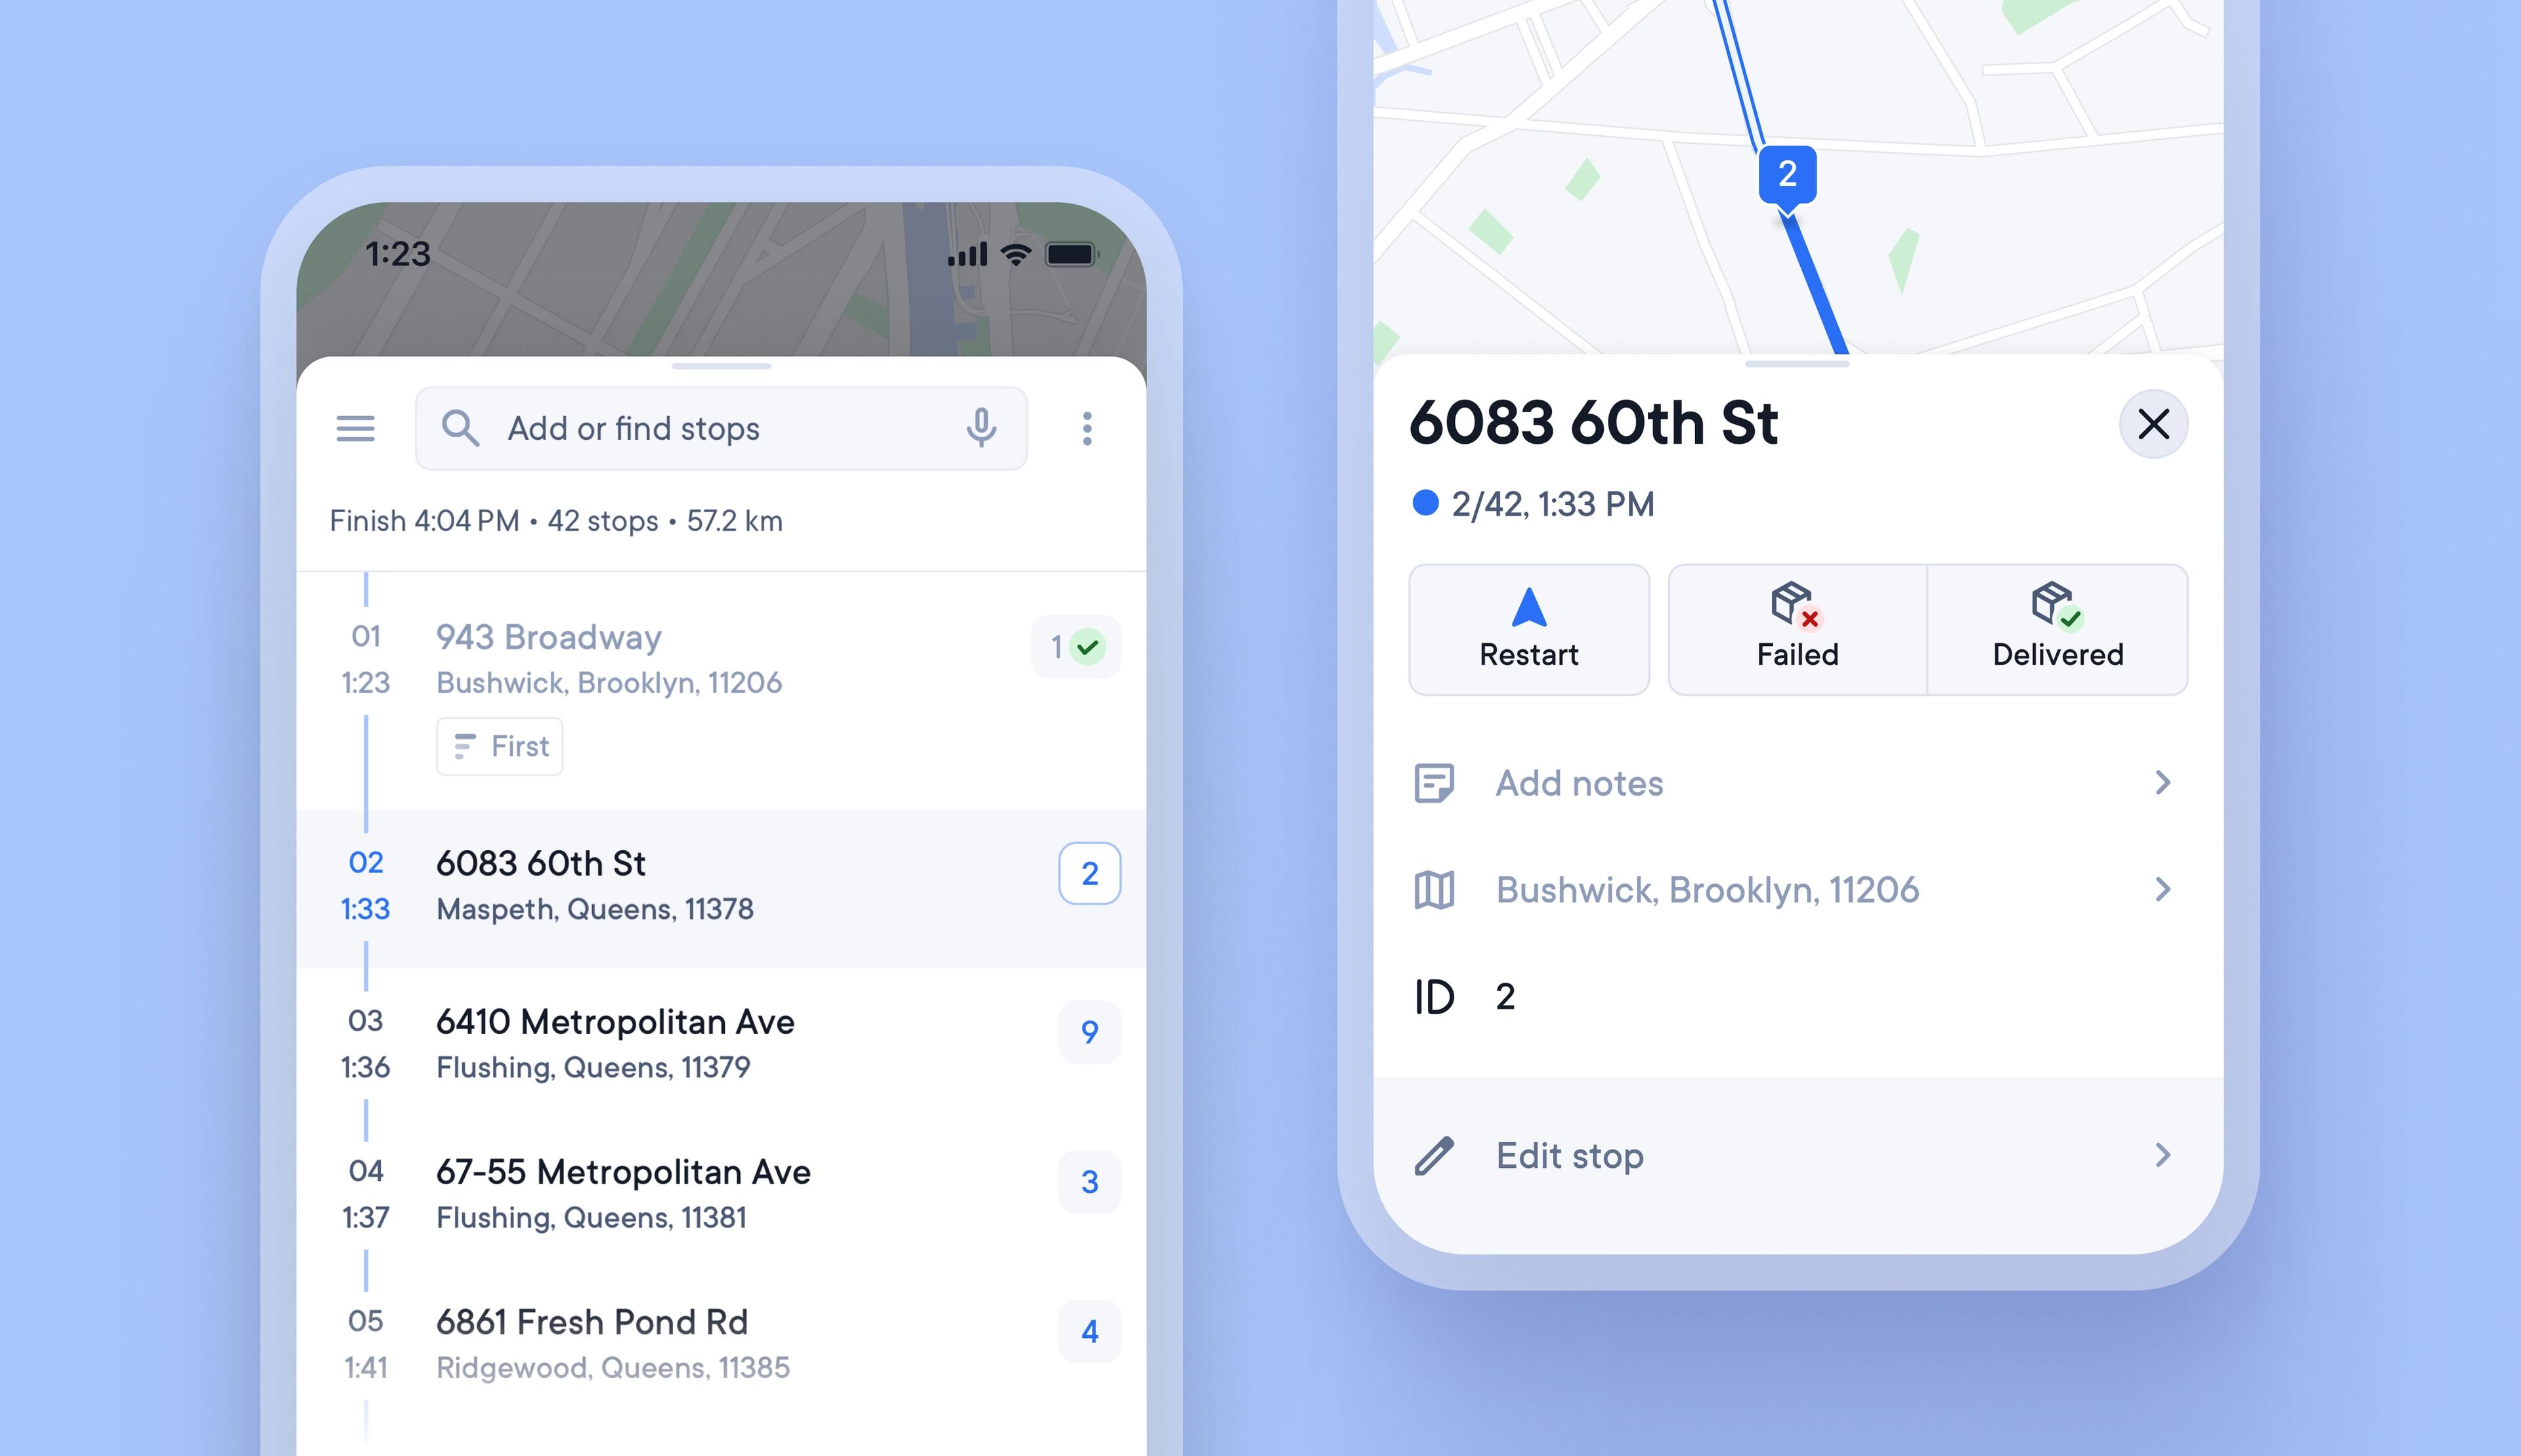
Drivers can now save time by selecting to navigate or mark stops as failed or delivered from buttons within the main stop details sheet.
Stop details sheet buttons allow drivers to:
- Tap navigate to launch in-app navigation
- Tap to mark a stop as completed
- Tap to mark a stop as failed
Easily toggle between map views
Toggling between map views whilst following a delivery route can help drivers orient themselves and stay on track.
Drivers can now tap the map pin button to switch between different views for easier navigation.
How to toggle between route and single-stop map views:
- Tap the map pin button in the bottom right-hand corner of the map
- Tap the map pin button when it displays a single pin to focus the map on the next active stop
- Tap the map pin button when it displays multiple pins to focus the map view on the whole route
- Tap the map pin button after manually moving the map to focus the map back on the previous view
Enhanced stop details sheet features
Drivers can spend several minutes on their delivery app searching for specific stops, important information and trying to make changes.
Enhanced usability features now mean that stop information and editing functions can be accessed with a swipe, scroll, or tap.
Scrolling functionality includes:
- Scroll to the top of the stop details screen for the maximum view size
- Scroll down from the top of the stop details screen for the medium view size
- Scroll down to the bottom of the stop details screen for the minimum view size
Specific stop conditions, such as time windows, are now visible in all three view sizes.
Tap or swipe functionality includes:
- Tap a stop on the map. The stop details sheet will then show that stop
- Swipe right on the main stops list. The option to navigate will appear.
- Swipe left on the main stops list. The option to select undo/delivered/failed will appear
Copy stops between routes
Most delivery routes finish, with some stops not being successfully completed.
Our copy stops feature allows drivers to select and copy across missed, failed, or specific stops from one route to another so that these stops can be attempted again.
How to copy stops between routes
- Select 'copy stops' on the main screen menu
- Or click the ‘copy stops to a new route’ button when a route is complete
- Select the route you want to copy stops from
- Create a new route or select an existing route you want to copy stops to
- Select the stops you want to copy across
- Copy the selected stops to your chosen route
App-wide navigation
Drivers can now check their main route map view and stops list without pausing navigation functionality.
How app-wide navigation works
- From the stop details view, drivers can tap the X to return to the main screen view
- On the main screen view, navigation now remains active
- Directions are shown in a navigation box at the top of the screen
- This navigation box provides turn-by-turn directions and voice guidance
- Tapping the navigation box will return drivers to the stop details view
Use voice commands to add multiple stops to a route quickly
Adding stops to a route while loading a delivery vehicle means holding packages and a phone, which can be time-consuming and awkward for drivers. It is now possible to add multiple stops to a route with voice commands whilst using a phone with just one hand.
How to use voice commands to upload multiple stops:
- Go to add/find a stop
- Tap the microphone icon on the far right of the search bar
- On the pop-up, select the option to ‘add multiple stops’
- Speak into your phone the stop address you want to add
- From the search results generated, select the correct stop address
- Once you have added a stop, you will see the message ‘stop added’
- You can then ‘speak to add another’ or click ‘done’ to finish adding stops
Select single/multiple stops to be attempted first or last
Drivers can select:
- a single/multiple stops to be attempted first
- a single/multiple stops to be attempted last
This allows them to complete priority deliveries first and leave less urgent deliveries until last.
How to select single/multiple stops to be attempted first or last
- Click on the stop
- Click on Edit stop
- In the stop details you will see the options to select First, Auto, or Last
- Stops marked as First will be attempted at the start of the route
- Stops marked as Last will be attempted at the end of the route
- There is no min/max limit on the number of stops that can be marked as First/Last
- The default for any stop not marked as First/Last is Auto
- Stops marked as Auto will be added to the route order when it is optimized
Edit the address of an existing stop
In the past, adding the wrong address to a stop meant deleting it and adding it again with the correct address. A driver can now edit the address of an existing stop if it is incorrect, saving them time and effort.
This feature is currently only available on the Android app version of Circuit Route Planner.
How to edit the address of an existing stop
- Select the stop with the incorrect address
- Click the Change address button
- Select the correct address from the search bar
- The text updated will appear in green text to confirm the change has been made
- Addresses can be edited when adding stops or even while out driving a route
Easy to read stop details
There is a lot of information associated with each stop on a route. It may be necessary for the driver to know the type of stop, the timing, where the package is in the vehicle, and many other details.
Drivers may have difficulty reading and using the app if all this information is displayed at once.
Stop details are now easier to read and edit
- As soon as a driver clicks 'start route,' a stop details sheet appears with clear and uncluttered information about their first stop
- Google Maps for that location opens automatically if they click the address details
- The Notes field can now be edited instantly by clicking on it
- Edit the stop by clicking the 'edit stop' text below the stop details
- When a stop is marked as delivered, the stop details sheet automatically moves on to the next one
- Swipe left or right on the stop details sheet to see the previous/the next stop, mark stops as failed/delivered, and see info and proof of delivery.
- You can access the main stops list by clicking the X in the top right corner of the stop details sheet
- Click the arrow in the bottom right of the main stops list to make the current stop on the route the focus of the list.
- On the main stops list swipe left to mark a stop as delivered or swipe right to navigate to that stop
Package ID helps drivers find packages faster
Having trouble finding the right package in their delivery vehicle can cost drivers valuable time. During a route, time spent looking for packages can add up and make their day longer than necessary.
We’ve introduced a simple Package ID feature to help make finding packages fast and more efficient.
How Package ID works
- Each stop is automatically assigned a unique Package ID number
- Once assigned to a stop, a Package ID number will not change
- Package IDs can then be marked on the corresponding packages in the vehicle to make them easier to find
- Regardless of how many times the route order is reoptimized, the Package ID will remain the same
Simple management of unreachable or skipped stops
Some routes contain unreachable stops. For example, by mistake, a driver's route in Lisbon, Portugal, may include an address in Lisbon, Florida, making that stop unreachable.
If a stop cannot be reached by the end of that delivery day, it will be marked as skipped.
As a result, drivers must figure out how to correct these stop types and incorporate them back into their routes. On-the-go management of unreachable and skipped stops saves time and allows routes to be optimized more easily.
How to manage an unreachable stop
- A route with an unreachable stop will display the error message 'can't create route' when it is optimized
- The unreachable stop will appear at the top of the route list with the message ‘this stop cannot be accessed’
- This stop can then be edited and successfully added to the route
How to manage skipped stops
- A route with stops that cannot be reached before the set end time for that day will trigger the notification 'X stops cannot be reached on time' when optimized
- You can then choose to ‘Include’ or ‘Dismiss’ these skipped stops
- ‘Include’ skipped stops gives you the option to add the skipped stops into the existing route and keep the original route order, or restart route, which will reoptimize all stops into a new order
Map visibility improved with dynamic stop markers
The status of a delivery stop is an essential attribute for drivers and dispatchers.
A dynamic stop marker on the map means you don't have to scroll the stop list to find important information.
Check the status of your stop at a glance
We've created dynamic stop markers that show if a stop is:
- A pickup
- A priority delivery
- A successful or failed delivery
- An error unable to be added to a route
- A new stop added since the route was last optimized
- An existing stop edited since the route was last optimized
- A deleted stop that will be removed when the route is re-optimized
Change a route without changing the order of stops
Drivers often have to make changes to a route once it’s been optimized and the van has been loaded, but if a stop is added or removed, the change means the way the vehicle was loaded no longer makes sense.
Now, if the detail of a stop such as the time window or priority is changed, a stop is added or removed, the driver gets the option to:
- Fit changed stops into route - changed stops are reordered into the route.
- Reorder remaining stops - the route progress is kept; only remaining stops are reordered.
- Restart route - route progress is lost, all stops reordered.
- Or skip, and carry on with their day with minimum hassle.
Share real-time route data
Sometimes it can be useful for drivers to share their live location and route information with a 3rd party. We’ve made this possible on Circuit Route Planner with our new shareable read-only route links.
How to share a read-only route link
- Within a route under the route name you will see the option to ‘share your live progress’
- Click the blue Share button
- A pop up of share options will appear
- You can copy the link and share it
- Choose Nearby Share to send the route via bluetooth to a nearby device
- Share the route using your phone apps such as Whatsapp, email, SMS
When receiving a read-only route link
- Click the link and you will be taken to the route view
- You will be able to view the route progress in real time here
- It is possible to view read-only information, such as the location of the driver, the status of the delivery, and much more
Automatically scan any address with Apple's iOS 15
Recently, Apple’s exciting Live Text feature got released together with iOS 15. The new feature lets you use your phone’s camera app to scan any text.You've asked us for this a lot, so we’re happy that we’re among the first iOS apps to bring you this new functionality.
iPhone users on iOS 15 can now use Live Text inside Circuit Route Planner in three easy steps 👇
- Click the camera icon in the search bar
- Point your camera at your manifest or package
- The address will automatically be added to Circuit Route Planner!
Then just add the rest of your packages in the same way 🙌
Improved address formatting for delivery drivers
Every day at Circuit we show delivery drivers millions of addresses. We get this information from Google Maps as well as from dispatchers using Circuit for Teams.
In our mission to make delivery as seamless as possible, we are improving how we format addresses. This means showing more important information upfront (like store names and postcodes) and making better use of valuable screen space.
This saves drivers time for every delivery they make, as they don’t have to check a manifest or search for the address in a different app.
Important information like the postcode, which many drivers use to find their way around, isn’t there. This is because most of the address is crammed into the second line which will be cut off on small screen sizes.
Everything drivers need to see is right there, no more, no less. As part of this change, we’re also changing how we save addresses in Circuit. This won’t be visible to drivers but will work silently to improve the accuracy of navigation with apps like Waze, Google Maps & Apple Maps.